A 'promise' of God: "And we know that in all things God works for the good of those who love Him, who have been called according to His purpose". Romans 8:28 New International Version.
In Christ Jesus, we become:
- Free from condemnation of sin
- Free from the power of sin
- Free from the penalty of sin
- Free from the practice of sin, and eventually,
- Free from the presence of sin.
Home Page of Our Unimog Restoration & Camper Project
Disclaimer
First thing to say is that I do not present myself as a professional in the field of motor vehicle conversions, and any information you act on, is at your own risk. This information is aimed at persons already with considerable breadth of both engineering and practical trade skills in the relevant disciplines/trades. I'm learning as I go, like most other first time owners of such a truck, and I'm making my fair share of mistakes. When its over my head, I go to a professional for advice and those who have gone before. I have taken every care to provide accurate and current information in this webpage and will not accept responsibility for injury, loss or damage occasioned to any person acting or refraining from acting as a result of the material in these website pages.
Definition: The term 'truck' in Australia refers to a large commercial vehicle (a lorry) and not small utility vehicles (pickups) which the Americans tend to call trucks, and because I cannot help myself; "UNIMOG: Eats pickups for breakfast" (well not really, as the mog is very slow).
Its easy for anyone with much money and little or no imagination, to simply pay someone else to build their special project or buy it off-the-shelf. The most value however, can often be in the actual journey of developing and using your own skills and imagination, and at the same time enable the most cost effective solutions. However, there is always a price to pay with DIY and usually its time (and sometimes damage to health). Pay someone and yes its quick. Do it yourself and its likely to take a lot longer (and you may need to learn the trade , develop the skills and purchase expensive specialized tools). You may make lots of mistakes, I did and still do, but I learnt a lot from them. A big advantage of refurbishing a rig yourself, is that you learn about it. You get to know how it works, what tools and tricks are needed, where to buy spares in a hurry, what tools to pack with you on a trip, potential problems (eg: did you over torque a bolt and now its in the back of your mind niggling you) and most importantly you will likely learn how to fix some things when in a tough situation in the middle of woop woop. So take a good range of tools with you. To this end, I suggest fitting some large and strongtool boxes.
Below shows the original vehicle on the day I drove it home from Minto auctions (outside Sydney) condition unknown October 2017.

The below shots are after I started to tidy up the original vehicle, starting with the UN theme.
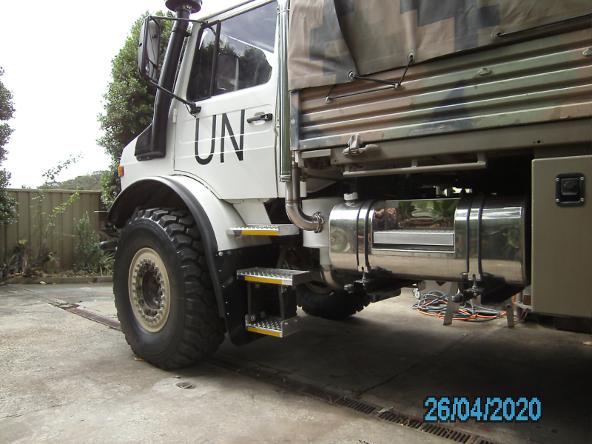

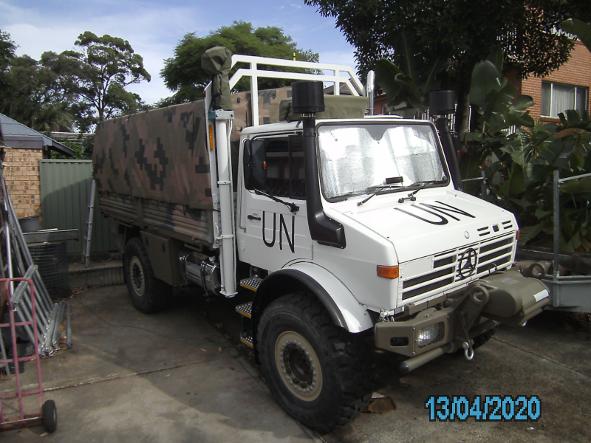
I have never served in the armed forces. I have adopted the UN theme to reflect the vehicles heritage and because the United Nations exists to try and do good. Also, there are only two legitimate colour scheme choices to pick from (in order to comply with the NSW rules for Heritage registration eligibility, Camo or UN). As camo is very common, I went for the UN look and registered it under the scheme (save a lot of money). It did not help me in the end, as they withdrew my registration a few days later due to having the bling (non standard shiny fuel tanks and exhaust etc).
The ADF did send UN scheme Unimog's to some peace keeping actions. The below photo is of an Australian Unimog with UN colour scheme (see below, Conflict: Namibia (UNTAG), 1989-1990). When these were returned to Australia, they were painted over with camo again (according to one Facebook forum member who did some of the painting whilst serving in the ADF).

.

Search Field (not yet functional) Use Ctrl+F in the mean time
Index:
.
.
Overview
This site is an ideas education site about my experiences with the design, construction & materials sources for my hobby, the refurbishment of an ex Australian Defence Force (ADF) Mercedes Benz Unimog U1700L, here in NSW Australia. I want to say first up, that Iam grateful to the Mercedes Benz forum https://www.benzworld.org/forums/unimog.39/ and Facebook experts from across the world who lend their knowledge and time to helping others. Without their help, I would have been proverbially stuffed. There is much assistance out there, especially from people who either worked on these vehicles in the military or in private industry.
A new Unimog expedition motorhomevehicle with all the bells and whistles could set you back ~ A$1M. In other words, prohibitive on the average working class persons income. In my case, I have selected a used military Unimog as the platform (simply because they are being auctioned off in a once in a lifetime affordable opportunity here in Australia). So if you choose a long term hobby project refurbishing a 30+ year old military truck, read on.
I do most of my own work, as I have 45+ years hands-on engineering experience. I observe on the Facebook forums that lots of people with no engineering experience jump in, and find that its a lot more complicated than building the kids cubby house. I've learnt that its akin to designing/building a complex bespoke home. My 'owner-builder' home builds each took 10 years on average to get to a comfortable stage, this project has so far taken 5 years of trying to make a silk purse out of a sows ear. I have learnt that it will never be a silk purse. Its robust, but very noisy and very mechanical, a bit like driving a tarted up tractor (in my view). But then, some people call Harley Davisons 'tractors' also. Each to their own.
I hope this knowledge site will provide some useful ideas and information for those who might aspire to a similar hobby and have the necessary hands-on skills (plus you will need deep pockets). Once you have guesstimated the cost, consider doubling it. For example, if like me, you are finding difficulties in selecting some gears, you might eventually need a gearbox rebuild and this could/would likely set you back on average $20k and even more.
This site also points to ideas from many wise and knowledgeable people who have gone before me. I do recommend the Mercedes-Benz forum ( https://www.benzworld.org/ ), whose Unimog members across the world are very knowledgeable, have been though just about everything one can think of before, and have been only too happy to help a relative newbie like me, wherever they can. There are also some very helpful people on Facebook Unimog sites and where you can see photos of other peoples rigs to get ideas. These Facebook sites don't always deal with serious technical issues, but are a useful source of general info and source of parts. Some sites are:
- OZMOG
- Unimog Owner's Group Aus.
- Unimog Do It Yourself!
- Unimog Owners NSW
- Unimog Owners Support Group Queensland
- Unimog and expedition camper
- UNIMOG Owners Vic
- Unimog and expedition camper
- Australian Unimog Community
- Unimog Parts For Sale
- Ex military buy swap and sell
Note: The person that gave me the idea of this Life Log page has already refurbished a Unimog and travelled extensively, see Bill Caids amazing web site www.billcaid.com
Registration
VEHICLE REGISTRATION in NSW - a WARNING:
Here is my experience. You may have a different experience:
I foolishly let my rego lapse, thinking I could easily get Historic rego when the time came to put the vehicle back on the road after a couple of years of cleaning up the vehicle and making it safer. I had read all the requirements regarding period bolt-on options, and was sure that I complied. But I soon learnt that I should not have let the rego lapse. I should have got my club Historic rego first, before I did any work on the vehicle.
It was a nightmare of red tape to get it re-registered again, as I found that most of the brown slip inspection people have little idea about these ex ADF vehicles. Also, if you make any changes (modifications), such as reduce the 3 seat capacity down to 2, or change the exhaust, or fuel tank(s), or different wheels for example, an authorised (and they are few and far between) automotive engineer licensed for trucks comes into the picture, and at considerable cost and effort. I also found that most of the automotive engineers are afraid to touch them (especially the young ones who are very risk averse), and you may end up spending a lot of time finding an engineer that knows their stuff. Well, after years of work, I eventually got my club Historic registration, but a few days later it was withdrawn. The reason; because the vehicle licensing authority (Service NSW / RMS) computer flagged that I had made some mods to the vehicle.
As I well knew, according to the law, certain mods require an engineer to certify and provide a new compliance plate with certificate which lists the mods and describes how the mods comply with the various design laws. Here in NSW the certificate of mods must be registered with Service NSW / Roads and Maritime Services (RMS) in their computer system. One may then apply for registration.
As a member of various historic vehicle clubs, I applied for the Historic Vehicle registration scheme in NSW. The club inspector was satisfied that the mods I made were period options (they do not have to be kosha military options). I included left side fuel tank, vertical exhaust stack, single seats, and safer military wheels. I went to the RMS, handed over the papers and gained registration, and fitted my shiny new plates. I had done all the right things. So far so good. But to my horror a few days later, RMS staff contacted me to advise that they (their front desk person who processed my application), had made a mistake, and that I was not eligible because their computer system showed that I had registered my modifications. They cancelled my Historic rego. I then had to pay full commercial use rego. The price difference for rego was ~$300 (Club rego) vs ~$2500 (commercial rego) a year, for a vehicle which sits in my yard for 99% of the time.
I tried to fight it, by discussing the issues direct with the RMS policy engineer group, but to no avail. I soon found that some of the younger individuals were not at all sympathetic (in fact quite the opposite) towards any modifications to any vehicles. They advised me that the Historic Vehicle registration scheme in NSW is intended to preserve kosha examples exactly as they left the factory, in other words NOT modified. In their view (and that's what counts here) ABSOLUTLY ANY modifications whatsoever, can be deemed by the RMS/Service NSW policy group as ineligible for the scheme. Thus we now see the reason for their inclusion of the little understood rule in regard to eligibility to the scheme, and which effectively states: 'there shall be NO modifications'. To make things complicated, at the time of writing, there is no RMS reference published, as to a definition for 'modifications' for heavy vehicles (other vehicles yes, heavy vehicles no). I am also cognoscente that, as the military has made changes to all in-service vehicles, every one of them is theoretically at risk of being deemed ineligible for Historic rego.
Thus, irrespective of what the Club inspector considers 'period options', if any are such that they come under the list of mods which require mandatory re-certification of the vehicle, then the NSW heavy vehicle registration rules are set up to ensure ineligibility to the Historic scheme. Unfortunately, there is no heavy vehicle provision under the Classic registration scheme in NSW (which could have been the other avenue). Of course, one can go for a motorhome registration which is cheaper than a plain truck, but note that the living module must be permanently fixed down and the vehicle has to be re-certified by an engineer with a new compliance plate.
Note: Under ADF ownership, the VIN numbers were never recorded on any national database, so you should be asking for a 1st registration if you are registering it for the first time after buying from the ADF. Prior to 1989 it was the 14 digit Chassis number that was used for I/D. The VIN numbers later changed to become a worldwide standard of 17 digit VIN number, with the addition of the Mercedes letter prefix. My 1986 VIN number on the registration and insurance papers all use the 14 digit number and I registered it for the first time. In NSW they did not and do notuse the three letter prefix, which in my case is WDB.
Cautions - General Safety and Compliance:
Under Australian law:
- Electrical: unless you are licensed (or have the work inspected by a licensed electrician), it is illegal to perform Low Voltage electrical work i.e. 240V work. If low voltage works are carried out, then a certificate of conformance must be provided. Note: Up to 50V is considered 'extra low voltage' so no license is required.
- Gas: unless you are gas-fitterlicensed (or have the work inspected by a licensed gas fitter), it is illegal to perform gas fitter work. If gas (eg: LPG) works are carried out, then a certificate of conformance must be provided.
- Modifications to Heavy Vehicles: Certain (listed) safety related modifications require mandatory inspection and an updated vehicle compliance plate.
Significant penalties may apply to transgressors who fail to have the gas and electrics certified.
It is in the interests of all ex ADF Unimog owners and enthusiasts to ensure that these large and unusual vehicles are kept safe for the general public. If you want to kill or maim yourself by carrying out non compliant mods, thats mainly your business, but if the vehicle is to be used in the public space, then it becomes everyone's business. If too many are found to be breaking the rules, then the authorities may start imposing even more severe restrictions on all owners.
Vehicle Platforms
Military platforms (if you can get them), are usually superior in their robustness and ground clearances and can go places that your typical motorhomes and domestic 4x4 vehicles cannot. Most motorhomes or coaches, are typically built on a medium or light truck chassis and this usually confines them to the black stuff or well graded dry dirt roads. The time that I have spent working on large bus size motorhomes from the USA shown me that they are usually on a standard truck chassis. Most of these vehicles as well as the domestic 4x4s vehicles (even my Land Rover Disco diesel) are lucky to have barely 200mm of diff clearance. That's not going to cut it under some less than ideal situations that one might come across in the Australian bush. Even if you are as conservative and risk averse as me, when travelling across Australia the most likely issue (aside from potentially crashing into the odd bullock, camel or other wildlife), is coming across a flooded or washed out track or creek bed crossing. This is when the Unimog comes into its own (though, it is heavy and can still easily get bogged especially with narrow wheels).
As in the case with the USA, the Australian Defence Force (ADF), is busy divesting itself of life expired fleet and upgrading with faster lighter more agile multi-function vehicles. The US have some very nice vehicles being auctioned also, but I found out that only US citizens are allowed to buy and export them. So its easier to just buy local. Not for 30 years has such a good opportunity presented itself for ex-military vehicles in Australia. I am very glad that the government took the stance to sell locally and not ship them off to developing countries (as was one option being considered).
One should go into this with ones eyes open. Some of the downsides to buying a life expired military vehicle such as the Unimog are that:
- parts can be difficult or impossible to obtain (as its often a bespoke build for the particular country of use). You will be spending a lot (and I mean a LOT) of your time searching the internet for value-for-money parts and for information. Likely to be on the computer every day for some years....
- vehicles are usually life expired and at about 30 years old (they don't get rid of them cheap for no good reason). In other words, they are starting to cost more to operate than they are worth. Even with well maintained vehicles, some of the rubber and plastic components etc may have started to perish, engine/drive train seals starting to leak, etc. Hydraulic hoses (eg steering pump) in particular are of concern. Its buyer beware,
- vehicles are usually very heavy which can be an issue at some locations (good chance of getting bogged),
- top speed is often only 80 to 90km/h (which means high revs and high fuel consumption to try and keep up with traffic on the highway). They are geared low (designed for torque, not speed). This means a slow vehicle,
- they are designed to be very austere, very functional and not the slightest bit comfortable. This means a lot of work to make them comfortable,
- engineering certificates may be required depending on the type of modifications (eg; changing wheel type, exhaust direction, adding fuel tank, etc),
- operating costs (especially fuel) can be significant (to say the least) due to the low speed ratios and low manufacturing volume of spare parts. For example, window felt guide for a normalcar is typically about A$9/m for the majority of domestic vehicles, but the Unimog genuine part is about A$80/m. Is it 10 times the quality of most other vehicle makers equivalent part?, I don't think so. In this example, I ended up buying the felt strip from Clark Rubber (took a long time to find the right profile however),
- parts are generally very expensive compared to your run-of-the-mill Toyota 4x4,
- a 30 plus year old vehicle is likely to have a lot of wear and backlash in the overall drive train, and the noise level may be very difficult to come to terms with. I have had my gearbox rebuilt as new, and it still makes horrible noise at idle (ball bearings in a concrete mixer?) but at least the noise is less than it once was, but still the overall drivetrain has some backlash. Sound proofing is not very successful (in my opinion) in these vehicles.
According to an Australian ADF fleet replacement strategy publication in 2014, the average annual cost of sustaining the life expired Unimog was $10,652 and $27,899 for a larger vehicle such as the Mack. In other words, this tells us that when buying a close to life expired vehicle, its likely to cost a lot of money to keep it on the road in a safe condition. The report also states that some parts are increasingly hard or impossible to obtain. Further, the ADF in their disposal and fleet purchasing strategy, state that the hierarchy of vehicle disposal is to get rid of those which are costing them the most to maintain, first. What I make of this, is that these vehicles are not going to be cheap to get up to spec and then keep on the road (and if not a fortune by paying 'others' to sort them out, then potentially thousands of hours of your own time). From my observations of Facebook sites, most people have no idea what they are getting into, they buy them because they are cheap, and likely, most will just run them into the ground on the farm thinking them indestructible. Some however, have stripped them down and rebuilt them even better than new. I'm trying to take the middle road. Unidan and Ozmog are companies that specialise in rebuilding the ex ADF Unimogs to almost as-new condition, should you wish.
A useful source of information when inspecting (if you get the opportunity)the trucks pre-purchase at auction, is the vehicles 'Service Record Book' (if it has one). At the time I purchased my vehicle I was not aware that also, there was a recent 'Technical Inspection Report' slipped into the book which details some identified problems. At the very least, its worth reading this brief report if you don't have time to scan the entire life history of the vehicle.
Some of the ADF variants are shown below (source: ADF public domain Maintenance Manuals):
I have no idea as to whether some of the more weird variants (radar etc), will ever come on the market but AFM is tasked with the job of 'de-militarising' them before they go to auction, thus armour for example is removed and I don't imagine they would let a radar dish be released into civilian hands (though I'd buy one if I had a chance, but the necessary accompanying automatic anti-aircraft gun might be a tad more difficult to come by ;-) ). Of historic notability, in the seventies, it was quite legal for a civilian to own a twin barrel automatic bolt down anti-aircraft gun here in Australian in suburbia. I suspect a significant number of ex army WW2 stock were purchased before the law changed. Someone would probably go to jail now, but I do wonder where they all went, after the law changed?
As can be noted below, military vehicles are very practical and usually very busy looking (the aesthetics are not so important). So I don't feel too badly about mine turning out busy also. The ones shown below, are the recovery vehicles, the one on the left is a MAN and the one on the right is the Unimog

Selection
I would have liked a 6x6 recovery Unimog for the extra length, but practicality took hold and I ended up purchasing the much more common UL1700L/38 flat bed. In any case, at the time, the ADF 6x6 recovery vehicles were classified as 'protected' and not supposed to be sold for some time yet. As at 2022, they were being actioned off and fetching around $70k plus, each. Too much for a once a year use, camper in my view, but good value for someone that wants to use them for their designed purpose, vehicle recovery.
Since being knocked back on Historic rego, I have adding security, comms, storage boxes, engine/ drive train management systems, air conditioning and finally, integrated a reasonably comfortable living module. Its a long term plan, taken 6 years to date, as I generally only work on it part time (weekends) and outdoors. Its a big job, as just about everything needs refurbishing. Nearly every bolt is surface rusted, every panel has marks and dents, every wiring connection is suspect, every bit of painting quality is poor, all sorts of inconsistent dodgy fixes, odd screws, torn upholstery, cracked plastics, some glass panels scratched, degraded/perished rubbers, surface rust, rotted timber tray, hoses perished cracked and weeping etc etc ......... I have replaced many hundreds of bolts. I always try to use stainless steel for the non structural applications. Some of the structural larger bolts are grade 12.9 black steel but which are difficult to get in Australia from OEM unless you buy Mercedes genuine. Most bolts are grade 8.8 which are easier to obtain. I usually apply anti-seize to the threads in case I want to disassemble one day, especially with stainless steel bolts/nuts which can gall up easily. But read the workshop manuals !! They will advise the bolt rating, torques and what compounds to put on threads. Some bolts must have thread locker compound, some must not.
In regard to the tray. I did fix it up by cutting out the rot, sealing and painting. However, after about 5 years now, the water was still getting in via hairline cracks. Its May 2023 and I completely removed the timber ply as its not serving any useful purpose. I replaced the front half with lightweight fiberglass sheeting. I am able to access the underside of the living module now for maintenance activities, without having to remove the module from the truck (which is~4 hours work).
Unimog 435 Series General info
Unimog is an acronym derived from the German “UNIversal. MOtor Gerat“ (UNI-MO-G), or all-purpose machine or 'Universal Machine'. Its a slow moving vehicle (based on a tractor), but very strong, the military version having a militarized commercial engine and drive train. The older square cab series is known as the 435 series. The U1700 is a medium battlefield truck. Any parts and materials I nominate herein are for the Australian military U1700 version (in my case the U1700L/38 / UL1700L) and they may not suit any other version and its up to you to check the validity yourself anyway. I suspect that most of the military U1700L's in Australia are essentially the same, with various options such as: winch, tyres, tip tray, flat tray, crane, radar disk, shelter cubicle etc. There are even a small number of dual cabs. They apparently all came out of the same Victorian Benz Daimler factory (as I understand).
At a time when most military light truck makers adopted independent suspension (the military sees an advantage in independent suspension, because a land mine can blow off one wheel and the vehicle may still be driveable) – the Unimog stuck with live axles, because of their superior wheel travel and tyre contact on highly uneven surfaces. Of interesting note: the modern Unimog (likely with some modifications and a set of working gears added) has been used to shunt up to 1000 tonne trains around rail yards (cheaper than buying a shunting locomotive) so you can get an appreciation of the low down torque available. But it will be moving very slowly and likely with a big lump of concrete on the back to get the rail traction needed.
Basic data for my derivative, U1700L cargo:
- Manufacturer Daimler-Benz
- Australia Army second line transport (medium size)
- Max load carried is 5 tonnes
- Ground clearance 460mm
- Mass unladen 6.8 tonne
- Maximum total loading 12 tonne
- Maximum legal loading with trailer 21 to 24 tonne
- Fording depth 1.2m
- Turning circle 19.6m
- Angle of approach 39 degrees
- Maximum gradient 60 degrees?
- Gross combination 24.5 tonne
- Fuel (standard arrangement) 25L/100km
- Engine OM 353.939 (OM 352a)
- Automatic load dependent brake
- Air brakes
- 4 wheel disc
- Voltage 24V
- Trailer socket NATO 12-pin
- Winch Werner 62kN. Cable length 30m x 14mm Steel. Synthetic cord is NOT suited (don't even think of trying it, I did and it was an expensive lesson).
First things First
Based on my experiences: I strongly recommend the following things should be inspected asap once you get your toy home:
- Check condition and level of all fluids (replace all fluids).
- Check braking system for hydraulic fluid leaks.
- Flush/clean out the pneumatic system of rust and crude. I recommend fitting the ADF designed filter/dryer option kit (a mate of mine has stock of the new kits to suit the 435 series for sale at a fraction of the original price)
- Remove the wheels and protection drums and inspect the brake disks and condition of brake pads, and
- If nothing else ........, Check that the rear park brake air actuators are functioning properly and in a safe reliable condition and adjusted right. They may need removing and stripping down to refurbish them. Warning: There is a large powerful (potentially very dangerous) spring inside. These actuating cylinders wear out, and especially if you don't have the air system filter/drying kit installed on the vehicle. You might even consider replacing the actuators if they are worn, as they can jam ON or jam OFF and also be a source of air leakage. I was unable to source seal kits for mine, so had to make my own.
Caution: The above activities should be done by a person with appropriate competencies.
Planning
The first stage for me, was setting up a small temporary work shed in my yard, planning the overall build and design in as much detail as practical for a couple of years, buying tools, materials and equipment and constructing any sub-assemblies where possible, ahead of time. As I live in suburbia, the local Council will not permit sheds or carports tall enough for caravans or trucks, so most of my work is done outdoors on a concrete slab and dependent on the weather.
If you are like me (without a proper machine shop), it may mean you can fabricate some of the smaller parts but getting the larger parts fabricated by professionals. I often only tack the more complicated items and then take them to a local professional for full welding (such as Beauchamp Metals in southSydney).
I regularly search on-line auctions and generally only stick to auctions in Australia now (as I found out the hard way, that crating, transport and Customs fees can be high). In fact even auctions in other states can be prohibitive as the packaging and freight costs can easily make it not worthwhile. Unfortunately with a military platform, nearly everything has been, and has to be, designed and built bespoke. With such a project, its a good idea to start becoming familiar with the relevant state and Commonwealth Heavy Vehicle Regulations pertaining to modifying a large motor vehicle.
The National Heavy Vehicle Regulator (NHVR) administers apply the rules for heavy vehicles over 4.5 tonnes gross vehicle mass. The HVNL consists of the Heavy Vehicle National Law and five sets of regulations.
The learning of new skills, trades and understanding of compliance's can be daunting, but if you don't start somewhere you may never start at all. I find its a matter of plodding along and learning new things, one step at a time. Rome was not built in a day and whatever time you estimate, double it. If you are unsure of what you are doing, get onto the forums, and ask, as there are always people to provide their experience, yes some can be quite rude, but keep asking. Its in all owners interests to have safe vehicles on the road.
Some jobs:
- Winch pulled down, refurbished, painted, regreased/oiled, new winch cable.
- Rear park brake and main brake actuators removed, refurbished, re-installed, tested.
- Air tanks and system etc removed, cleaned up (tanks coated inside with epoxy sealer), re-installed.
- Original seats removed, adapter bases made & new air ride super heavy duty seats installed.
- Cabin roof lining and internal odds refurbished.
- Added auto drier/filter kit to air system.
- Front guards panel-beated as new.
- Rear guards panel-beated as new.
- Freight liner steering wheel and hub.
- Straighten front bumper.
- Small welds to fix holes in roof and passenger door.
- Soundproofed underside and inside.
- Stripped out cab and doors and replace most rubbers.
- Repaint cab (inside and out).
- Repainted underside of vehicle chassis (drab olive).
- Manufacture and fit fuel tanks hangers and adapter brackets.
- Fitted long range fuel tanks (316 mirror polished from F650) including piping and level sensors etc.
- Relocated batteries under bonnet.
- Fitted custom tray head board.
- Added front underside front protection crash bar.
- Canvas covers for cab air conditioner, masthead flood lights, spare wheel, crane, rear folding steps, etc.
- Replaced all engine belts and idler pulleys and bearings.
- Replaced all filters.
- Tubed up new low pressure air systems (for: air horns, seats, tyres and telescopic mast).
- New turbo.
- Turbo intercooler.
- Replaced exhaust with stainless: new muffler and vertical stainless stack.
- Added bracket for tilting the cab safely (using hydraulic ram).
- Custom tool boxes front of rear wheels.
- Replaced cab access steps with 316 stainless arrangements.
- Fitted 12m telescopic pneumatic lighting mast to barge board on drivers side.
- Engine / drive train: monitoring/warning systems.
- Cabin air conditioning (with compressor fitted under bonnet).
- Headlights refurbished.
- Remote door locking modules installed.
- Security alarm module fitted.
- Black box video and data logger accident recorder.
- Camper module installed.
- Large storage boxs fitted.
- Crane for spare wheel installed.
- Spare alloy wheel purchased and secured.
- Spot lights fitted.
- 300l of water tanks added.
Progress Summary
May 2018
Removed unwanted side mounted items (spare wheel, battery box, tool boxes, fuel tank etc). Stripped down air system, added air filtration system. Cleaned up , removed surface rust, loose paint flakes and started painting vehicle.
June 2018
Finished cleaning up and painting the hubs with epoxy paint and fitting MRAP style wheels. The only way for me to safely move the new wheels was via the engine crane and a chain cage (same set up as snow chains) as shown below. I'm 5' 10" tall, so you can see that these are not small wheels. Note the size of the standard steel rimmed wheel sitting behind it. New longer studs were required for the alloy rims. Checked for wear or leaks, general clean up, grease, adjusted brakes and repainted portals, new pads at the rear. Added stainless steel super powerful magnetic oil plugs in portals. I used synthetic oil in portals.
July 2018
New fuel tank support adapter brackets fitted on both sides (tricky job utilising only existing bolt holes in the chassis rails). Had hanger brackets made by Hilton Industries in Melbourne (to suit stainless tanks).
Now that the cab is lifted, started on the engine bay. After removing the exhaust pipe from the turbo outlet cast iron section, I observed that the exhaust brake butterfly valve was not sitting fully open. I found that all linkages need work to clean, paint, adjust (take out slack). Where there is wear on shafts, additional bushes and end thrust washers may be needed to bring them back to new.
Removed the cab underside anti-stone chip tar coating that was not solidly bonded. Good that I did, found that rust had started to hide under it in one corner of the floor. The only practical tool for removing this thick coating is the pneumatic needle gun. It is perfect also for removing heavy paint and rust in general, eg the dozens of layers of paint on the portals/hubs and the winch with the curved surfaces (took it back to the original primer).
Its Nov 2018 and I have recoated the underside of the cab with a synthetic tar-like coating. New turbo is in, and tested ok. Made up exhaust pipe with a vertical stack, all in stainless steel and added a Cowl muffler.
Mid 2019 Progress
Designed extended head (barge) board frame and had it made by Beauchamps.
June, TIG'ed the frame into place and the telescopic mast supporting brackets.
Fitted Unidan intercooler kit. Note: Its a good kit and if you buy one, read the instructions very carefully. I jumped in, and had to take parts back off again (more times than I want to admit) to get the parts in the right order. The main issue for me, with the kit, was that I had to trim a fair bit off the bottom of the front grill, Its a tricky job to trim the grill but turned out fine. The intercooler radiator was shiny aluminium, but I eventually painted it black (using radiator paint) so that it does not stand out.
For a boost pressure sensor, I welded a 4mm thick plate to the aluminium tube just before the engine air entry point and drilled a hole in it.
December 2018 Christmas break.
Fabricated brackets and bolted air conditioning compressor under the bonnet. Worked out gas fittings and parts needed for air conditioning system. Brought in Red Dot items from USA and fitted Condenser on roof with stainless bars and bolts etc . Discovered that the in-cab evaporator at the front of console position fouled the gear shift lever in 1st gear. Had to ad-hoc make up new bracket for mounting it off the rear wall between the seats instead. Probably a more sensible approach anyway, as it will leave me space on the centre floor to walk from one side of the cab to the other, and for the dog to sit on the floor in the centre.
Prepared cab, front chassis area and winch for painting (lots of sanding and priming due to 32 years of layers of paint over paint). Removed roof hatch for priming. Replaced numerous bolts with new. TIG tacked the vertical smoke stack together. The professionals at Beauchamp's Sheet Metal fully welded it up for me.
Cut the unwanted superfluous brackets off the rear wall inside the cab.
TIG repaired 2" splits in roof and door. These were caused by the ADF maintainers over sanding the paintwork on the metal edges eventually wearing through the metal !
Painted front chassis and inside/roof of cab. After weeks of filling stone chips, hand sanding and removing loose flakes, I eventually gave up trying to fix the hundreds of stone chips and overspray blobs and runs. Ended up with a few runs myself.
Installed the air ride seats (made by USA Sears Seating, the best money can buy in my view).
Fitted up the newly painted front underside bash plate (sump guard). Then discovered that I cannot get to the steering pump, so its got to come off again (so I can get a long leverage bar onto the oil pump mounting pivot). Installed an air pressure dam using conveyor belt material. The air dam theory is that it creates a negative pressure area at the lower rear part of the engine bay, thus more air flow down past the engine. Apparently only tends to be efficient onlyat higher speeds however.
Removed door lock mechanisms, washed re lubricated lithium grease spray. Removed window guide felts. Installed sound foam and fitted cabin rear wall panels. After trying many profiles for the window slide felts, I eventually found a version from Clark Rubber (at a fraction of the MB price) and which worked fine. Hell of a job sliding the felt strips into the door windowframes using silicon oil.
Australia Day weekend 2019
Filled some of the cab box section cavities with expanding foam but not all, (need to allow for condensation drainage holes). CAUTION: foam may continue to ooz out of a hole for some hours and anything it touches is ruined.
Made up custom brackets and mounted air conditioning Evaporator inside cab. Only just fits with a few mm to spare from arm rest. Made the polished stainless exhaust stack heat guard (unreasonable prices to buy). Starting to make up the 316 mirror polished steps for the cab entry see photos below. Need to be wide and stable so my wife can feel more comfortable using them.
Finished installing additional idler pulleys for the new air conditioner compressor belt and one for the fan belt. The fan, water pump, generator and A/C are all driven by one belt from the crank. These are long belts and tend to vibrate, so the additional idler pulleys remove most of the bounce. Also, after running for a while, they will stretch and bounce even more. I have re-tensioned my new belts more than twice . Getting the right tension is important. Letting then flop around causes them to erode (you may notice a black powder building up). The difficult one to do, is the air compressor. To replace the one at the rear, you have to remove all the ones on front. Note: To get the belt length, you can fit a loop out of rope or twine etc , and take the loop to a belt supplier who should have a machine to measure it and provide the correct belt size. However, expect to find that its still not quite correct. I usually end up trying 5mm either side of what I think until I get the right length (trial and error because they can be too short and hard to install, or loo long and run out of tension adjustment).
Air conditioning charged and tested.
Christmas 2019 over three week break
- Re-fitted PTOwinch after overhauling it.
- Painted vehicle underside.
- Wired up and tested telescopic mast flood lighting. Comms antennas can be left to later once I figure out what technology I need to implement.
- Installed lower hanging steps. After trying to buy one, I gave up and made my own using 316 stainless and conveyor belt type material (metal free). It is flexible in order to move slightly, if struck.
- Primed tray frame surrounds.
- Tidied up rear lighting wiring.
- Ran most of the outstanding wiring to inside cab (driving lights excluded), ready for later termination (big job many new circuits to terminate).
- New Years Eve: Bad day for bush fires further down south. Decided I did not like my paint job. Unfortunately I picked a bad day New Years Eve (extreme temperature so paint was almost drying before it hit the surface), then a wild wind storm in afternoon (with soot and dust) tossed some garden furniture around eventuating in a big dent in the middle of the grill.
- New Years Day: A little cooler, so did the necessary repairs on the grill, undercoated and managed to get a few colour coats before the full heat of the day. A couple of paint runs, but too bad, I've run out of patience. Also sorted out rear mud flaps.
- Started work on sorting speedo re-calibration. There is a gearbox at the transfer case (see photo) and at the back of the speedo,
- I also started to install the front wheel guard rubber extensions, but the 4m length of rubber arrived twisted and useless, see photo. I include two photos to show the difference in sunlight on the same day due to fires and smoke haze. The reason its all twisted, is because they sent me end of roll. I had to re-order from a different company but it took some time to find someone with new stock, i.e. a new roll. What finally arrived was good.
- Installed Turbo monitor and Madman engine management module into dash..
- Purchased local stainless hand rails (for use on a house, as they were about 1/10th the price of versions with the word 'truck' in the sales brochure), modified and fitted to outside of cab using nutserts. Lots of overpriced items out there, but despite my doing my homework, sometimes I still end up getting bitten and paying too much.
9th Dec 2020
Took it out for a run, down to Wollongong this morning (a warm day) so that the certifying Engineer could inspect my mods (fuel tanks, wheels, exhaust). I stopped at the various truck stops, hob knobbed with some real truck drivers, one called it a 'tank'. Drives like one, I have to say. It's no good as a daily driver unless you like having your eardrums hammered (my ears are still ringing an hour later). I need to add more sound proofing.
Stopped regularly and checked diff's, hub's, gearbox temps, etc, all were good. Engine monitoring and tyre monitoring systems all in the green. There is some annoying backlash in the drive train but I suppose you expect that in a 34 year old vehicle. New mirrors kept rotating with the wind when I got the speed up, so I was blind some of the time.
It will sit at 90Km/h comfortably only on the flat at 2600RPM (almost flat chat, does not like running much higher). It seems to refer sitting on 80km/hr at about 2300RPM. Max I could get out of the new stock turbo (with intercooler) was ~0.77 Bar and exhaust temp never went above 500C (lots of steep hills between Wollongong and Sydney). Exhaust brake worked well when descending Mount Kiera. Slow trip at about 30km/hr when going up Mount Kiera.
Steering heavy due to the run-flats in the wheels (~220kg each wheel) and only 60psi. Steering started to get even heavier close to home, steering pump belt was slipping (again) and had stretched. Made it home ok, but a stressful drive. Nothing fell off or blew up however, which is a good sign. I always pray before driving it, that God will get me home safely and without my causing anyone else any upset along the way. I've now set the tyres to 75psi for running on the tar.
Anzac Day 2020
Due to Covid-19 restrictions, the neighbors and I stood at their driveways with a candle this morning for dawn service of remembrance. I drove the truck up to the top of the driveway for the morning. Very tight fit, a couple of inches each side, took out a few large branches but minimal damage that re-paint won't fix. I'm just going to have to get used to the fact that the paintwork is going to be constantly scuffed.
I think I'll put the original brush-guard back on the front (even though it does look horribly ordinary and commercial).


Note that the rear chevrons in the above photo on the rear are not legal (cannot have them all sloping in one direction).
Mundi-Mundi Trip April 2022
First long run. Sydney / Mundi Mundi plains north of Silverton (about 3000km round trip). Checked all fluids before leaving.
Regular stops and checking of portals, diffs and transmission showed all in excellent temperature range during the 2 week trip. On the good condition flat roads, vehicle was comfortable sitting on 90km/hr at 2600RPM.
Unfortunately 5th and 6th selection got worse on the way back just before Sydney at Bathurst. Did not want to risk damage, so I had it delivered rest of the way home over the mountains on a low loader (see last photo below).
Transmission Overhaul 2022
I found that 5th and 6th were getting increasingly difficult to select, despite using the very best synthetic 500,000km transmission oil available. The rattle from the gearbox was like a concrete mixer full of bolts. It was time to fix it. Total kilometrage: 114,400 (previous speedo) plus 88,765 (on new speedo) = 203,165km.
The transmission consists of transfer case and gearbox. There is one impellor (input shaft) and two output shafts (to front and to rear). The gearbox and the transfer case are separate items but bolted together. The gearbox can be removed separately from the transfer case. To remove the transfer case, the two output shafts need to be disconnected (its a bugger of a job).
None of these jobs is for the faint hearted, and should be left to the professionals, as the average joe, could do themselves a very serious injury.
First steps: One will find it much easier to work on the transmission by first removing the spare wheel and holder. Drain oil (gearbox and transfer case are connected, so draining oil from the gearbox, does both). Disconnect all peripherals.
Gearbox removal - June 2022
Aside from the traditional Mercedes Benz dealer workshop, there appears to be only a few companies that can rebuild the gearbox in Australia (Unidan and MogCentral to name a couple). Both these companies have been very helpful in getting me out of a mess with good parts supply and helpful advice. Mind you, parts are never cheap, so you will need deep pockets. It was a significant job for me to lower the transmission, as I don't have an indoor workshop. Many thanks to the forums people on the Facebook pages for advice.
Some of the Australian Unimog Facebook pages are located at:
- https://www.facebook.com/groups/589295301436229
- https://www.facebook.com/groups/2527939060815709
- https://www.facebook.com/groups/518406386906837
- https://www.facebook.com/groups/1500177646863312
- https://www.facebook.com/groups/511818889184644
- https://www.facebook.com/groups/3768162993255236
The most difficult jobs I found, were re-connecting the output shafts in the torque tubes. Note that it is possible to remove the transmission without lifting the cab (but awkward). The standard way to lower the transmission is to remove the tray so that you can get access to use a block and chain shackle from an overhead structure and lower it down to ground on to a pallet jack. But its all too much work for me to remove the camper and the tray (need a big crane).
Gear Selector Lever: Disconnection of the gear selector horizontal shaft is achieved by loosening off the two clamp bolts on the universal joint and which just unscrews by hand. One might need to remove the bolt just under the gear lever itself, also. When reconnecting the gear lever horizontal shaft and its universal joint, its not really a critical adjustment, main thing is that the gear lever does not interfere with anything inside the cab and that you can select all gears. Remember that, you need to select 3 or 4 before you can change to 5 and 6 and visa versa (cannot jump 2 gears at a time).
Transmission input (propeller) shaft: I used the starter motor to rotate the drive shaft (gearbox in neutral) so I could progressively get access all 4 bolts on the transmission input shaft flange (15mm ring spanner). A better option is to have someone hold in the clutch so that one can rotate the engine propeller shaft by hand. I had to grind a little off the thickness of the ring spanner to get at two of the bolts. I had to use a lump hammer to tap the spanner to loosen them. Once the 4 were loosened, I used a large screwdriver to progressively inch the flanges apart as I wound the bolts out. BIG HINT: It is a good idea to mark (paint pen) the position of the two flanges before disconnecting. This is because the 4 holes are not always in an exact symmetrical placement, and like me, you might spend an hour getting 3 bolts in but find the 4th one refuses to go in. Its a matter of rotating the shaft 180 degrees and trying again. Note: You might want to consider fitting two new greasable Universals to this shaft whilst you are at it (purchased mine from Mog Central). The change of universals is a big job, involves cutting out the old ones, so best to have a professional do this.
Rear Drive Shaft: One needs to disconnect the torque tube to get access to the drive shaft flanges. In order to get access to the torque tube casting bolt heads, the rear rubber cover first needs to be loosened and then slid backwards. I tightly chained the rear torque tube up to the tray frame so that it cannot drop. I suggest don't use rope as it will stretch. I used a 4 tonne steel cable ratchet winch (mine from Bunnings) with chain attached to the rear of the vehicle to pull the torque tube backwards. I used a jack to be able to move the tube up and down a bit so that the drive shaft flange would pull back without dropping. I progressively loosened the torque tube bolts, winching it back a little each time, and did this a few times until the long bolts came free and then pushed the large cover casting back out of the way then slipped a piece of timber into the gap to ensure that the gap cannot close up whilst I am accessing the 4 drive flange bolts inside with my fingers. It was filthy black moly lithium grease inside, so probably a good idea to wear gloves and overalls. The vehicle moved a bit when I ratcheted up the torque tube, but not enough to cause any issues. Accessing the 19mm head bolts on the drive flange was a difficult job as the clearance on two of the bolts was near impossible. Remember to mark (with a paint pen) the position of the flanges before you separate them fully (see reasons further above). I had to cut down the length of a ring spanner to be able to get it into position to rotate it enough (one spanner notch at a time). Needed a range of different offset ring spanners. Ideally, I would be able to jack up one wheel, release its park brake, and rotate it, to align the flange bolts vertically (but there would be some risk of vehicle moving this way). As it was, the bolts were at about 45 degrees, making it a hell of a job. I also placed a stand under the tube to help keep it up (belts and braces). Whilst the manual quotes torque settings to do the drive flange bolts up again, I'm not going to be able to get a torque wrench in there, so I'm going to tighten them up based on how tight they were originally and using experience (they were quite tight, all requiring a lump hammer to tap the ring spanner to undo them). There will be shim rings and a split nylon shell inside. I reused the same shims and shells (I marked them so I knew the front from the back sets). When reassembling, you need to grease up (with the right grease)the shells liberally.
Front Drive Shaft: Similar deal for the front tube, as the rear. In order to get access to the torque tube casting bolt heads, the front rubber cover has to be removed. Chained up the front tube to stop it dropping. It was not as hard as I first thought accessing the bolts around the front torque tube cover. Got them all undone easily, and slid back the cover out of the way exposing the white nylon plastic half shells. Someone had used a generic red grease on these. Not correct grease. As best as I can tell, a lithium grease should be used. I used a 4 tonne ratchet winch and jacked up the front wheels to allow them to move freely, and it made a difference. I was barely able to move the tube, but I managed to open a gap just big enough to get access. Same process as the rear tube.
Re-greasing the torque tubes ball joints: Some people are complaining of a groaning noise when they are negotiating rough terrain at low speed. Its often simply that the ball joints and plastic shells simply need re-greasing. See above details on how I did this. I used a pneumatic grease gun with the nipple fitting removed from the end of the hose, so I could poke it up inside and squirt grease everywhere. After I removed the two half shells, I used a pneumatic die grinder tool with ball tip to put some shallowdepressions in the shells so as to retain a bit of grease.
Removing the Transmission: The 4 bolts on the drivers side for the gearbox support were relatively easy to undo. The passenger side 6 bolts for the transfer case were very tight (22mm bolt head) . I used a torque multiplier tool to loosen these. Mercedes Benz recommends replacing the 10 mounting bolts with new. I'm going to re-use mine as in good nick. I cleaned up the threads before refitting and used loctite when refitting. However, after disconnecting the output drive shafts, I decided to remove only the gearbox, as there is not much that can go wrong in the transfer case? Photos show a ply cradle (set up to support only the gearbox), on top of the red scissor lift table (500kg rating). These photos are before I secured the box to the ply cradle using ratchet straps. Note; when removing just the gearbox, the drivers side of the transfer case is no longer supported. Thus, the transfer case needs to be independently supported with a jack stand or such.
Out of interest, I read through my entire service book history and noted:
- 'Contract Maintenance Sec. F.M. Mech. DNSDC' overhauled the transmission at ~114,000km in 1998.
- Transfield Services rebushed gear selector due 'to crunching in 6th' at 158,872km in 2005, but its the same problem I am having?
Removing the Gearbox - August 2022
Warning, this vintage of original gaskets will likely contain asbestos. It's 26th August 2022. Gearbox is out (with assistance from a mate) and crated up ready to be sent off for a rebuild.
Here is what I saw:
Photo 1: Front end cover plate removed. Photo 2: Main front thrust bearing observed behind cover plate. Note: My box had two end float shims (1mm and 1.8mm) on the font side (behind the main cover plate). The ADF overhauled the transmission at 114,000km and engraved the word 'Bolt' on the thrust washer so it goes back in the right way again. Photo 3: Red scissor lift table . Yellow jack stand is supporting transfer case (this is important to keep in place all the time). Photos 4 to 7: Winching the gearbox backwards. Photos 8 to 9: Gearbox clear of transfer case. Photo 10: View into transfer case after gearbox removed. The synchroniser disk needed levering off the transfer case gently and it comes off together with the transfer case input gear and two thrust bearings (caution, its heavy). Photo 11: Transfer case input gear viewed from rear of vehicle (before being pulled out). Photos 12 to 13: View from front of vehicle before transfer case input gear is removed (from rear side). Photo 14: View into gearbox after being removed from transfer case. Photos 15 to 16: Lowering of the gearbox once the long studs are clear of the transfer case. Photo 17: Gearbox is wheeled out from under the chassis. Photo 18: Gearbox is lifted by engine crane, ready to be plastic wrapped and boxed up.
Note: Once the case has been opened up it is important to immediately seal everything in plastic so that no dust can enter. Everything needs to be kept surgically clean. One spec of grit can destroy a bearing quickly.
Further info. Here is what I saw:
- Photo 1: The top centre circled hole is an oil plug that does not need to be removed. The top right circled shows two bolts that must not be removed.
- Photo 2: The gearbox is winched backwards using the yellow strap. Note: We first fitted the nuts to the long bolts and then gently tapped the bolts in order to crack the gasket seal. Warning, this vintage of gaskets will likely contain asbestos.
- Photo 3: The synchroniser disk that had to be gently levered from the rear of the transfer case (once the gearbox is out of the way). Behind it is the transfer case input gear which has a tapered roller bearing each side of it (see photo 5 below). The transfer case input gear can then be pulled out the rear of the transfer case with a bit of wobbling and gentle tapping with a lump of (clean) wood.
- Photo 4: Synchroniser disk and transfer case input gear.
- Photo 5: the transfer case input gear with front main tapered roller bearing each side looks in perfect condition.
- Photos 6 to 7: Show some worn leading edges on toothed selector rings associated with the high low range selector.
- Photo 8: Some heat issues associated with the above toothed rings.
- Photo 9: Shows the ring that has heat marks.
- Photo 10: Shows where the ring comes from and hear marks behind it.
- Photo 11: Took 4 hours to make the crate. Exposed gears and internal areas were plastic bagged and crate lined with builders plastic.
Re-installing the Gearbox - December 2022
Note: at the time of writing Mog Central had excess stock of genuine Mercedes gearbox components at best prices I have seen.
However, I sent the entire gearbox (not transfer case) away to someone else for a complete exchange unit (rebuilt). They preferred to use their own genuine Merc parts. It arrived back late Nov 2022, but I needed to await assistance from a mate to install it (too big a job for me). If you are doing this all from the underside, its a very awkward and a tiring job, best done by two people. I strongly recommend doing this the proper way (if you can), which is to remove the tray and sit a crane above, so as to pick up or lowerthe box from the top instead of using scissor lift table. If you use a scissor table, it needs to be a good quality one. I thought mine was, but it droops at one end and thus this makes it very hard to keep the box level.
There are two gaskets, one each side of the transfer case (a rear and a front). They look similar. I picked up the wrong one, and fitted it. I modified it slightly (that should have been a giveaway, but I was tired and impatient) thinking that maybe its a universal gasket that can be used on a range of slightly different model boxes. In any case, a mate of mine helped me remove the box a few weekends later and refitted it, this time with the correct gasket.
Once you have fitted up the gearbox and before fitting the transfer case end cover, the front main tapered roller bearing need to be checked for the correct axial end-float. The ADF manual states end-float 0.04 to 0.08mm (see table 17 of manual G604-1). This is achieved by fitting shim rings (available from Mercedes etc) to the outer ring. The Repair Parts Scale gives a list of the various thickness shims and the Mercedes part numbers. I fitted a cross bar (temporarily) to load up the outer ring. I also temporarily tightened half a dozen nuts around the periphery to compress the rear gasket and then checked the gap on opposing sides using feeler gauges in 0.01mm increment. I was informed that the gasket is 0.28mm thick. By this information, I worked out the available end-float. A micrometer is a recommended tool. I was lucky, as my existing shims got me to just within the required tolerance.
The ADF manual states 75Nm for the M12 bolts and nuts around the end cover.
The front main tapered roller bearing supplied, was Timken part 98.17.0083
The front gasket supplied was MB part A4372610880
The rear gasket supplied was MB part A4372610580
I used non hardening Loctite gasket sealant No. 3 on the two big gaskets for the gear box and Blue thread locker (medium) for the bolts where its specified and Loctite silver stick anti-sieze for bolts I expect to undo again and plumbers liquid sealant for air fitting threads.
I recommend installing the best quality strongest magnetic drain plugs. I found that the best on the market (if you want to enhance swarf pickup) was the Dimple super magnet drain plug (much stronger than the Mercedes version) M24x1.5 metric tapered, but it is A$77. I fitted magnetic plugs to both fill and drain holes.
Setting up: I suggest marking the air hoses between the shift cylinder and the air relay ports before disconnecting. After assembling, I had a little trouble working out how to set the shift cylinder and how the shift air relay worked. I found that whilst it was possible to pull the high/low lever back with a satisfying click, I could not push it forward by hand. I had thought that I should have been able to do this and was concerned, but a forum member explained that there was a big spring inside the box and that it needed the shift cylinder at proper air pressure to do this. After building up proper pressure, the shift cylinder did push the lever forward ok, but it would not pull it back. I found that my control relay was leaking, and stuck on the forward port. I disassembled and found the black pin in the center (see photos below) was stuck (bit of corrosion I suspect). I re-greased, reassembled and refitted. It then worked better, but still have a slight leak past a small O -ring at the bottom of the nylon plunger. The shift cylinder stroke needs to be set according to the manual. When testing with the gear lever in the cab, Remember that you need to select 3 or 4 before you can change to 5 and 6 and visa versa (cannot jump 2 gears at a time).
Total cost to get gearbox going again: Don't ask,........... but about half the price of my new Kia.
These vehicles are all about the hobby, the enjoyment of working with the hands. They are not going to be suited to most people.
Cab Tilt System
Designed/fitted hydraulic cab lift system.
I made up a steel adapter bracket (shown in brown) to fit a standard 600mm 8 tonne air operated hydraulic ram (shown in blue) to the lower pivot point. All up, materials: about $150. Managed to ensure manual pump handle does not foul anything and the control valve is accessible. I had intended for the ram to sit within the two forks top and bottom, but due to the sway bar, I had to use long bolts to offset it. Still works fine. It only takes the cab up to about 30 degrees but this is sufficient for me to do most work (short of removal of the engine). It's also good for me, as it is not so high that the steering shaft pops out from its socket, as its a two person job to align it for lowering the cab and I don't have a helper. With this simple pneumatic option, its quick and easy to raise and lower. I don't use a safety cable, as the cab can never exceed the rams extension limit. But it is VERY important to have something (a strong brace) to stop the cab dropping down. I fitted a safety brace (as shown in yellow), rated at about 12 tonnes. I also put timber chocks in place (belts and braces approach).
The price of the workshop proper ram tool kit runs into the thousands, so this option is much cheaper at about $150 odd dollars (if you make the bracket yourself) if you just want to tilt the cab enough for minor maintenance.
Warning: The use of a ram on one side only, twists the cabin on its front two pivots. This is due to the angle that the ram push's (forward and upward). This is not such a problem when lifting the cab. However, it can be a cause of much nashing of teeth when lowering. I find that I have to prop up the drivers side of the pivot saddle (the saddle supports the two rear cabin rubber mounts) so that when lowering the cabin, the edge of the opening in the cabin floor does not strike the parking brake lever. If you do not keep an eye on the parking brake lever, it will likely be smashed and bend the metalwork, requiring some panel beating etc. Also, you will likely find (as I do) that due to the twist in the cabin, the passenger side rubber cab mounts and bolts will not drop into place. To enable this, you will likely need a cable winch to drag the passenger side backwards as you lower the final distance or even after lowering. In my case its often about 30mm offset. I winch off the rear axle until the cabin drops into place. The better way would be to raise/lower dead centre of the cabin from the fitting on the centre rear wall so that the cab does not twist out of shape (but you need an overhead beam). Put simply, its a nightmare to lower the cabin from one side only, due to the severetwisting out of shape.
Wheels
In Australia, a wheel comprises a rim and a tyre. The rim is not the wheel.
Tools needed: In my case the stud torque is 400 to 450Nm, so I had to find a reasonable price 3/4" torque wrench up to 500Nm and an impact socket set to suit. Wrenches seem to vary from ~A$185 to well over A$1,000. For very occasional use in changing wheels, I purchased a middle of the road tool. In removing the original wheel nuts, I could not budge them even with a 1m extension pipe. Probably another good reason to replace the studs and nuts, as someone had waaaay over-tightened them. I had to buy a torque multiplier tool to undo most of them. If retaining the original wheel studs/nuts, the threads will likely be caked up with oil and grit. One can clean the threads (both the nuts and the studs) with petrol and a brush and compressed air dry them. They should then run up beautifully afterwards using a drop of light machine oil.
I used this torque multiplier on various large bolts and nuts which were rusted in. The risk however is that one might end up shearing off a bolt whereas patience using penetrating oil and some heat plus shock loads might be the safer option in some cases. Once you have sheared off a grade 10 or 12 bolt you are likely to be in big trouble. I could not get a long bar or even the torque multiplier into a few spots under the vehicle eg: when changing the shockies and ended up splitting some nuts by hand with lump hammer and chisel. Hard work holding a heavy hammer upside down.
I have to say that the standard steel military wheels are likely indestructible and very practical. But I just don't like the look of them and the standard tyres are too narrow (easy to get bogged). For me, its not just austere functionality, its also about the visual aesthetics. Note: when selecting rims and tyres the national heavy vehicle regulations limit how much change in offset is permitted without an engineering assessment and certificate. In Oz, I think its 12mm for cars. Note; overall vehicle width must not exceed 2.5m. I am presently unclear if this includes the bulge of the tyres?
There are lots of rim offsets available. Hutchinson alloy rims for example, come in two pieces, both parts have different numbers and need to pair up not to exceed the 2.5m vehicle width rule. You need to do your homework when buying them. Companies like Mog Central and Unidan have already done this homework and can supply wheels that comply.
Tyres
When considering upgrading to the wider tyres and alloy rims compared to the more common 12 or 13" tyre width on the ex ADF Unimog 435 series, the following additional issues will need to be considered:
- Weight (will you be able to change a wheel by yourself? I know I won't)
- Longer wheel studs likely needed if you change from steel to alloy rims
- Different nuts required (two piece, if you change from steel to alloy rims)
- Depending on new rim offset etc, might need a chassis lift (either fit pucks at top of existing springs or replace springs with longer springs) and/or Cab lift. Wheel guards to be extended out (either new guards or extend existing guards as I did)
- Possible extra wheel(s) for spare or use standard steel wheel(s) for spare(s) Note: If you have converted to alloy rims with longer studs and want to keep the original steel wheels as spare, you will need to keep some original conical nuts and may need to make an adapter spacer plate (which might not be legal). It can also be a legal issue if the pair of steering wheels are different. Tyre offset and compliance rules to be considered (as well as overall width of vehicle). In the end, its probably simpler to just buy the matching spare wheel.
- Possible extra load on portal bearings due to extra weight if run-flats fitted. If different tyre diameter, you should check your speedo and may need to get it corrected. My truck engineer advised that this is a necessity. Luckily for me, my speedo was reading slightly in error previously, and the larger diameter tyres actually brought it into the correct range.
- Tyre may drag on mud guard at full lock (mine did). This likely means getting the front guards modifed or raising the cab or body.
- Engineering compliance certificate needed if changing wheel type, (as well as exhaust system, fuel tanks, seats etc).
Tyres can be very expensive and difficult to obtain in a hurry. If however you look after them, I am advised that they can last a long time. Aside from age, UV damage and loss of volatile organics is something you need to be aware of. Ideally best to keep the tyres covered in aluminium foil and place the vehicle on jack stands when not in use for extended periods (but that's not very practical). High and heavy duty jack stands are hard to find at a sensible price here. I was going to weld on extension pipes, but they might be unstable, so I bought a strong standard truck set and simply used timber blocks to get the right height. I've used BBQ covers from Aldi to protect the wheels from grinding sparks and paint over-spray but they are not suited for UV protection as the temperature rise is severe.
The standard ADF tyres here are ~46" diameter and G rated so don't expect to go racing with them. In fact if the gear ratio is changed, one could theoretically exceed the tyre speed rating? The U1750L (typically for the Airforce) has 365/85R20 / 13R20 (13" wide) tyres and the U1700L (typically for the Army) has 12R20 (12" wide) tyres. According to an Army friend, the 12" wide tyres are a regular problem in some situations as they can easily bog the vehicle. The 13" are a little more useful but still not ideal for this weight truck off road. The 6x6 recovery version (U2450L) however, is fitted with the wider 16" tyres as standard i.e.395/85R20. Note: According to a senior army source, the reason for the three tyre widths is that the Army simply did not want to spend the extra money on wider tyres for all vehicles, and so decided on the thinner cheaper tyres for the majority of the vehicles. Wider front fenders for the 395/85R20 are difficult to find. The company which prepared the ADF U2450L's was 'Evans Deakin Engineering Pty Ltd’ and they were then acquired by the 'Downer Group'. Its anyone's guess then what happened to that group, as 'Downer' did not reply to my emails. Wider fenders are now available however.
I'm running the Michelin 395/85R20 XZL Radial. The Michelin engineers are (as to be expected), very conservative (risk averse). Their web site specification sheet (2018/2019) for this 'X Force' tyre, states (max: load and pressure), but do your own homework for pressures:
- Road 5.6T /tyre max 120psi
- Cross country 3.65T/tyre max 52psi
- Sand/Mud 3.65T/tyre max 30psi
These are for the tyre loads shown. The specification table does not distinguish for unladen nor for run flat/bead lock options. The local salesman told me minimum pressure was 87psi and would not change his story despite my telling him my tyre loads are only about 2.5T.
Anecdotal evidence from forum members seem to indicate one can go as low as 20psi in the sand (but they probably don't have the run-flats)? I guess I'll find out one day. I've initially set mine to 75psi for use on the tar. The lowest I'm going to risk as a general rule, is 30psi because I suspect that I would be running on the run-flat at 20psi.
Rims
The Australian military Unimog wheels are 10 stud 20" with 334mm/335mm wheel bolt centres. The army U1700L steel rim for example, is about 8.5" wide. My Hutchinson alloy rims are 10" width. The Australian military Unimogs apparently mostly have steel split rims with a sprung ring. When changing tyres with a ring, this style of split rim can be very dangerous if you do not know what you are doing and a safety cage may be required around the wheel. Not many repair shops like to, or will, work on them (so that's a clue straight away). Also, I note that the bolts stick out and the wheel nuts are more exposed to being damaged on rocks due to the steel rim profile. So far I have not been able to find heavy duty wheel nut protectors (they all seem to bedecorative type).
For Hutchinson alloy rims, I have fitted wheel separators (thin 1mm plastic discs) which isolate the inside face of the rim and hub allowing for very minor imperfections and stopping the two getting stuck together due to corrosion and sticking paint.
What does annoy me is that I bought the best quality two piece wheel nuts I could find, direct from the USA and they have started surface rusting. The black steel coating is breaking down. Perhaps I should have bought galvanised versions, but these are reputedly not as hard as the black high tensile versions. Safety is (almost) everything so don't skimp with brakes or wheels or steering. I'm still thinking through my options to fix this issue. Trying to recoat them with something, in-situ won't work, as the coating may get all over the rims, then requiring them to be repainted which cannot be done without removing the tyres. On top of that, the 24 smaller peripheral galvanised nuts are starting to rust also !!!!
Drive-train and Wheels
Unimog Drive-train
The Unimog is heavy and geared down low. These vehicles are intended for off road use and have a maximum speed of 90km/hr at top revs. Note that trucks here in Oz are limited to 100km/hr anyway. Running at high revs continuously over long distances will tend to chew the juice and wear the engine out sooner. If you are retired and living off savings, then fuel consumption could become a problem over time.
The U1700 can be adapted to alter the gear ratio, but at much expense. For example, its apparently about A$12k to bolt on a Claas Adaptor for highway running speed (possible ~110km/hr). I understand that the PTO gearbox also has to come off, that means no standardwinch. A possible better option would be fast Crownwheel & Pinion kits for the diffs. I am hoping Atkinson Vos will develop a reasonably priced kit one day (which should be very popular here, potentially many customers). Larger diameter tyres can also help slightly (but not much).
If you have the military tyres they will likely be G rated, i.e. you will probably be limited to 90km/hr so the primary advantage of a high speed adaptor or fast axles for a Unimog is that the engine revs will be a little lower for highway running (maybe worth it for that reason?). In other words, the engine will not be running flat strap just to do 90km/hr and its life should be extended as a result.
Run flats & bead locks
When the tyre pressure has been reduced for soft surfaces, sand can enter around the bead and cause the tyre to leak, the tyre can come off the rim due to distortion and/or the tyre can spin on the rim. Bead-locks allow for low pressure travelling (sand etc) thus reducing the chances of a tyre slipping or coming off the rim. For some wheels, if you don't have the combined run-flat/bead-locks (or don't want them), alternatively bead-lock only rings can be fitted inside the tyre.
Some military wheels (MRAP) from the US come with the combined 'run-flat/beadlock' inserts. The run-flat in the MRAP wheel is designed (so I am advised) so that the wheel can be run at up to 50 km/hr for a distance of up to 50 km while the tyre is flat (I imagine there would not be much of it left after doing that). However, if the lube has dried out, the tyre will be damaged well before the above speed and distance values are achieved (and probably on fire). I was considering for a long time as to whether I should remove the run-flats. But after recently talking to a tyre expert , I have come to understand that the main advantages are that:
- if you get a blow-out at highway speed, you are much more likely to have a better chance of keeping control of the vehicle whilst pulling over. This is because the tyre cannot delate to 100% (see my photo further on), so its effectively still kept up (to some extent) by the solid donut rubber run-flat inside.
- if you get a flat in an awkward location such as a river bed or sand dune, the run-flats allow you to drive a limited distance without air in the tyre. The tyre might be wrecked after driving a considerable distance, but at least you can get to a safe place to deal with changing the wheel.
- as the Hutchinson run-flats also function as bead-locks, they reduce the opportunity for the tyres to spin on the rim when the tyre is deflated for soft surfaces.
- As the tyre cannot fully collapse, the tyre is less at risk of being damaged by driving on it (hopefully at a slow speed sensible speed for a short distance).
The main down side as I see it, is the extra weight, causing increased steering force at low speed, increased wear on bearings and increase in fuel costs. Be aware that these wheels are almost solid rubber and almost immovable for the average person due to their extreme weight (even on a concrete surface). Hence you might have buckley's chance of changing a wheel on a loose surface by yourself? Also, when the air is let down for soft surface, the tyre may not bellow out sufficiently for the conditions (but I don't know, as I've never driven it in soft sand). But I do know that the steering is heavy.
For the Hutchinson military run-flats, I have been advised of the following by the manufacturers:
- Heat Retarding Lube is absolutely needed inside the tyre if you expect to run them flat for an extended period.
- If the lube leaks out or dries out or you replace the tyre, the lube needs to be replaced or the tyre can catch on fire if running an extended distance with no air.
- My size tyre requires about 48 ounces of lube and its not cheap.
- The lube is applied as a paste to the inner liner of the tyre under the belts on the crown. Unfortunately it cannot be inserted through the air valve and to get it into the tyre.
Note: a special replacement 'O' ring is used to seal the two piece alloy rim. The proper Hutchinson version of the 'O' ring is made of fancy materials so as to last in extreme temperature conditions. I am not sure if an 'O' ring can be re-used again, but if its in good nick I suppose its at the owners risk. Sounds like its a good idea to carry a few on trips. Hutchinson military rims, parts, repairs etc (including 'O' rings and lube) can be purchased from local company in Australia, Marathon Tyres. I am advised by Marathon Tyres that their:
- 'O' ring part number to suit this rim is Part Number: 50015
- heat retarding lube to suit this rim/wheel/run-flat combination, is Part Number: 500280
- Check the part number for your wheels as it may be different to mine (because I selected and imported my own wheels).
Assembly Bolts: Caution: When the assembly of (peripheral) 24 nuts are undone, the run-flat apparently tends to want to expand out suddenly and pop the face plate out. This can be a safety issue. When re-assembling the wheel, the donut run-flat needs compressing in order to re-fit the face plate. Some owners (I am told) fit longer bolts at every second hole as standard, as the odd longer bolts allow some nuts to be screwed on first and to compress the front plate down enough so that the rest of the nuts can be fitted. If you do need to change a tyre on a wheel fitted with a run-flat and you don't have these odd longer bolts, you will need to take the wheel to a place which has a large press, of a type suited to changing these tyres. Be aware that most truck tyre outlets apparently do not have the presses, though the ones that fit solid tyres to trucks (such as garbage trucks) may. My concern with permanently fitting the longer bolts, is that they will be exposed to damage and a risk to the public. They might not be permitted in Australia if the vehicle is being used on public roads?
Caution: The removal (should you choose) of the Hutchinson run-flat insert if not done properly, can damage the tyre (or yourself). One method to remove it, is to partially compress with a ratchet strap, place the tyre under the fork of an engine removal stand and slowly pull it up and out. Another method is to start pulling it out and when part of it is out of the tyre under tension, cut it in half (risky). However the proper method is to compress the donut into a squashed oval shape using a ratchet strap and carefully remove it by hand (this is the theory, but apparently does not always work in practice). There are web sites explaining how to properly remove a run-flat. The pictures below, shows an example of a run-flat (with bead-lock also).
The guideline states: When fitting wheel nuts, use light oil on the threads (in other words, not grease , not anti-corrosion spray, not WD40, not anti-seize but only light oil) eg Singer sewing machine oil to ensure one is able to achieve the correct repeatable torque. The torque value I am using is 425Nm on the Hutchinson military alloy rim. I also fitted the latest plastic indicators andwhich prevent a nut unwinding. After the first 250km I checked the torques from first tightening (new rims) and there was no change.


First photo is of my tyre at 48 psi. Second photo (on the right) is tyre with zero psi. You can see from the second photo that it does not fully collapse. The tyre might even be sitting on the run-flat at 20psi?


Further info on my wheels and hubs
The new Hutchinson/Michelin (XZL 395/85R20) wheels (with runflats) I brought in, are for the MRAP (Mine Resistant Ambush Protected) vehicle. They are alloy two piece removable face rim. My version combination has outer component model W0-1137 B 20X10 with inner component model WI-1137 F. When fitted to my vehicle the overall measures as less than 2.5m from outside to outside (that's the limit here in Oz). They work out to be 50mm offset inside and 50mm offset outside, from previous wheels. Local companies are also bringing in these wheels (new and used), so its easy to pick up a set without importing your own. Note that military Hutchinsons come in various outer and inner component combinations, which can result in different offsets. There are different combination versions being imported and you should first check that you do not exceed the overall legal width of your vehicle here in Australia.
I use my IR hand held sensor to check the hubs, diffs, gear box, after every major stop on long hot day runs. By this means, one should be able to pick up any excessive wear problems as soon as practical, especially if one logs ambient and equipment temperatures.
On 19th of August 2017 I collected the four wheels from the customs facilities stacked one on top of the other on a pallet, in my box trailer. It was a heck of a job to unload and re-stack (took me most of the day and damaged my shoulder, which took a year to heal). I never thought the wheels could weigh as much as they did (and these are small by comparison to some that Unimog owners fit). These alloy wheels weigh about 220kg each (the same as an A380 planes wheel !!). I also found that I could only just roll one on a flat concrete surface, but when the wheel started to tilt sideways, there was no way of stopping it fall over or even to lift it up again by hand. These wheels could injure you badly if one toppled on you !!!
Pictures two and three below show what to expect on the front axles after removing a steel wheel. I have removed the drum protecting the calipers hydraulic piping in the third photo for inspection, ready for general a clean up, grease and repaint. The hubs were all disgusting. I strongly recommend checking the ex ADF vehicles hubs carefully. The protector drums are a hassle to remove but they can protect the brake lines from damage. Note: I found that there are 6 grease nipples on each front hub.
After much work I eventually found the right wheel studs. A closely guarded secret at the time it seems, as I had to figure it out from scratch from dozens of brochures across dozens of companies across the world based on dimensions and standards. I purchased them from Germany: FEBI Bilstein 07940. They are grade 10.9, are 85mm long, M22x1.5. They are sold in sets of 20. You can also buy individual bolts on ebay (but an expensive way to go). There is likely a special tool available to gently press the existing wheel studs out, but I removed the studs (as shown on the fourth photo) by tapping them out with a lump hammer (rotate flange in order to remove each stud (as the stud may hit the calipers otherwise), but don't forget to screw a nut onto the thread (face flush with stud end) before whacking it out. I took a risk and did it without removing the flange from the disk, but apparently one is supposed to remove the flange from the vehicle in order to tap out the studs. I used a (25mm diameter centre hole) thrust bearing as a simple tool to pull in the new studs by simply tightening up a nut (the bearing allows the nut to spin freely as it slowly pulls the stud in without applying much rotational moment to the stud). Unfortunately some rotational force can get transferred to a stud and the 5th photo shows how I use a Stilsens to grip the 'D' head bolt behind the flange to stop it rotating. Note: Very Important: The studs have a flat on one side of the head. The head must be rotated and aligned in the right spot before pulling in the stud. That's where the Stilsens comes in, it keeps the head in the right position as the stud is being pulled in. Of course, if you have a special hydraulic tool to pull the stud in, you wont have this risk of the head rotating.
Note that I used an epoxy enamel on the hubs, as its a bit harder than ordinary enamel paint. Its held up well so far. I bought brown as it was cheaper.
At my first drive with the run flats (Nov. 2020), I found it hard going in traffic. Noticeably heavy on the steering at low speed. Got her up to 90km/hr plus, and no issues with vibration, so the wheels must be well balanced (by luck or good engineering)

Photo above shows the footprint at different pressures for the Michelin 395/85R20 XZL.
For MRAP Hutchinson rim wheels, below are some options I found, for purchasing this wheel package. Be advised that lead times can be long, depending where you buy them.
Buy locally new:
Up side: warranty provided, some peace of mind that you get what you paid for and they are new (maximum life).
Down Side: the price. This package may not leave you much change out of ~A$6k each (~$2k for tyre, ~$2k for run-flat, ~$2k for rim).
Buy locally slightly used:
Up side: much cheaper as tyres are used and often advertised as having most of their tread. They are usually brought into the country from usually either Europe or US. Good source of replacement tyres if the budget is tight or if you tend to chew them up often.
Down Side: usually used surplus military stock and life expired (according to military standards). The main risk is damaged or cracked crap tyres which don't last and may have been stored in the sun. Do your homework and only buy used tyres from reputable stable suppliers who have a top industry name.
Import yourself (new, used or new old stock):
Up side: Save money.
Down Side: no warranty, no return and if not brand new, they may be life expired according to military standards. If they have the run-flats, a possible need to replenish heat retarding lube if you plan for them to function as intended (to do this, you need to disassemble the rim).
Recently however, some local importers have been offering old stock for very reasonable prices. This will save you all the hassles of importing your own and prices seem as good as I could get direct from the States.
Tyre pressure adjustments
Some higher end vehicles have in-cab tyre pressure adjustment on the go i.e. you do not need to stop or get out of the cab to increase or decrease the pressure of all the running tyres. There are two basic versions available:
- The version (often a retro-fit) which has exposed tubes on the outside of the vehicle can be easily ripped off on the first bush you pass and thus deflate the tyre,
- The integrated design where the air supply is connected through the centre of the hub, and has no external tubes exposed at the wheels.
Either way, both types of system apparently suffer (anecdotal evidence only) the disadvantage of air leaks (which can be a nightmare to resolve). From my analysis, the best value for money compromise is to permanently run air sockets up to each wheel location. You have to stop, get out, connect a short hose from each socket to each tyre. Another option is to adjust the front pair separate from the rear pair. You can fit the control valve(s) in the cab and monitor the pressure, or if you prefer, do it from outside by hand, the old fashioned way. By this means, all tyres are adjusted at the same time to the same value. Its not as fancy as some systems because you have to stop and get out of the cab, but its going to be much less prone to leakage problems. UNIDAN have a RTIS kit for fast inflation and deflation if you don't want to make your own.
I have decided not to install fast fill valves, nor to install air adjustment from the cab. As I am not likely to be in a hurry to adjust pressures, I'll do it the old fashioned way, and I have tubed up an air outlet socket next to each wheel position. By this means I only need to lug a short fill hose around.
Spare Wheel(s) storage
I have noticed some examples where people have fixed their wheel support brackets direct to flimsy parts of the living module structure usually not designed for it. It is likely best to fix the wheel directly to the chassis, tray or barge board where possible. Placing your spare wheel in front of the grill is not a good idea for obvious reasons. Placing a large wheel above the cab can be even more risky unless the support arrangement is robust enough to allow for emergency stops or vehicle crashes. Whilst the 435 series cab is apparently strong enough to support a spare wheel under static conditions, you don't want your wheel ripping loose and becoming a missile (taking your roof rack with it and twisting the cab) under minor forward collision conditions possibly exasperating what might have otherwise been a minor impact scenario. I was originally planning to place a spare wheel above the cab, but as they are so large and heavy, its not a good idea, as you will need a small crane such as the Splitz-lift. Its also likely to be illegal here to put such a heavy weight on the cab roof rack unless the engineer has signed off that the arrangement is acceptable in a crash situation. I have observed photos of cabs where the tubular frame design supporting the spare wheel over the cab is bent downwards from the static weight alone. Not sure how some of these do-it-yourself arrangements will fare in an accident. Only needs one accident of significance to bring it to the attention of the authorities and ruin things for everyone else.
Wheel Guards and Mudflaps
When using my rim/tyre combinations, they added 50mm to the outside from original. This meant I had to:
- Buy wider replacement guards, or
- Have a strip of metal inserted to make the existing guards wider, or
- Add a rubber fender extension
I went for the simpler option, and added 75mm rubber extension. I first tried 50mm but it was not wide enough and would have been rejected by the certifying engineer. Warning, when buying the rubber extension edging, make sure its not from end of roll, as it will arrive twisted and not fit for use. I discovered this the hard way.On the matter of ex ADF mud flaps, they also had to be replaced to make sure they are no less than 300mm from the ground. Note: If you add body lift, this means you will likely also need to replace the mud flaps. I installed dual wheel width mud flaps at the front to protect my air filter/dryer system and the steps from being covered in mud etc.
Seats
Pneumatic seats can be adjusted for your weight especially as this vehicle has stiff military suspension (it was not meant to be comfortable).
I purchased a pair of new Sears 'Comfort Seats' made for CAT trucks. They are of a very solid construction (overkill in fact). They have breathable fabric reputedly designed for Australia's harsh outback conditions. The integrated seat belts option shown in the second photo have been removed and the existing cab seat belts are used instead (compliance with the original design). There are many good standard pneumatic truck seats available, I just happened to come across these. Try 'Mog Cental' and 'Unidan' for seats.
If you are replacing the existing ADF seats with a modern style, you will need much stronger seat support boxes. The original bench type seats, seat support boxs and frames are surprisingly flimsy (almost a joke in terms of robustness). My new seat support box's have been made to my design from thicker steel, fully welded (not pop riveted) and extra bolts to the floor pan with large steel washers underneath. Something to watch for, is your final seated height. It's all too easy in these vehicles for your head to be hitting the roof or your knees touching the steering wheel if you install a seat which is too tall. My seats have a large dampening adjustment range (i.e. they can go up and down a lot more than average to accommodate big bumps in the road). But the down side is that they would not suit some people with meaty buttocks, they only just suit myself (being stick thin) and my head still touches the roof. I may have to modify the drivers sidesupport box to lower the seat one day. Also, if the standard steering wheel is too low or diameter too large, there are extension bosses available to move the wheel higher up on the shaft. I fitted an approximately 4" high extension boss to suit a Freightliner steering wheel.
I also ran two by 4mm stainless cables per seat support box, back to the curved rear of cab box section that the seat belt buckle end is bolted into. Note: there are 3 bolt holes behind each of the two seat positions (1 for the seat belt buckle attachment and 2 spare).
The driver side floor pan is flat, but the passenger side needs shaping to the profile of the arched floor (fifth photo). I had both boxes made square and then cut out the passenger side to match the curved floor profile and then took it back to the local sheet metal shop for full welding.
Third photo is where I drilled the holes in the seat adapter boxes. I found that a magnetic drill is useful on this vehicle. It uses rotabroach bits; expensive, but worth every penny, as it can be very dangerous to try and drill large holes otherwise. Don't try using the drill without using the magnet. I found out that the drill bits shatter easily if the drill moves (and at about $50 to $100 per drill bit, not cheap).
Fourth photo shows fitment check for controls etc. Important also that you can adjust the seat and that your knees don't foul the steering wheel when using the clutch and brake.
Fuel System
Tanks:
I purchased a set of standard tank support brackets (along with matching 50mm wide insulation rubber strips to suit) from Hilton Industries in Victoria, who make a wide range to select from.
It is not permitted to drill or weld the chassis (unless you know what you are doing). Its hardened steel anyway, so difficult to drill. I used 12mm plate adaptor brackets (I since realised I could have done it in 8 or 10mm) to pick up existing bolt positions on the chassis i.e. the old battery box and existing fuel tank bolt holes on the drivers side, and the oldspare wheel and tool box bolt holes on the passenger side.
I purchased some items years ahead of buying the actual vehicle. The fuel tanks for example, are mirror polished 316 stainless steel (200L each) as well as the stainless steps; are all from a Ford F650 (these are likely still available from Ford in the US as spare parts or direct from the tank manufacturer). I chased up the manufacturers tanksdrawings using the tanks serial numbers for my automotive engineer to scrutinise. Unlike some fuel tanks, these have a low vertical height so as not to hang down too low and be wiped out on rocks etc quite so easily. They have the required 3 connections (vent, fuel OUT and fuel IN), as well as side and bottom drain connections.
I purchased 0-180/190 Ohm marine stainless steel senders. I'm not sure if the range is quite right, because I ran out of fuel when a tank was showing 1/8 full. My pick up is about 25mm from the bottom. Both tanks floats are wired to existing fuel gauge, and I use a changeover switch to display either one.
Fuel Selection panel and Water Filter :
Added fuel selector panel to select fuel from either tank. For the two tanks, I kept it simple and fitted two marine grade 3 way manual operated brass diverter valves. One is for fuel OUT the other is for fuel IN (return). I need to make sure both valves are turned towards the same direction when operating them. On my vehicle, the fuel line to the fuel filters is 7/16" (11mm). This is a difficult size to source compression fittings for, and I only found them from the US.
There are many water filter products on the market all promising great things, so I decided I might as well go for a product from one of the big players. I fitted the MANN Preline 250/1 pre-filter with sensor and red light kit, which condenses out water and brings up a warning light on the dash if too much water is detected. The filter has M15 ports. I am generally using 3/8"NPT compression fittings, so I had to find adaptors (the 2 adaptors cost almost as much as the entire filter). But if you are using M15 banjo fittings, then no need for adaptors. However, you then need to buy a special tool to push the tube onto a banjo barb.
Note: the inlet and outlet ports of the MANN Preline 250/1 pre-filter can be swapped over for different mounting orientations.
The sensor and red light works such that: The red light comes on for a few minutes after the ignition is on, then if no water present, it turns off.
Telescopic Mast
Another useful item for security and or emergencies and improved communications at remote locations, is a telescopic mast to mount things like: antennas, flood lights, etc. The better technology (but expensive) masts are usually slim, pneumatic and made from aluminium, and thus lighter. You can get cheaper models but they are often much thicker and much heavier for the same height. There are also electric masts which use a cable inside the mast to extend them. These can be prone to mechanical problems.
They are available from small, to humongous in size (some about 14" in diameter). You can save money by buying a second hand mast. I managed to find a used military pneumatic Hilomast (11 meters) in the UK. It can lift 18kg of equipment (when new). I pulled it down, cleaned it and lubricated (using silicone oil). See photo of fully extended test where I fixed it to the side of the temporary workshop for testing. I have carried out a weight test and no problems lifting 12kg even though the Teflon seals are lightly scored. I recommend a locking model and I have converted mine to hand locking 'T' screw clamps so that I don't need special tools to lock each telescopic section in place when extended. I made my own locking handles out of SS, as genuine handles cost a bundle. Note: Without the locking option on a pneumatic mast, the mast will deflate (due to minor air leaks once the engine is turned off). If the mast does not have an internal cable option, one can use an external cable, either spiraled around the mast (see example on the white van) but a cage is needed to contain the cable, or a curly cable down the side of the mast but a tube is needed down one side to contain it. A curly cable is expensive at A$400 just for the cable without the containment system. For the moment, I have a simple removable (pluggable) lighting cable that hangs down the mast.

Wind pressure, lightning strike and forgetting to lower the mast are SIGNIFICANT risks. If lightning hits directly, all bets are off, and you may end up with a very expensive melted mess. WARNING: An extended mast is a lightning attractor and its probably prudent to lower it well before storm activity mind you, the act of lowering it could also get you killed! I will likely fit an equipotential earth cable for use when the mast is raised as 'touch' potential can be lethal if you happen to be accessing the vehicle at the time lightning is around. Interlocking with engine start is recommended to prevent accidentally driving off with the mast extended. Most mast suppliers have options to fit a magnetic sensor switch to the base of the mast to detect when fully descended. Alternatively an industrial micro-switch can be used to carry out the detection in lieu (cheaper).
A mast is useful for area lighting and to place antennas when needed in an emergency. Good for flying the flag also.
Pictures below show:
- the fitment of the mast on the headboard , and
- example of Curly Cord vs Cord spiraled around a mast on another vehicle
Surge Arrestors/diverters
Electrical equipment connected to the mast may need surge protection. Surge diverters (eg MOV's) may be required at the top of the cable and at the lower end of the cable. Surge diverters should be line to line and line to ground. As the mast is unlikely to have a good electrical connection to the vehicle chassis, the cable might need a robust copper conductor (usually a braided shield). A subject matter expert will be needed here to provide an appropriate design.
TV antenna
The choice for TV antennas is extensive. Seems to me that a satellite dish style antenna is the only sensible option. They seem to average at 700 to 850mm diameter and usually the bigger the diameter the better the chance of reception. These domestic style dishes are not suited to pole top mount so I will need to allow space on the vehicle roof, but it will come at a price, using up valuable PV solar panel space. I have also come to the conclusion that I want automatic signal detection (who wants to muck about after arriving at a site searching for reception and having to keep adjusting things to maintain it). There are nice modern square array type antennas available now (the old fashioned round dish technology seemson the way out).
Levelling Legs
A nice-to-have item are levelling legs for uneven locations. Trying to sleep with your head lower than your feet is unnatural and very uncomfortable with the extrablood pressure on the brain. Equally uncomfortable is having your spouse rolling against you or vis versa if a shared bed.
Electo-hydraulic kits are probably the most common option, but very expensive (~$10k for supply only of a basic kit). The advantage of buying a kit is that all the bits are provided (you don't have to spend a lot of time designing, sourcing and integrating them). The disadvantage is that a kit may cost more, compared to buying loose parts and doing it yourself (but with the good chance of getting it wrong, and taking forever)? I've also looked at air, and air over hydraulic legs, but nothing so far seems suitable for the required weight load at least 3000kg each leg. The other risk is air leaks.
Generally, mechanical landing legs as used on prime mover trailers, now seem the more likely option at the moment. Mechanical landing legs can handle heavy loads, are available from dozens of suppliers, are reasonably affordable and are likely to be much safer than air or hydraulic systems as they cannot deflate and therefore, I suspect are safer when used for changing tyres and working underneath (unlike the alternative systems). Mechanical landing legs are normally hand winched but electric drives are available. Electric drives come in at about ~$5k for 4 kits plus a remote control (without the legs). Four legs are about $1k, so that's about $6k for materials. Still fairly expensive, considering what they are.
Some vehicles don't have sufficient underside clearance and may need a folding leg solution (this is likely to be expensive). If however, you have a robust beam extending out from the chassis both front and back and providing the overall width of the vehicle is still compliant, its probably easier to mount standard outriggers as used with vehicles sporting cranes. Most vehicles however, are going to require legs fitted directly on the chassis rails, but the problem here can often be that there is not enough extension reach. Folding legs are available as either fully automatic, or manual (where you need to crawl under the vehicle in the mud to flip them down. Risk is forgetting and driving off with them down, unless microswitches fitted to warn).
Other considerations can be;
-
whether each leg should be independently controllable (the risk is twisting the chassis if you have a standard vehicle and don't know what you are doing) or whether the front pair should act together and same with the rear pair or perhaps if the sides should act together?
-
Are controls required to be remote from inside the cab, or direct at the legs? Are they to be electric, pneumatic, hydraulic or manual?
Frontal Protrusions
Brush Deflection Cage
If you are planning to go off the tar (and that's what the vehicles are meant to be used for) where tree branches etc might be an issue, you should consider a steel cage around and over your vehicle. As you have likely invested a small fortune in your home away from home, the last thing you need is to wipe it out by a low hanging branch that the council forgot to trim from the side of the road. Also most of the bush tracks to far away places of interest are likely to have been worn through by standard sized 4x4s. They have cleared the tracks from debris to suit their vehicles and usually not for trucks. You should consider that you might be needing to do a lot of sawing etc to clear a path. Ideally, a deflection cage needs to start at the front of the vehicle and gently curve up to the maximum height so that on impacting an object such as a small tree branch, the object hopefully gracefullyslides up and over the vehicle, or the vehicle deflects down and under it. Perhaps better to be jammed under a bridge than wiping off the top of your vehicle? If the cage frame is to start at the front of the vehicle, it must not obstruct the drivers forward view. The rules around this issue seem very vague from my enquiries and perhaps not fully understood by police or even some transport authorities? One officer told me that he uses the 50mm rule, i.e. if the structure in front of the windscreen is wider than 50mm its non compliant? I have not been able to find any rules pertaining to the maximum view width obstruction to date.
There are however strict rules about sharp edges. No sharp edges can be presented on the front of the vehicle. I seem to recall that the minimum radius is to be 5mm, but don't quote me on it. The certifying engineer did not seem to have an issue with the existing 1986 brushguard.
Bull Bar and Frontal Protrusions
Another decision is whether a bull bar is needed and if it needs to be frangible or not. Frangible implies that part of the forward structure will collapse and absorb part of the impact. Non frangible implies a super rigid arrangement with the hope that small objects like cows and small cars will simply bounce off without doing too much damage? The down side is that serious structural damage to the chassis can occur with non frangible arrangements. In any case its important that bull bars (frontal protrusions) are designed with rounded surfaces and no sharp projections which could cut or injure a pedestrian on impact. Both a structural engineer and an automotive engineer might be needed here? For a frangible design, each section may need to be designed to be bolt replaceable if they get bent (why replace a whole bull bar if only one side gets bent). I am keeping my arrangement essentially stock, with just one horizontal bar added to provide some lower protection.
A side note: I was once lucky enough to travel the length of the Northern Territory (wet and dry seasons) during my term on the NT gas pipeline construction/commissioning. Wild camels and buffalo are commonly seen wandering the top end where there are few fences, though its mostly the buffalo that end up on the roads (camels are shy). Driving into these creatures at high speed is going to total even a large truck. I used to regularly come across bloated water buffalo bodies by the side of the roads (bulldozed off the road by the local councils) and left to explode in the sun for the birds and dingos to clean them up. You can smell the stench (depending on wind direction) often many kilometers before you get to the carcass. When working on this project, we lost more than a few 4x4's and some people ended up in hospital after driving into buffalos. One team member died. Due to the great distances involved, nearly everyone drives fast, as you might have to travel 1000km or more in a day. I remember a close call when I was driving back from the Armadeus Basin gas fields to Alice Springs late one night looking forward to a beer (or two) at the motel after a very hot day (gets to 50+ C). I was doing at least 150km/hr at the time and only due to my long distance driving lights was I able to glimpse something vaguely ahead and stop in time. It turned out to be an otherwise mostly black cow standing in the middle of the road. Hence a strong bull bar and brush deflection grill is very likely a good investment for the front of the vehicle. On a related note (I digress easily), another near miss was when I was driving back to Alice one late afternoon and I saw some cars lying on their sides off to the side of the road. I slowed down, saw that there was a camp fire with Aboriginals seemingly calmly sitting around it, and as I slowed even further I only just in time noticed that there were two evenly spaced apart wheels on the road with rear axles still attached sticking upwards in the middle of my lane. I was able to throw the vehicle off the road, and get around them in time, and I hope the next driver behind me was as fortunate. When back in Alice, I asked around and heard that it was a common practice, that when a vehicle breaks down and they cannot fix it or it runs out of petrol, they know no one is going to risk stopping to give them a lift, and some in my case knew enough to remove the wheels with axles and put them on the road as a way to try and force vehicles to stop to persuade them to give them a lift back into town. Now it sounds callous that I did not stop, but in those days (early 80s) alcoholism and related violence was rife in the region, and some Aboriginal communities were (and still are being) absolutely decimated by it.
I would suggest always be on your guard when going into remote places and always let someone know where you are headed and always have a back up plan for a fast exit from a site. Perhaps best to try to park your vehicle such that you can drive straight out quickly in an emergency. Its pretty rare for an incident needing an emergency exit, but most people I have talked to have had at least one experience such as a river rising rapidly or redneck noisy campers where they had to get away usually during the night. I remember driving over dry river beds at times in the Territory, and once on a sunny day (for weeks on end) with no clouds in sight and returning back the same way a few hours later only to encounter a raging unpassable flood (~2m deep). I would not have believed it if I had not observed it myself. Flash floods can be on top of you from not a drop in sight, to meters deep in an instant. This is usually because the flood water has traveled from many miles away upstream where a sudden very heavy localised downpour has occurred.
Anyway, I'd better stop here, back to the issues at hand:
An ex ADF model U1700 Unimog is a universal all-terrain vehicle. The vehicle includes a ‘thing’ (a 'thing' is the term that the vehicle standards refer to)which forms a standard essential part of the vehicle. The 'thing' in this case, is centrally located on the front of the vehicle and consists of a winch head with adjacent structures. This forward winch consists of a gearbox on the rear of the engine, a drive shaft to the front of the vehicle and a (cable drum) head. The winch head protrudes past the front bumper and is flanked each side with protective ‘structures’ which are integrated into the vehicles chassis. There are two structures (one on each side of the winch head) are an extension of the vehicles chassis and they: ·
- provide side damage mechanical protection to the winch head,
- form part of and support the, vehicles bumper bars, ·
- are the frontal vehicle lifting points in a workshop or field environment, ·
- are the primary point of cable attachment for vehicle recovery purposes, and ·
- are the forward tie down points when transporting the vehicle on a low loader for example,
.......the whole configuration/arrangement being fully in compliance with the ADR’s applicable to pre 1st July 1989 builds.
Note: Second Edition ADRs are the applicable pre 1989 vehicle build design requirements and are silent in respect of front of vehicle protrusions. It was not until 1989 that the Third Edition ADR’s came into being and made provision for vehicle protrusion rules. The pre 1989 vehicle whether fitted with a winch head (or not) and or its associated ‘structures will be fully compliant with the ADRs applicable at the time of the vehicle build.
However, in circa 2012 the National Heavy Vehicle Law (NHVL) was enacted and this includes requirements additional to the ADR’s. In particular, it includes a rule regarding frontal projections. The new rule states “A thing fitted to a heavy vehicle must be designed, built and fitted to the vehicle in a way that minimises the likelihood of injury to a person making contact with the vehicle”. (Source: Heavy Vehicle (Vehicle Standards) National Regulation: Schedule 2, Other vehicle standards applying to single heavy vehicles Part 2 General safety requirements 7 Protrusions). This rule is subjective and has no definition. Note: If the intent is to comply with latest Third Edition ADRs, then some modifications will be required to the 'thing', as it came out the factory.
Living Modules
Comforts
Pop top units may help with vehicle aerodynamics (having a lower profile), possibly saving a small amount of fuel and allowing you to get under some of the minor country overpasses, but they are not as good as full height campers, as I see it. They mostly use canvas/plastic type side walls at the top which can leak or let dust in and attract mold. They also let the heat and cold in easily. After saying this, I ended up buying one, due to cost considerations.
I have however, observed split type shell cabins where the top shell sits over the bottom shell and often pneumatic rams are used to lift it up when parked. These provide the security but I am not sure how reliable they are in moving up and down, or for sealing to keep the bull dust out. In any case, I have only seen them on the US web sites. Check out Bill Caids site for information on one such module.
Living module Options
There are essentially four living module common options, as I see things:
- Slide-on (typically made for utes and some flat tops and very popular in the US),
- Custom built,
- Modified caravan, and
- Build your own.
I once built my own camper conversion into a Toyota minibus, on the basis that I wanted something better than the run of the mill commercial fit outs at the time. It turned out ok, but in the end, I discovered that one can never compete with the professionalism of commercial builds for re-sale.
Slide-on module
I have reviewed literally dozens and dozens of brands and models of slide-on camper units from the US and a couple from Australia. The US market is enormous with hundreds of slide-on versions to pick from and new models are coming out almost every week. The import option from the US is probably the cheaper route, (as the local companies here in Oz charge very high comparative prices simply because they have a captive market). It reminds me of the marine market, where prices seem to be jacked up simply because the product has something to do with 'marine' (the assumption is that if you can afford a boat you can afford to pay any price for parts)? Some risks of importing your own slide on module are costs of: freight, customs duties/taxes and conversion to Australian standards compliance for gas and electrics. Also warranty rectifications are likely to be a problem. If importing a new unit, before its been completed I would recommend trying to get the maker to cable up in accordance with Australian standards (600V insulation rating), because retrospectively replacing all the mains wiring could be next to impossible without having to cut into the panel linings. However, that's the theory, and when I contacted some of these US companies, they either refuse outright to wire to Australian standards or refer me to their Australian distributors. Hence, the actual opportunities to have one wired to our standards is going to be very slim to impossible (the markets are on the whole, cornered by the local Australian distributors). One option is to arrange for a local in the US to buy and send on to Oz via a container (if it will fit in a container). You will then have the issue of ripping out the US 120V wiring (probably not rated at 600V) and appliances (including gas?) and replacing them at great difficulty?
The only thing I don't like about most of the US models, is that they seem to favour dark wood grain interiors which make them appear dingy and depressing (some would call it cosy?). Whereas in contrast, modern caravans here in Australia are nearly all going for bright white interiors making them appear open, clean, modern and spacious looking. If you are going to spend weeks or months in a small box, you don't want it to be dingy.
A useful US web site for information on hundreds of slider etc models is Truck Camper Magazine (https://www.truckcampermagazine.com/). I have not found any caravans or slide-ons with the lightweight engineering or quality comparable to the products available from the US and Canada. Australia is however just starting to catch up, with some using composite one piece panels etc on aluminum or steel frames. They are very expensive here, for what they are.
Our Camper
Due to cash limitations, I ended up purchasing a new 2020 model Chinese slide-on (aluminium composite panel with aluminium frame) camper. The body is the right size for the truck tray at 4m x 2.2m. I can just stand up in it with the pop top roof down. However, the overall quality is not the best (the word 'amateurs' comes to mind). I had to spend a lot of time bringing it up to basic standards in particular the non compliant electrics and gas.
I recently found a much better quality and value-for-money slide on/off camper of a similar size is available from Queensland and is the Palomino SS1251 which has most of the bells and whistles such as electric roof raise/lower (a big plus when you are not a weight lifter). By time I upgraded my 'cheaper' module, I could have purchased the Palomino (I suspect). But you live and you learn (often the hard way).
RE: Raising the roof of my camper. I had great difficulty raising the pop top roof on my camper. Needed to get a strong man in to help me with it. When lowering, it came crashing down. I then noticed that the gas struts are stamped 20N, i.e. rated to lift 2kg (why am I not surprised !!). Even if its meant to be 200N, that's still only 20kg per corner, and not enough. I tested them and they are 35kg. I changed to 45kg high quality Australian struts at $100 each. I could push it up, woo hooo, but then, did not have enough body weight to pull it back down. I cut 2 of the 8 springs on the scissor lifts, and was 'just' able to lower the roof myself with my body weight without it crashing down (an improvement). But now I cannot lift it again. There will be a combination of scissor springs and gas struts that will work for my body weight and strength, but it would be too big a job for me to sort out.
I prayed about the issue and then remembered I had an unused lightweight ratchet adjustable cargo spreader bar somewhere that I bought ~5 years ago (never throw anything out). Bunnings now sell them. I tried it, and it was perfect for the job, and I was able to ratchet it up and lift the roof (that's well over ~$1000 saved on not buying an air lift system).
The semi flexible solar panels have now failed after a year in the sun. Apparently that's quite normative. Its August 2021 and I have installed new better quality technology, but they may only last a few years. The rigid glass panels are apparently the only thing that will last a long time, but they are heavy and stick up from the roof inviting to be caught on overhanging branches etc. When these flexible panels fail, I'll fit the rigid. Also, the heat generated by the flexible panels is incredible and the heat gets transferred down through the aluminium frame of the poptop roof. Another reason to fit rigid panels with an air gap under.
In order to secure the camper to the tray of the truck, I had to make a subframe (I designed it, Beauchamp Metals made it). I used my box trailer to roll it under the camper, then jacked it up into place. It was bolted up to the camper module and then secured to the truck tray by means of the NATO container rear mount pins. Note: If you want to go for registration as a 'motorhome' the camper has to be 'permanently' fixed down (permanent structure) with tools required to remove it. The NHVR definition of 'permanently' fixed down is a bit vague. This can work for you or against you. Basically, if you need tools to remove it such that its a workshop job, then its permanent. If you can do it easily at a camp site, its not. The big advantage of a motorhome registration, is about $650 a year vs about $2500 a year here in NSW. The RMS policy makers are only concerned about revenue generation and not about fairness (as in, fair usage charges).
Apparently, under the Australian Design Rules, a “Permanent Structure” is defined as a structure that cannot be readily removed within a short time and requires the use of tools.
Jacks:
Managed to jack camper up slowly. I added 1m extension legs (I had then made) to the standard jacks, in order to get the overall 1.8m height clearance required. I was not watching the front legs properly and over retracted them and tore off the steel feet (another annoying job to repair the jacks). This occurred because the jack controller does not have torque overload protection (cheap design). Also overloaded the two motors, and melted the isolation switches. Lucky I did not destroy (but might have done some damage) the motors or gearboxes, as spare parts are not available. The mechanical side of the jacks is strong and they are very heavy. But the motors stopped working after a year in the weather. They had allowed water ingress and were rusted. I eventually chased down the motor manufacturer in China, and ordered and fitted their new IP66 weather resistant version. Have had water covers made for them.
I have had to store the front jacks vertically next to the rear jacks. Its essentially a workshop environment to unbolt them from the rear and then bolt them up to the front of the camper (they are heavy). The camper is now a 'permanently' mounted unit. It must be 'permanent' in order to go for motorhome compliance plate.

Wife and dog guiding the trailer as I roll it under camper.

Side view of subframe in position (not yet secured to camper). Amazing how strong milk crates are (back up only).

View of finished subframe being rolled under camper.

A mag drill is an invaluable tool. Makes life easy for a change. Photo shows drilling holes for nutserts in the frame.
Glass fibre reinforced plastic decking meshnow fitted with safety handrail. Steps swivel to the side for use with the deck.

Scissor Stairs:
The camper came with a cheap set of 5 fold out steps. They were not able to reach the ground (the tray being 1.5m above ground) and they only had single links, not double, the link holes were 9.0mm and should have been 8.0mm, the zinc plating is failing, the bolts are all too short so nylocs cannot be tightened and no nylon washers fitted between the pivoting links. This single link design is not stable enough and the steps wobble around badly. They do not have a nylon washer between each link, so this means that the pivot bolts have to be slightly loose in order to be able to fold up and down. This makes them even more wobbly. I could not find the same model anywhere in the world, so purchased a 3 step set of Torklift Glowsteps to get the extra extension height. The Glowsteps are very well made (double link with nylon washers), but had to wait for them from the USA. In order to improve the original section of cheap steps, I had 16 more links laser cut from marine grade aluminium at $350 and fitted nylon washers and longer stainless bolts. Beefing up the original steps was still much cheaper than replacing them all with Glowsteps. I also ordered an adjustable Torklift handrail. Making ones own is just too complicated and will likely be just as expensive as the USA model. The overall solution is a stable set of steps that concertina up on the rear landing for storage.


Rear Awning:
June 2021, custom awning arrived and I fitted to rear ofpop top.
Spare Wheel Storage & Crane:
I ended up storing the spare wheel (1.2m diameter and 400mm thick) on the tray under the void of the camper. The Spitz aluminiumcrane was too tall and was flexing under the weight of the spare wheel, so I shortened the boom and the vertical section and strengthened it.
- Purpose built module
These typically consist of a robust fibreglass module fitted out with standard caravaning equipment. They are the most expensive option I have discovered. Based on the local prices I was quoted, its an ideal option for oil sheiks or Russian oligarchs who can afford the very best and price is not an issue but for ordinary people like me, its not even close to an option. Advantages: Typically very good all rounder, with potential for large open living space and storage spaces. Purpose built product to cover all needs. Disadvantage: As there is a very small market here in Australia, they can be very expensive (can be a lot more than the truck) due to small production runs or more often, a bespoke or custom design.
- Modified Caravan
One method is to simply cut off the suspension and draw bar of an off-road caravan and directly mount the caravan chassis onto the vehicle tray with rubber isolation mounts. Alternatively, one can simply use the existing container mounts on the 4m tray. That way, the living module is a 'load' and effectively a slide-on slide-off (even if a forklift is needed). Probably best to use a caravan with a departure angle at the rear. The Lance 1475 is a suitable unit for fitment onto a Unimog U1700 but it has the door on the wrong side. Its not practical to get one shipped here as it will not fit in a shipping container. Check out Bill Caids site for information on fitting a Lance caravan on a truck.
- Advantages: available with all the features you would expect, off the shelf.
- Disadvantages: A bit of engineering work to do, in order to integrate it properly so as to look tidy and professional, but likely worth the savings if you are a 'hands-on' type?
- Build your own
Seems to me that another option (if you have the time) is to start with a pre built enclosure (or make your own out of 29mm composite panels) and simply fit it out or start from scratch for those brave folk. You would need to likely be very experienced, if you want it to look like a professional rig. There is at least one company that now provides the components including wall panels, to assemble your own. A sensible option if you have the time to do it.
Shipping Container Option
Another option is convert a shipping container. As the ADF vehicle has the 4m container locking points already built in, its not a bad idea to consider the module a 'load'. That way, the living module does not necessarily need to comply with all of the usual rules. New lightweight (empty) containers are available for as low as A$5k. Smooth wall insulated shipping containers are available at reasonable prices. Some even use fully stainless steel frames with fiberglass panels. Weight here might be an issue (most are 3 tons empty?) but on the other hand, an external protective cage is unlikely to be needed as the inherent strength is in the container frame.
Cool Box option
These are the smooth wall insulated modules one sees typically fitted onto the back of refrigerated trucks of all sizes. They are no where near as robust as shipping containers (probably disintegrate at impact with the first small branch) but can be made to any size and spec. Probably the most sensible option if weight and price is a consideration (and it usually is), but often flimsy construction. I would be considering an external cage with this option also. They also have thick walls and waste a lot of internal space. I was recently quoted by a local company over A$26k for just the empty box .
Fuels (for cooking, generator and space heating)
Here in Oz, gas is the most common fuel for portable cooking. There is however, an alternative option to lugging heavy gas bottles around and the inherent dangers of gas leaks; and that's diesel . There are appliances available such as: generator, oven, cooktop, room heater and water heater all of which can run from diesel fuel. They not likely to use much fuel either. You may find difficulty getting your gas bottles filled up at some remote locations, but you are always likely to be able to source diesel. The appliances are not cheap to buy and I have not yet carried out a life cycle cost analysis as to which is better in the long run. I saw these items demonstrated at a recent Sydney caravan show and was surprised that there was no smell (as the small amount of fumes are piped outside the vehicle). I think they are the way to go, depending on ones budget (very expensive however).
Pop tops are not well insulated. The top canvas/vinyl section lets heat and cold through very easily. So it can be freezing in the morning. If going to cold areas like the snowy, you will need something to provide reliable cheap continuous heat through the night. The only high calorific energy sources are LPG and diesel. So I purchased a diesel 2kW air space heater from Lifestyle Equipment & Supplies. I am very impressed with the kit. It actually has everything in it, good instructions and all top quality materials. The kit is put together in Tasmania with the quality parts one would expect from an Australian supplied system kit. https://www.lifestyleequipment.com.au/products/diesel-air-heaters/diesel-heater-kits/full-installation-kit-plus-10l-easy-fit-tank/ Beware cheap Chinese knock-offs, as its your life at risk here. Not worth buying rubbish that can be a fire and noxious gas risk.
Toilets (one of the more important topics)
I will try to deal with this topic in a polite manner. I don't have any first hand experience with motor home toilets but have compiled a summary of what I have observed and been advised over the years, from relatives with motorhomes/boats and from the internet. This is one of the more important issues to be decided (this and hot showers), especially when you are getting along in years like me. I like the idea of saving water (so I can have a shower regularly).
- Seems to me, that there are essentially 5 main categories of motorhome toilets: Canister, Tank, Incineration, Bag-it and Composting. I still have no idea which is best, none are perfect, all have design or logistics issues. Here's what I have gleaned so far:
Canister:
Advantages:
- Canister systems are simple, well understood, compact and there are many models to choose from
- Reasonably priced
- Can be flushed like your home toilet
- Can use toilet paper (so if you need much paper on occasion, this might be the solution for you)
- Spare containers can be provided to double or even triple capacity when out on the road
Disadvantages:
- The contents turn into stinky sewage and needs chemicals in order to break down the sludge into a more easily disposable liquid
- Have to lug a heavy container around. Some people carry a trolley around for this purpose. If you have issues lifting heavy weights, you might want to consider a black water tank system
- Very limited capacity. May only have capacity for one or two days for two people
- Risk of splashback when emptying. If at a dump-point, risk of encountering other peoples mess
- According to some, the stench can be overwhelming when emptying them in an indoor space, but most dump points are outdoors, sono issues.
Black Water Tank:
Advantages:
- With a large tank, one can utilise a proper flushable toilet just like at home
- Can use toilet paper (so if you need much paper on occasion, this might also be the solution for you)
- Limited in capacity only by the size of your tank. A decent sized tank means that you have to stop less often to deal with it
Disadvantages:
- Black water tanks can only be emptied at special sewage dump-points which have the facilities to dispose of the contents
- You may have to deal with other peoples sewage left around the dump-point, some people are worse than pigs (no disrespect to pigs).
- You will likely need a separate large compartment to store stinky dirty (health risk) hoses. You will have to man handle the large hoses, with the risk of splash-back
- The contents of the tank turn into stinky sewage and you need chemicals in order to break down the sludge into a more easily disposable liquid
- Tanks need to be cleaned out regularly so crud does not build up and cause problems
- Internal level sensors are notorious for jamming or failing. Make sure that you have a level monitoring system that is not connected inside of the tank but rather, a sensor that is run up the outside of the tank
- Hoses can get blocked. I recommend watch RV: Runaway Vacation and the Robin Williams scene when emptying their black water tank

Incineration Toilet:
Typically they use electricity or even propane gas and mostly used for home based situations eg the Cinderella. Not sure if there is a domestic diesel version, but it would be a great idea (the perfect solution). There are military diesel toilets eg : Ecojohn, but they are not suited to a small motorhome. Incineration toilets usually require the use of a liner to contain liquids and solids until the incineration process is commenced.
Advantages:
- If diesel, then likely cost effective in its use
- Nothing much to empty but a bit of ash occasionally
- The most convenient of all toilet types
Disadvantages:
- If an electricity or propane model, its going to use up an enormous amount of fuel and not likely viable to operate in a mobile vehicle
- Very expensive to buy
Auto bag-it Toilet:
Advantages:
- Both #1 and #2 go into the same plastic bag
- Cost effective to buy toilet
- Automatically seals the bag once full
- Sealed bag is convenient to remove for disposal
Disadvantage:
- I suspect its going to stink (as the top of the bag is going to be open when in use)
- Special bags have to be purchased from the toiler supplier (possibly not biodegradable?)
- I have no idea how to legally dispose of the full bags. It cannot be legally placed in a garbage bin. If not a biodegradable bag, it cannot be disposed of in a dump-point or home flushable toilet (unless you open the bag and tip out the contents and then dispose of the bag separately).
Composting:
Probably the best all round solution, I have discovered. I like both the 'Natures-Head' and the 'Air-Head' brands. Whilst they call them 'composting' toilets, its likely it would take months for the solids (#2) product to turn into harmless compost.
Advantages:
- The makers claim no smell (because liquids and solids are kept separate). I can believe that (having once been a sewage treatment plant engineer in my younger days)
- Main advantage, is that it needs no water
- No need for a black water tank
- As liquid is directed to the front of the bowl, it is collected in a separate container, and can be disposed of easily. If you already have a black water tank, liquids only can be directed to this tank
- Some people claim they can go 2 months without emptying the toilet (but they put their toilet paper in a separate container (bag), certainly not hygienic and certainly stinky as I have discovered from being on yachts where they sometimes practice the same methods). More likely it can last 1 week for #2 container and every day for #1 container for two people?
- The #2 in its dedicated container is not 'sewage' (because there is no liquid content) and is emptied into a plastic bag for disposal. I'm not sure if its legal to put a bag of #2 in a dumpster, but if using a biodegradable plastic bag, I see no reason why it cannot be dropped into a flushable toilet (hopefully not block it) or dump-point. If out in the bush, it can be buried (responsibly and away from camping locations).
Disadvantages:
- As liquids and solids need to be kept separate, one needs to make an extra effort to train yourself to always direct liquid to front of bowl
- Likely need to wipe the bowl out with wipes after use due to skid marks (no flushing water). Some people place paper mats (you can buy them made for this purpose) over the #2 area in the bowl, to minimise skid marks
- In order to empty the #2 canister, one has to lug the whole toilet through the camper, down the 1.5m ladder (and hope not to drop it on the way). Seems to me, that it would be more sensible to fit a hatch in the rear of the shower/toilet cubicle, so as to be able to slide out the whole toilet and deal with it OUTSIDE the camper, rather than inside the camper.
- As above, one needs to get up close and personal with your #2's
- Need to carry spagnum moss or coconut husk to place in the #2 canister which mixs with the #2 to dewater and dry it out
To be plain about it: If your bowels function well, you don't have irritable bowel problems, you don't suffer from gastric diarrhea a lot and you have firm stools, then this is the likely choice. If however, you need to use lots of toilet paper, then its not likely for you.
Some things to pack, (which seem important to me)
- Chain saw (I consider petrol is best, even though I hate the idea of carrying petrol around),
- Bow saw with spare blades,
- Safety reflective vest, eye and ear protection (PPE),
- Three reflective triangles (for kerbside breakdowns),
- Wet weather breakdown gear (reflective fluorescent jacket with hood and trousers),
- Tools to suit vehicle including 3/4" torque wrench with socket range including for wheel nuts,
- Robust jack and lumps of hardwood,
- Selected spare parts such as a full set of top quality engine belts, some oil and a set of filters (especially fuel filters)
- Some, recovery equipment,
- Outdoor enclosed fire place / grating,
- Recovery boards. I am planning so save some money by using plastic freight pallets. They are likely to be much more robust than the typical 4x4 products I see on the market and cheap as chips (used ones often free). I hope to report back one day as to how they perform.
- Shovel, pick, axe, etc,
- Satellite emergency beacon,
- First Aid kit (and learn first aid),
- Snake bite kit,
- Spare set of spectacles (if you wear them),
- Broad brimmed hats and head fly nets,
- Large packs of selected cable ties, insulation tapes including self amalgamating tapes,
- Inverter power generator(s) ultra quiet,
- Heatshrink kits,
- Pneumatic tubing (different sizes) and a range of fittings such as in-line joints,
- 12/24Vdc soldering iron and solder.
- Wire, crimp fittings, crimp tools and fuses.
Air Conditioning Considerations
When working in the Territory, central Queensland and the gulf, I found (surprise surprise) that 50 degrees C (plus) in the shade with 100% humidity is very uncomfortable and so are below zero (eg: -5C) nights. There are two basic requirements for air conditioning (also see write up on Page 2 detailing the equipment I purchased for the cabin):
- when you are camping (engine not going) for the living module , and
- when you are driving (engine going) for the cab.
Living Module
A living module air conditioner draws a lot of power eg: 3kW, so a very robust power source is needed. Batteries are unlikely to cut it, even with lithium, calcium or other battery technologies, especially if relying on solar PV panels and there is cloud cover for a week.
Vehicle Cabin
Typically an air conditioning compressor is fitted in the engine compartment and usually driven from a rubber belt and occasionally even direct drive and sometimes an electric motor. As most vehicles will already have a heater (from the engine hot water), a reverse cycle air conditioning system may not be required for the cab, so I have gone for cooling only. I have purchased a heavy duty belt driven Sanden compressor, a Red Dot evaporator for the cab and a Red Dot roof condenser (as its the only compact unit I could find that does not foul the roof hatch). It only just fits with millimeters to spare. Note: The R6160024P unit does not include all the innards (only the fan and radiator), you will need to order the other parts such as drier and trinary pressure switch (I'm putting them under the condenser casing rather than under the bonnet as I like a tidy design). Refer to page 2 for details.
At the camp site
Here it gets tricky. There are two sub-scenarios here i.e., when connected to the grid (as in, at the caravan park) or when away from the grid.
The living module air conditioning condenser can be fitted at various locations; on the roof, underneath the vehicle, wall mounted etc. Some prime mover sleeper cab systems can for example appear to tick all the boxes (diesel fuel driven, auto self start/stop to top up batteries, reverse cycle air conditioning), but they don't have the capacity for a larger living module in 50C conditions. Seems that most caravan air conditioners are typically located on the roof (good spot to be easily torn off on the first low bridge or tree branch). They are also going to take up valuable solar panel real estate.
After doing some homework, I have found that the purpose designed RV under bunk air conditioners (eg: Truma) are best for my arrangement.
Low sound level is very important so as not to disturb the ambiance or adjacent campers. The inverter technology is likely best. Need to be able to run the air conditioning all night and not have the generator running flat strap. Generator should be able to run at low revs and handle the continuous load.
Another option is to simply use a common house AC system if you can find room to mount it !! The pros for a house typesystem are: cheap, parts are easily available and the big names have a large dealer base across the country, quiet, powerful, can be run from diesel/petrol generator. The cons are: vehicle vibration could damage the compressor pump but it's possibly worth the risk of having to have it repaired a few times, warranty will likely be voided, need an inverter if running from batteries. They will also look ugly with a large condenser stuck on the side or end of a vehicle and take up a lot of room.
Camper Module Airconditioning - As Installed
After much assessment, I purchased the Truma Saphir RC unit because its the smallest most powerful package to fit into my brownfield camper (under the bench seat). The hardest part was cutting the holes in the floor and not hitting any structural beams. Truma has a good reputation, so I am expecting lots of reliable use. Came with 1 strap, 3 air outlets and 1 large air inlet. Needed to order hose and hose elbows separately. 240V lead does not have a plug on it, so an electrician is required to wire it up safely.
- The first photo shows the remote sensor module at the top and two of three air outlets below it.
- Second photo shows the cutouts in the bottom of the camper, under the seat position. The blue strap comes with the module, but I had to add the green strap to provide stability. There is no hard fix down feature, so straps are the go. I ran a small strip of 5mm foam around the edge of the two rectangular holes in the hope that this will enable a good seal between the module and the floor? May have to replace with thicker foam if it lets air escape into the camper.
- Third photo shows aluminium panel masked up before cutting a big hole for the large air return grill.
Power Source
A powered camping site connected to the grid is the most efficient usage of energy.
When away from the power grid you will likely need to use a generator; LPG, petrol or diesel. I don't like the idea of lugging petrol or gas around. Gas is consumed at a very high rate and petrol gets stale and gluggy after a while. One needs to run a petrol generator regularly to keep it maintained otherwise it can gum up. Gas generators are rare in Australia but common in Canada/US. Trying to find someone in Australia to service a gas generator is almost impossible, and even more difficult to get someone to certify a bulk storage LPG tank (so the owner had to rip it out and use tiny 9kg bottles).
A diesel generator on the other hand is likely going to be safer (due to the potential reduction in explosion risk), last longer, need less maintenance and can be run direct from the vehicles fuel tanks. Inverter generators are strongly recommended as they can provide proper sine wave output to suit electronic equipment, self adjust speed to suit load and are more efficient (less fuel used) and probably quieter. Diesel generators are about twice the price of petrol equivalents, but there is no good reason why they should be quite so pricy. There is certainly a large enough market base for them (the demand is there, but the suppliers are just not interested), possibly because the diesels require more sound insulation to try and make them comparable with the quiet petrol models.
The air conditioner start-up current needs to be factored in when selecting the generator. Generators usually have a quoted average running power level and a peak level (which is only for a short duration). Be aware that the peak level is sometimes quoted. If you don't select the right size generator, the air conditioner might never be able to start. Also keep in mind that when running in a hot weather environment the actual available power will be reduced also. Look for the rated Watts, not necessarily the peak Watts. For me, about 2800 rated Watts is required, even for a small air conditioner.
Noise: In terms of noise there are two sources, the motor mechanical noise and the exhaust noise. SFAIRP you cannot do too much about the mechanical noise as the motor needs cooling air flow other than ensuring that it is a fully enclosed model. For the exhaust, one can fit a secondary muffler and plumb the exhaust up the side of the vehicle to the roof.
Its very important to keep noise to a very low level. Besides being a light sleeper, I do not want to annoy other campers either. I certainly would not be buying a tradies open cage generator as the noise levels are usually severe. Ideally one should be looking for a fully enclosed generator with dBA in the mid 50s. As Honda (EU range) and Yamaha have large distribution dealer networks across the globe, parts and repair shops should be easily available. To give you some idea, a low level conversation is probably about 40dBA. Some other companies quote similar ratings but I don't necessarily trust their specs.
Saw some good statistics recently on the Westinghouse iGen4500. If price is a consideration, I think its better value than the Honda EU30is or the Yamaha EF3000iSE.
Safety Systems
Safety camera systems
You might consider:
- a forward view on both sides for side clearances when creeping past tree branches etc at low speed,
- a top forward view to check height when passing under low bridges etc so you don't rip off the roof or the PV panels, and
- a rearward looking system.
If you are planning on climbing over some obstacles, an underside clearance camera might be useful?
If you want to be a courteous driver, you could consider a dual camera at the rear with independent long and short focus. The long focus allows one to keep an eye on road trains barreling up behind you at 150km/hr so that you can let them know when you will be pulling over to let them pass (they will expect/insist that you get off the tar onto the dirt to let them pass). Ideally this long range camera could be turned on all the time, and the short range pointed downwards for when you are reversing.
Reversing
I once saw someone who was standing behind a parked 4x4 in a car park, and who was struck and injured because the vehicle driver (whilst reversing) did not see the victim nor did the victim hear the vehicles modern (quiet) engine start up. The victim got away with minimal injuries, luckily. I have now fitted a reversing camera and loud truck reversing beeper (negative issue is that it annoys the neighbours) to my Land Rover. It has done me well, as children and adults ignorantly often walk past the back of the vehicle whilst I am reversing. I have done the same with the truck but this time have purchased a truck white noise (quacker) version which is less annoying to neighbors.
Emergency Strobe or Beacon Lights
Orange/amber strobe warning lights can be a useful safety item when coming across an accident or having broken down yourself. They are typically used as a light bar on the roof of emergency trucks including tow vehicles. The best brands are usually those used by the government agencies (but are very expensive). Go and have a look at your local cop shop highway patrol car to obtain the manufactures and models. Its a choice between very expensive and good longevity (and high availability), compared to cheap and likely short longevity. By buying a lot of separate cheaper lights, you can possibly improve the overall availability to something like the high quality units. I have found that the cheaper LED light units I purchased from China don't last many years.
Its illegal to use any colour other than orange here in Australia and to never drive with them running. In fact only certain vehicles can operate them at all. Basically, it is illegal for a private individual (such as myself) to ever turn one on whilst in the public domain (roads etc). However, the NSW Vehicle Standards Information sheet publication 10.366 dated 24 Nov 2010 advises: ' The light does not have to be removed when the vehicle operates in non-hazardous situations but it must not flash.' it also states that 'Examples of vehicles which can be fitted ... are: Volunteer vehicles not accredited by the State Rescue Board.' Make of these what you can. But I would rather have a light fitted just in case its needed in an emergency, and pay a fine if I have to.
If you do intend to fit one, best to have an indicator switch in the cab, so you don't miss leaving them on whilst driving. Check your local state laws about their usage.
Condition Monitoring
Even with a militarized commercial engine and transmission, its still a very good idea to monitor the various critical systems. There are many add-on engine management systems available on the market. They seem either cheap and dodgy or laboratory quality and very expensive (overkill).
Temperature Transducers
The higher temperature transducers are either thermocouple or RTD type. As we do not need precise accuracy (a couple of degrees either way should be fine), a thermocouple is ok. The most common and cost effective thermocouple is the K type as it covers a very wide range typically -300 to 1250C (hence it will do everything). Note that if you are extending the cable (as it forms part of the thermocouple), you must use compensating lead. To use copper can cause inaccuracies. Even the jointing of the wires would normally be done using compensating terminals, though I have found that its not needed for our accuracies.
Lower temperatures are often done with negative coefficient thermistors (oil, water etc).
I consider the following functions important to check:
- engine oil temperature,
- gearbox oil temperature,
- differentials oil temperatures (manually using thermal gun),
- hubs oil temperatures (manually using thermal gun is ok for me),
- exhaust gas temperature,
- engine water jacket temperature,
- engine oil pressure,
- air inlet manifold pressure #,
- Tyres pressure,
- Tyres temperature.
Most engines (in general) are de-tuned by the vehicle manufacturer to make them semi idiot proof. If for example you bypass the turbo safety limits, you should fit EGT and turbo pressure monitoring to help ensure that you don't exceed the manufacturers general design limits.
# Turbo manifold pressure is normally implemented via an analogue meter as this parameter is quite dynamic and difficult for human interpretation using a digital meter. Temperature monitoring of hubs and differentials could help to detect a failing bearing before catastrophic failure. However, presently I just use my hand or the IR meter to compare temperatures. If they are all the same, then probably no issues (expect the front hubs to be fractionally warmer than the rear, as the front do most of the braking effort). Investing in a contactless infrared meter is a sensible way to go, as by this means, you can check all of the drive train components at regular cycles and write the values down in a log book. If you see one going up over time, it might mean a problem that needs looking at? Catastrophic failure of a bearing is not something you want to happen, anywhere, especially with a large non standard vehicle, so I cannot strongly recommend enough, the importance of regularly checking non monitored drive train component temperatures after every long run.
Madman EMS-2
I used the MadMan EMS-2 monitor. To date, I have connected the following parameters (because they were easy):
- Engine oil
- Gearbox oil
- Coolant level
I have fitted a standard 1/8 NPT VDO temperature sendor to the gearbox via the forward drain hole using an adapter. The EMS-2 has a standard calibration curve for a standard VDO sendor, so thats easy to set up. Best to get the same model sender that MadMan nominate, otherwise you will have to program the temperature vs Resistance curve for another type of sensor.
Engine oil access was a bit trickier. I accessed engine oil temperature from one of the oil filters M10x1mm drain plug (because its easy access). I will likely take engine oil pressure from the other oil filter drain plug one day? I used the VW coolant sensor (LT 027919501) as its the only short barrel M10x1mm thermistor sensor I could find easily available (used in dozens of different vehicles). Because its so fragile, I used copper washers with 'O' rings built into them to seal against the filter canister. My previous attempt to tighten one up using just copper washer, ended up in shearing off the brass sensor. Luckily an 'easy-out' was able to remove the thread left in the filter canister. The EMS-2 needs to be programmed for this sensor curve. After much work, I eventually found the right curve (there are hundreds of different curves). I programmed in 6 points across the curve (should be enough). Today the temperature ranged from 10 to 18C, and the display was within a few degrees of actual, so I know its ok at the low end. If I find its not too accurate at the higher temps, I can adjust the calibration by comparing temp with the IR heat gun and measuring resistance. Of course, the best way is to use a water bath and do your own curve before you fit the sensor (I'm lazy and did not bother).
Note: Its important to run a negative wire to each of the sensors, as the casings earth returns might not be solid. The gear box for example might not be sufficiently well earthed and this may cause intermittent results. The below photo shows a method of earthing the oil temperature sensor. Its a ring lug and a few copper washers to ensure that the earth is available for the sensor return path. You will likely need to run one wire for the sensor and one wire for the earth.
After a couple of years searching the internet for a practical, compact, reasonably priced multi input, reliable monitoring/alarm system, the most suitable product I have found, is the USA made 'Auber'. Its very small and I have had one on test with EGT for about 6 years now in my Land Rover (which has very stiff suspension and truck rated tyres) and no issues found with vibration, accuracy or reliability. At ambient, mine is only a degree or two out, but that's dependent on the quality of the transducer probe (usually K-type thermocouple). Auber also sell a dual channel version (see photo). This particular model has a kit for EGT and boost pressure. I selected two different colours so I could easily distinguish the two displays without having to think about it too much. Whilst boost should normally be an analogue meter due to the usually fast changing dynamic, in this case the turbo is not vary fast to spool up.
Note: I don't see the need to pick up the turbo temperature at the turbo inlet side (as some would argue), because eventually the whole thing equalises in temperature, and we are not running up near the limits and its not a racing car. In my case I tapped the insertion probe holder into the turbo exhaust casting on a flat spot seemingly designed just for this purpose. The advantage is that I did not need to drill the turbo casing nor the exhaust manifold.
This module requires a bit of programming. There is a 'Quick Guide' on their web site, it makes things easier. Note: I had the thermocouple wires reversed, and when I saw the temperature going negative, I knew what I had done. Temperature programming is easy, but Pressure is a bit tricky, as you may need to zero out for the local air pressure where you are based. Pressure sensor needs 5Vdc (from the display unit) and has an output of 0.5Vdc at 1 atmosphere (engine not running). Note: You will highly likely need to connect the terminal (8) for dimming (can also be done manually from the front panel) to the headlight circuit (otherwise its blindingly bright at night, as I recently discovered).

Dash Lights
I thought it a good idea to replace old incandescent bulbs in my dash with LED versions (better longevity, less current, brighter, pure colour spectrum). It was a mistake.
Just tried the dash instrument lights at night. They are all fine for daylight viewing, but at night the cab is lit up like a Christmas tree, affecting my night forward vision. The only dash lamps now remaining as LED, are the green gate indicator lamps. I need the brightness so I can clearly see them on the brightest day. Relay 17 is meant to tone them down at night by means of an inbuilt resistor, which is suited to dim the incandescent version lamp. But LED lights are not very good at being able to be dimmed and the resistor value is not sufficient to dim the LED lights I put in. I have removed relay 17, and hardwired a new relay to switch in a custom resistor (about 10k Ohm from memory) to dim the LEDs appropriately at night. Just about right now.
Portals Temperature
I keep hearing stories of oil being sucked past seals and into the diff, thus starving the portals of oil and then the resultant self destruction. Various Facebook posts have been published on ways to monitor their temperatures. So far my portal oil levels have not changed.
At the moment, I just use the thermal IR gun and walk around and touch the hubs after a long drive to compare temperatures. An interesting hardwired product recently mentioned, is the Engine Guard EG01-2 product. Each kit has 2 sensors and a monitoring module for alarm warning. On the face of it, this seems a very interesting product, as the sensor can be fitted under a small bolt head on a hub. 2 kits will do the 4 portal hubs. Whether it can be relied on, to save your portals, I do not know.
Oil temperature - General
Oils need to be maintained within a strict temperature range. The combustion process produces water and the intake air of course has water vapor in it. This finds its way past the piston rings into the crank case oil and causes corrosion of bearings etc. In order to avoid the problem of water (condensation) oil needs to be above 100C (to drive off the water) but not too hot so as to break down early. According to blurbs on the internet, the ideal range is between 110C and 126C. Its a very tight range to try and manage, so make of this what you will. In fact the only real control over oil temperatures (unless you go high tech) is your driving manner and simple monitoring systems will enable you to maximise the longevity of your investment by driving appropriately.
Radiators and heat transfer
In the design, if you plan to tweak the power plant, you might need to consider and allow room for a variety of additional retrofit radiators, such as:
- engine oil
- gearbox oil
- turbo intercooler
Door Latches
First off, I fitted a Heavy Duty Rhino wireless 24v central locking (via motors) and alarm/immobiliser. The Rhino system has the usual rolling code technology etc.
A definition for the purpose of this section:
- Latch/unlatch: To release the door so that it can be opened by hand with a key from the outside.
- Lock/unlock: An additional level of locking that would prevent anyone opening a door irrespective of having a key on the outside. This is achieved by sliding the red lever on the door up and down by hand when inside the cabin. Probably to stop an attacker simply opening the door on you, because the stock outside door handles have no locking ability (no key lock).
There appears no way to make the mechanism able to be locked/unlocked by means of a vertical pull rod to a motor actuator However, if you do want to latch/unlatch the door latches via central locking motors, a rod connection point needs to be welded to each of the existing mechanisms. See photos below. First attempt was at 90 degrees and was wrong as it pressed against the window guide. Had to cut off and re-weld it parallel. Now all installed ok. But here's what I found:
- The door latches are not suited to being motor latched/unlatched, as they are too stiff. With my latching mechanisms, I need two hands to unlock/lock the passenger side but can do the driver side with one hand. I've no idea why one is so stiff. In any case, whilst the motor on the drivers side can intermittently operate the driver side, there is no way it has enough power to do the stiff passenger side. Thus it was a waste of money, unless I replace the door mechanisms with new ones (which hopefully would slide more smoothly).
Note: The new Febi modern replacement key lockable door handles need the key to open the door. It is not possible to lock/unlock a door and simply push the button to open a door, the key always has to be used. Now it may be, that a version of the handle exists which can be operated without a key when needed, but I never found one. In retrospect, it was not a good idea to add central latching, here's why:
- The latch mechanism does not release the door but simply provides an additional level of locking. As I still have to use a key on the outside to lock/unlock the door, it was a pointless exercise to install central latching. I have disconnected the pull rods but left the actuators in place. They make a satisfactory thud every time I remotely alarm/un-alarm the vehicle, but that's now their only purpose. Was a waste of time and energy.
Tyre Monitoring
A solid state digital tyre monitoring system is a must. In-cab centralised tyre pressure/temp monitoring systems are now cheap and easy to install and two options are available: sensor is inside the tyre or the sensor is on the outside of the tyre (screwed onto tyre valve). They are an invaluable product for warning of tyre pressure problems and over temperatures. Also, its highly unlikely that you will be able to obtain a replacement tyre of the right match and quality off the shelf, and especially in the middle of nowhere. Its worth also monitoring the spare wheel(s) to ensure they have not gone down over time. Reminds me that one day I had better check my spare on the Landrover, after not looking at it under its cover for about 15 years. I know its got some air in it, as I give it a whack ever so often to see if its soft. Still hard. Goes to show you that flat tyres are almost a thing of the past, at least on tar roads.
Here's my assessment:
1) Inside tyre sensors
Advantages:
- Protected from damage.
- Normal flow rate when adjusting pressures.
Disadvantages:
Sealed (battery normally not replaceable) and item need to be replaced when the sealed battery expires. This means removing the tyre (very big job in my case). However, if this is every 5 years, it might be a viable option?. However, as my wheels have military run-flat inserts, this limits me to the external types of sensors, as detailed further below. Probably not suited to wheels with bead-lock inserts either.
2) External to tyre sensors
In-line version and end of cap version.
Advantages: Cheaper than inside sensors. Battery usually replaceable and easily replaceable, but generally needs to be replaced every year. In-line version does not need to be removed to adjust air.
Disadvantages: If you have rubber valve stems you should probably change them to metal, as rubber can allow the sensor to flop around potentially causing damage to the sensor and a leak. Capped version needs to be unscrewed to adjust air pressure, are assigned to a specific tyre and can be mixed up. It may take the monitor a while to display the pressure after the sensor has been disturbed. Someone can steal it easily or it falls off (and with the in-line version, your tyre goes flat) In-line version is exposed compared to the capped version (as it sticks out a lot more), and can restrict air flow.
Other options to consider:
- absolute pressure measurement (safer and easier to use), or
- calibrate yourself (risky and a hassle),
- real time monitoring (picks up problems asap),
- low battery alarm. Systems that don't monitor their own battery voltage wait until they are no longer receiving input from a tyre sensor for a period of time before warning of a problem. I have read of one product that takes 45 minutes. This is a worry as you might have no monitoring for that period.
Future needs. Do you want to fit your spare wheel(s) with sensors and also allow for anything being towed? If intermittent towing, perhaps best to carry some spare external sensors so they can be quickly screwed to any as-hoc trailer or caravan you decide to tow. A commercial system for large trucks is likely to be the best as should be designed to provide a good signal strength and they often have options to add additional wheel sensors.
I ended up buying the B-Qtech 6 wheel sensor set (from Amazon US). I fitted the four wheels, one on the spare wheel (and one as a spare). I checked the temperatures displayed for each tyre with my infrared gun and they were within 0.5C, that will do me. Pressures are sufficiently accurate for me also. For a while it was in permanent alarm mode and I could not figure it out. I thought it was defective, but I eventually condescended to reading the (poor) instructions and eventually figured out that one needs to enter the actual tyre pressure (as displayed) for each tyre in the alarm settings. Once I matched them up, the alarm stopped. Seems to be working ok. It will be a hassle to have to re adjust the alarm setting whenever I change tyre pressures, buts that's life. I also purchased a set of de-flator screw on valves. I have pre-set them to 25psi for the moment. That all work ok, and save time by not having to hold in the valve by hand.
Fast-flow/fill valves could also be useful also, especially if you need to fill a flat tyre in order to re-seat it or if you are often adjusting tyre pressures (but you would need a veryyyy big reservoir added, to be able to take advantage of these valves).
Wider Access Steps
I chopped up some stainless fuel tank plank steps. I also welded Unistrut rail onto the existing steel steps so that the stainless steel planks could be screw mounted on top of them. A motorised 3rd step would be the most sensible option here, but the only viable fold down step is long out of production in the US and no one makes anything suitable for a truck (I mean a real truck not a pickup). The next best thing is a cable step, as it will flex on encountering an object (or at least that's the theory). The real deal are expensive and not easily available in Australia, so I have made my own using conveyor belt rubber to hang from the existing lower step. This lower 3rd step arrangement (whilst flexible) is far from ideal however, because its likely that when crawling over a boulder or such, the first thing to touch after the wheel rolls over, will be the lower step and mudguard. As I have had to fix the mudflap to the lower step (in order to pull the rubber flap away from rubbing on the tyre at full lock), and the arrangement is now too stiff, it will likely to be wrecked on the first obstacle I crawl over.

The above picture shows the three steps. The lower one being the flexible hanging step. The 20mm (2 layers) of rubber hanger was too thick. I re-hung the lower steps using a single 10mm sheet as per below, and its still quite sturdy.

Paint Schemes
The ex ADF platforms here in Oz come with the traditional camouflage paint scheme to suit the Australian bush environment. There are lots of web sites providing information on colour codes for those who want to match up correctly. The paints used (at least in Australia) are made to special formulas in order to reflect Infra Red light. The main paint supplier is Protec. They supply the 601 series Camouflage Enamel to APAS-0165/1 . Protec advise that their 342 series is the standard domestic automotive formula and there are no restrictions on buying it. However, if you want the proper military paint with all the high quality materials, its the 601 series, and almost impossible to purchase without a military purchase order. On the down side, in a breakdown scenario in the middle of nowhere, its probably not a good idea to have a vehicle which is difficult for the rescue services to find using infrared.
The following are the Protec domestic codes (not infrared light reflecting):
- 342-5726 - Camouflage light Tan
- 342-5265 - Camouflage tan (brown in actuality)
- 342-1166 - Camouflage Green (likely the origional Olive Drab?)
- 342-7165 - Camouflage Black.
- 342-5239 - Camouflage Pilbara Brown (more like a dark red). Not used on Unimogs to my knowledge.
Dark colours can cause heat problems. The outside of a dark vehicle absorbs sun heat easily and re-radiates it back into the vehicle compartment's.
I have decided on plain enamel . Its not the most robust paint (quite soft unfortunately), but it makes life easier to use, as I am doing my own painting. I've gone for white colour scheme on the body and slide-on camper. Chassis will remain olive drab. I painted some of the underside chassis etc with a brush. The finish is not so nice, but at least I don't end up with overspray all over the place.
Warning: the original polyurethane paints used by the military can be dangerous to your health (vapours including sanding dust, certainly made me feel sick). Make sure you are wearing PPE respiratory protection when working with this type of paint (or any paint for that matter). I see no point in sanding off the existing paint where its well adhered. Its a very hard paint, and a good base for other paints. Just make sure you give it a light sand and degrease before you paint over it.
Steering Wheel
With an air ride seat fitted, there is little room left under the steering wheel for the legs and the wheel may become too far away for comfort. Took a while to find the right combination of parts. I purchased a Freightliner 18" wheel and a 5 bolt alloy Freightliner truck extension hub to suit. Ordered them direct from the USA. With this combination, I can reach the wheel comfortably and my knees do not touch. Note these parts must be a heavy truck rated/designed and not the flimsy stuff used on sports cars etc (even if they look similar). Remember that in the event of steering pump failure, it requires an awful lot of force on the steering wheel to drag the wheels around at low speeds and a car style steering wheel will likely just crumple in your hands (not something you want in an emergency, plus you may not be able to source a replacement for a while). My wheel column has 36 splines at 24.5mm diameter. Note: I needed a wheel puller to remove the original steering wheel (they are available on ebay for about $20).
Filters
- Main Air - MANN C27 585/3
- Oil cartridges (two) - MANN 932/4x
- Fuel (two) - MANN BFU 700x
- Steering - MANN H 601/6
- Cab air - MANN CU1836. This one is very expensive for what it is, due I assume to the rarity (perhaps no one bothers changing them, so production quantities may be low?). As an interim measure, for the spare, I have used a local reasonable priced alternative product from Ryco (model A268 (A92)). It will not have the same air flow, as its not as deep. One has to fit a cover plate over it to block the open end. I did this by reusing an old MANN filter end cap by cutting off the filter mesh part, flattening it out slightly and turning the plate facing the oppose way to seal against the Ryco filter. Works fine, see below.
Oil Capacities & Drain Plugs
A very experienced BenzWorld.com member advised me to first replace all oil drain plugs with good magnetic ones. This I have done, in fact I have put magnetic plugs in some fill holes also. Two good brands with reputedly strongest magnets are: 'Dimple' and 'Gold Plug'. Here's what I have measured and purchased to date:
- Portals measure as M18 x 1.5. Gold Plug AP-05.
- Engine sump measures as M26 x 1.5 and gearbox measures as M24 x 1.5.
- Differentials measured as 24mm x 1.5 tapered plug with 14mm female hex socket. Dimple M24 x 1.5 tapered see below (blue product).
- Main gearbox case has 3 plugs (same plug as differentials). Two are drains and the highest one is the fill. I measured as 24mm x 1.5 tapered plug with 14mm female hex socket. Dimple M24 x 1.5 tapered see below (blue product).
- Clutch/PTO case has a fill and two drains. Note: There is also an inspection plug below the clutch bell housing which should be checked every so often for seal leakage issues.
Don't take my word on the sizes, check them yourself.

With the steering oil, I ended up using Dexron II. Hard to get however so I'll go with Dexron III next time (its a better spec).
I initially used Nulon full synthetic GL-5 in the gear box. I was having trouble getting 5th and 6th without double clutching. GL-5 is apparently not suited for the synchros, so I soon changed to a GL-4 and went for Castol Syntrans 75W-85 which complies with MB235.4.
My remaining GL-5 is used for the portals.
Pneumatic System - General
One of the important things to do with an old vehicle like this without an air dryer, is to check the air system, as its sure to be full of gunk (if mine is a typical example). The vehicle relies on a clean reliable air supply, so the tanks, valves and tubing etc need to be clean. There are 3 reservoirs (2 high pressure, and one low pressure) that needed cleaning out. Tanks may need to be de-scaled and ideally sealed against rust (I used Red-kote and surprisingly it worked great). Note that it binds with rust but does not like sticking to shiny smooth surfaces. All the tanks inside surfaces were surface rusted, and it seems to have sealed the insides quite well. Only risk I can think of, is that if any of it does peel away, it could start to block regulators etc. Time will tell. I sealed my tanks by:
- Removing tanks and stripping them of fittings,
- Added a handful of old screws, nuts bolts etc inside, shook violently to knock off rust scale from inside, then emptied out,
- Flushed with petrol to remove oily residue,
- High pressure blasted inside with water and detergents,
- Dried out,
- Coated inside with Red-Kote,
- Cleaned threads of any Red-Kote before it dried,
- Removed all external surface rust from stone chips, sanded and repainted outside.
I have added another auxiliary air tank under the cabin for: air horns, air ride seats, pneumatic mast etc along with manifolds, regulators and control valves.
If your vehicle is like mine, a significant number of the air line olives will be frozen (corroded) in place and will not be easily separated. I had to be patient and use penetrating oil. When refitting the olives, I'm using Loctite aluminium based anti galling thread compound on the olives. Be advised that its easy to damage sealing surfaces and some replacement parts are next to impossible to purchase. Most of the air fittings on my vehicle are Voss brand.
Compressor Output
The piston compressor on the ADF vehicles is belt driven. Its a nightmare to change the belt, not a very good design when the air system is so critical. Some claim its reliable, some claim its not. Unlike the rotary compressor typically used for cabin air conditioning which has a clutch in it so that its not being driven all the time, the vehicles piston compressor is being driven all the time the engine runs, thus its not going to last forever. There is an optional direct drive piston compressor which (in theory) can be fitted to the side of the engine by removing a cover plate, but I don't believe that there is room for it on this vehicle. I will stick to the belt driven version (the military boffins must know what they are doing!). The output from the piston compressor is quite high (about 1.8MPa). The vehicles high pressure system needs to build up to about 1.2MPa before the park brake actuators (connected to the low pressure system) will release. The belt is long, and to remove some of the slap I had to increase the tension and added various a small 40mm idler pulleys combinations. Re-tensioned and re-alligned pulleys 4 times and the vehicle is not even on the road yet. But its still not right. The belt still vibrates and slaps on occasion. In the end I took all the idler pulleys off the compressor belt, installed a much shorter belt and tensioned it up tighter. It now requires a crow bar to lever the belt on (one extreme to the other). Works a lot better now, no slap, but does pulse (but that's to be expected on a reciprocating pulsating load). Possible downside is that the belt and or compressor bearings fail early due to the extra belt tension?
Regulated Air
The air from the compressor is regulated down for general use on the vehicle. There are dual reservoir tank systems. One system is regulated to about 700kPa and the other about 900kPa (not sure why they are different?).
On my vehicle, most of the small air fittings with olives are Voss brand. One of the Tee fittings was cross threaded and needed replacing. I spent many hours communicating with dozens of companies around the world in order to try and find someone who will sell small numbers of these fittings. It has an M12 x 1.5 thread which is usually used for the pressure measurement points. I used one of these connections as a convenient place to tap off for the tyre pressure system. Difficulty is, 12mm is an uncommon size, and I cannot find a isolation valve to suit. I ended up using an aluminium adapter. Only time will tell if its up to it on the 18Bar system (if it goes, it will probably go with a bang)?
Braking System
Master Brake Actuator
The master brake cylinder is controlled by an air actuator (air over oil).The air actuator is controlled by pneumatic valves which are connected to the brake pedal. The Master Brake Actuator will need checking as air actuator cylinders are places where muck tends to build up. I have removed the air actuator from the brake hydraulic master cylinder. This can be done in theory without disconnecting a hydraulic line. Don't forget to support the hydraulic cylinder if removing from the air actuator or the metal lines might kink.
My air actuator is a Wabco part 421 517 082 0. The repair service kit seems to be part 421 517 001 2.
When I separated the two cylinders from each other (air actuator and master hydraulic cylinder), about a cup of hydraulic oil spilled out. This indicates to me that oil has leaked past the hydraulic piston seals hence, the hydraulic master cylinder may (one day) need an overhaul. I have purchased a service kit (about 175 Euros). I will probably leave overhauling the hydraulic cylinder to the experts, as it might need honing out.
After pulling down the Wabco air actuator, it was in good nick, with no signs of corrosion. I only needed to clean, spray paint the slightly rusted mating surfaces, grease up with silicon based grease and fit a new 'O' ring before reassembling.
Pneumatics & Braking System
Park Brakes
Park brakes are only on the rear. One of mine was not working (jammed OFF). I only noticed from an underside inspection of the piston shaft position. The parking brake lever device on the hub is spring loaded, so watch out when the pivot pin is removed, as the lever will fly towards the wheel direction. I put a piece of timber between it and the wheel to soften the shock as it sprang across, and to keep the park brake on. Be careful with disassembly of an actuating cylinder, as there is a bl**dy large and dangerously powerful spring inside. As I dismantled my first unit, it exploded apart on undoing the last screw. Good way to get injured. I should have looked up the diagram before pulling it apart to see what's inside. I recommend a hydraulic press for disassembly and re-assembly.
As can be observed from the photos, I found rust impregnated greasy gunk inside one, and dry surface rust powder inside the other cylinder. Both are different designs and brands, and all components different (nothing the same, except the ball bearings and outer rubber boots). One is Wabco (a newer design) actuator, it uses a rubber 'O' ring to seal the two halves and the cylinder bore is coated to resist corrosion. The other is an older June 1986 GrauBremse (likely original, part 344 016 001, DB 009 420 6818), uses a paper gasket and the cylinder bore is zinc steel.
I thought the Wabco unit was in disgusting condition inside, until I opened up the original GrauBremse unit (was a shocker). I have tried to buy the service kits. No one seems interested in selling me an OEM version, and the Mercedes kit for the Wabco unit was too expensive for a few bits of plastic. I did without the service kits, and refurbished as best I could. I would have liked to replace all the rubber/plastic wear surfaces, but re used them. They seem still serviceable (just), and with the newly installed General Pneumatics air system Dryer/Filtration kit, there should be no gunk build up in future. I bought a Viton replacement 'O' ring easy enough but re-made the paper gasket for the GrauBremse unit. Both have surface rust areas inside the cylinder walls, allowing the piston to stick. I tried Red-Kote inside the cylinders (because I had some left over from sealing inside the air tanks) but it was a BIG mistake, because it is a flexible product and is not hard enough. I had to remove it (not an easy task) before I hand honed the insides to make the bores smooth and then clear epoxy coated the inside bores. The risk with painting the internal components and epoxy coating the internal bore, is that the coatings break down over time, wears off and gums up the air bleed vent aperture which is only about 2mm diameter at best. For re-assembly, I had to organise a mechanic to compress the two halves (due to the large spring inside). Not worth my buying a hydraulic press just for this one off purpose. For testing, I was able to control the park brake actuator pistons positions finely to any position, by adding external air to the park brake reservoir using a needle control valve to adjust pressure/flow. See 12th photo showing temporary brass needle valve at bottom of photo used to regulate air flow to check park brake actuators slowly.
If I had enough money spare, I'd replace them with new, as they are such an important safety component. Risk with these park cylinder's, is that if a hose blows off at speed, the wheel will lock up, and potentially, there goes a $2000 tyre with a deep flat on it. You don't want them to jam ON nor jam OFF. Note: If one is jammed ON (or needs to be disabled for towing for example), you can release it by striking the shaft with a lump hammer. Read the manual before doing this, as its tricky (I've forgotten the procedure myself).
Master Brake Actuator
On pulling down the air actuator, it also had greasy rusty gunk that had scoured the insides but not as bad as the part brake actuators. I epoxy resin relined this also and repainted. So far its held up the past 5 years. What I did find on disassembly, was some hydraulic oil between the master cylinder and the actuator. This means that there is a minor leak in the master cylinder seals (wear).
Brakes - Pads
All hub discs are ok for a while yet and front brake pads are ok (10mm left on them). Discovered that one of the rear pads compound had mostly disintegrated, leaving the metal backing plate squewed and partially jammed (see first photo below). Luckly it had only recently happened so no damage to disk. Tricky to get the pad out when in a mess like this.
When setting up, according to manual (G 603 page 127) there are two adjustor screws. The outside one needed penetrating oil for a day before it would budge (worth waiting before risking forcing something). See the second and third photos below showing the hex key in the adjusters). The adjustment screws actually worked and wound the pistons sufficiently inwards to get the old pads out. The disintegrating jammed pad could only be removed by chiseling away at the remaining compound, in order to remove the backing plate. Luckily no damage to the disk.
Conclusion: The pads were clearly old and had not been replaced for a long time I'd guess. The opposite side that had not disintegrated had delaminated from the backing plate and was not far from coming apart also. The sensor wires had broken off hence no warning light on the dash. Note: Pad wear warning system is not fail-safe design, and not designed to warn of catastrophic failures. It pays to check the entire braking system from one end to the other with these old girls. Clearly, whilst the army had done a lot of maintenance over the years it had missed inspecting this wheel for a long time. In fact this whole wheel hub needed much more work than all the others in cleaning it up, repainting etc. This, combined with the condition of the park brake actuators means I had to check almost everything, as some parts might not have been refurbished/overhauled since the vehicle was built?
Hydraulic Jack
The military standard jack (if you are lucky to get one) which comes with the vehicle (drab olive green shown on the left below) is sticker rated at 10 tonnes, but built like you would expect a military piece of hardware, and very heavy. My cheap back-up jack (small blue one on the right) with yellow extension tube, is supposedly rated at 12 tonnes, and has pneumatic option as well. The Mil Spec green jack shows up my cheap blue jack as being a relative toy in comparison. The green jack is now starting to leak oil around the base seal. The manufacturer of these Unimog jacks is now called Andrew Engineering (Melbourne). They don't sell the seal kits any more, and were not interested in providing any details of the seals. I am told that any large company that does jack rebuilds will have the right seals. I suspect it will be an expensive exercise if I ever can find a company on the south side of Sydney within cooeee.
Compressed Air Dryer/Filtration - Kit
As earlier mentioned, I wondered why everything in the air system was gummed up with fine rust and greasy rusty powder and goo. Answer: There is no filtration or auto water removal system !!! I guess the military wanted simplicity with less things to go wrong. This dust/rust/oil/water mix however, does eventually damage/wear-out seals (eg: parking brake actuators) by making a grinding paste and can block fine holes such as in the air regulators, causing failures. After making enquires under freedom of information, I found that a bolt-on filter/dryer kit had been designed/purchased but not installed. Apparently the ADF were having too many system failures (the vehicles were becoming unreliable and maintenance costs were rising) simply because drivers were not very good at bothering to regularly flush the air tanks. So they had a company design and build a modern auto flush system in the form of an add-on kit. The special ADF retro-fit Air Filtration/Dryer kit has been purpose designed for the U1700 (435 series). Quite a number of kits were supplied to the ADF for use, however, before they could fit them, it appears that the ADF may have gotten wind that the fleet was to be replaced and left them in storage.
I discovered that very few had been released for auction, rare as hens teeth at the time. But I managed to acquire one for $550, (a bargain), and installed on my truck using the photo on the side of the box as a guide. Anecdotal information from the original supplier is that they probably cost the ADF at least $3k each and likely a lot more. Based on what I know of the process to develop such a unit for the military, with all the hoops that have to be jumped through (prototypes, failures modes analysis, etc), I'd have to assume they would have cost more like $5k each?
The kit includes an adaptor plate, wet tank, filter unit and an auto water dump valve system with a timer and all fittings. Its a comprehensive kit with all parts included, requiring only a few basic tools (spanners, shifters, screwdriver and hacksaw or pipe cutter), and one can even install the system roadside. In essence: remove the existing air tank located under the drivers position, bolt the adaptor plate on to the chassis rail using the same mounting holes, refit the air tank to the plate, then fit up the additional wet tank and other parts to the plate, run the included pre-terminated cable up to the cab circuit breakers, connect the wire to the recommended circuit breaker (i.e. a breaker or fuse rating to protect the timer wiring) and cut into the existing 18mm main air pipe. Note: When viewing the below schematic, the two pop-off vents are located just below the blue arrows.
The filter unit is a coalescing type, so unlike most (if not all) other types on the market who use replaceable cartridges, it does not need to have anything replaced when it fills up. It automatically flushes away the waste. This system saves against having to manually drain the tanks every day. I do recommend this kit as it has kept my air system sparkling clean from crap and water since I installed it. The kit comes essentially complete with everything including the solenoid cable and all the fittings to suit the 18mm high pressure line, in order to divert the air through the filter system via flexible braided hoses supplied in the kit. The photo shows two standard fittings used to break into the existing 18mm steel line. Also note that the kit contains two shuttle valves and when I got mine out of the box and installed them, the shuttle valves were sticking (so the system did not initially work). This is to be expected after sitting in a box for a number of years unused. I just needed to free up the moving parts (the existing grease had dried out a bit) in accordance with the ADF draft Light Repair manual procedure. Its been trouble free ever since. Whilst the entire kit is no longer available from the manufacturer (and was never available to the public), a service kit is currently available from the manufacturer (General Pneumatics, now trading as 'GP Truck Products' in Victoria) for the two shuttle valves (one kit per valve needed) and which includes new O-rings, seals and some grease. But its unlikely this service kit would be needed for many years of operation (if ever, in my view).
WARNING – COMPRESSED AIR MAY CAUSE SERIOUS INJURY OR DEATH AND ONLY PERSONS WITH THE APPROPRIATE COMPENTENCY SHOULD ATTEMPT TO CARRY OUT INSTALLATION OR MAINTENANCE WORK.
Background: This compressed air filter/dryer retrofit kit is manufactured for Australian Defense Force (ADF) U1700 Unimogs. The kit is excess unused stock purchased from the ADF via an intermediary auction house. The kit suits U1700 435 series and likely other models as well. The kit comes with the manufacturers maintenance instruction manual (pamphlet) and parts list. The air filter/dryer system is installed between the air compressor and the braking system, i.e. on the output of the compressor. The equipment is intended to filter out a portion of water vapor, oil vapor, and other contaminants. This may help prevent freeze-up during the winter, corrosion of steel, the gumming up of equipment due to oil carryover from piston compressor and may extend the life of air valves/regulators and pneumatic cylinders on the truck. Most trucks use ordinary replaceable desiccant cartridges requiring regular changes of the cartridge, and according to the manufacturer this kit was designed in collaboration with the ADF engineers and the Australian company ‘General Pneumatics’ to be robust, automatic and needing minimum maintenance. The kit includes a wet tank, a Dumpmaster 500 (coalescing) filter, two electronic ‘non block’ auto drain shuttle valves and fittings to provide a total air system filtration, according to the manufacturer. The complete kit is no longer available from the manufacturer however, some maintenance components should still be available. The shuttle valves and the filter unit do need some regular minor maintenance, but I've had no issues since I installed mine years ago. So long as you continue to hear the pop-off of the air flush about every 6 minutes or so, then its set and forget.
Mode of Operation: The air from the compressor flows first into the wet tank where any slugs of water should collect at the base. The air then flows out of the wet tank into the coalescing filter unit where most remaining water vapour is removed and which should collect at the base of the filter. The significantly dryer and cleaner air then exits the filter unit and flows on to the main pressure regulator (dump valve). At approximately 6 to 10 minute intervals, the shuttle/ejector valves both pop open for a short time and dump a small amount of air to atmosphere carrying away any water that has been collected at the base of the wet tank and/or the filter unit. Note: The discharge of air makes a loud popping sound which can startle.
Servicing/Maintenance: Maintenance (ejector service kits) for the ejector shuttle valves, should be still available from General Pneumatics, now trading as GP Truck Products in Victoria; https://gptruckproducts.com.au/ This writer understands that shuttle valve ejector service kit XD-102 is still available (https://gptruckproducts.com.au/?s=xd-102&post_type=product).
Note: The 3rd tank (under the cab) is not fitted on some Unimogs. It is a tank for ancillary devices. This 3rd tank is optional and not necessary for the filtration kit to operate. In fact, it is in the way of the filtration kit, and the adaptor plate allows it to be moved further forward, in order to fit the new wet tank. The 3rd tank is also a convenient place to pick up a low pressure air source in order to operate the shuttle valves.

What's in the box:
Photos below, are examples from the maintenance manual showing the level of detail.
Cab Security
Its apparently illegal to leave a vehicle unlocked and unattended for more than a set time period or distance, in Australia. So I replaced the door handles with key locking versions. I purchased more modern square style lockable Febi door handles . I had a locksmith set both door handles to the same key. The existing ignition switch (Neiman 0310 style) has a captive slotted key. I purchased an ignition key barrel from Ben Nash and changed over the ignition barrel myself, as the locksmith seemed unsure how to do it. Need a fine slotted jewelers screwdriver to pop it apart.
Dash & Associated Electrics
I added a forward junction box made of stainless steel and nylon cable glands fitted to keep it water proof. Photo shows cable glands fitted before cabling installed. I could have fitted stainless glands and flexible steel conduit for security, but I figure there are a hundred other places a saboteur can disable the vehicle so, little point armouring all cables.
The circuit breakers in the cab dash screw down to a flimsy plastic base. These plastic support bases are brittle and extremely fragile due to age. New ones cost about A$400 from Mercedes. One of my banks of circuit breakers has a cracked base, but as the electrics still work, it was cheaper for me to provide supplementary support to the existing bracket using aplastic frame. The arrangement is not ideal, and one day the base will fall apart simply due to the age of the plastic, causing me more grief.
I have added 4 x new heavy circuits (with 13mm square, multi-strand flexible copper cables), with 20A Maxi fuses fuses located next to the batteries. Sub circuits are run off these, incorporating standard size automotive blade style fuses.
The drivers dash facia was slightly warped. The only way to make it new, was to pull it out and panel beat. See gallery photo below.
There are a lot of warning indicator light plugs behind the facia, so mark all of them all before you disconnect them (I also took a photo of the order of the indicators before I started). I discovered that the Australian bull dust is electrostatic (maybe due to the iron ore in the red dust?). Due to the age of the wiring, some of the plasticisers are leaking out of the insulation and making the outer surface sticky. Thus the dust is essentially impossible to remove and as the wiring insulation is starting to become brittle, I do not suggest trying to remove the sticky dust from it.
Started running the wiring looms for the basics (radios, alarm/immobiliser, black box and engine/turbo system monitor). Picture below, shows a portion of what to expect. The electrics are a lot of fiddly work and you need a sharp mind to keep track. Below shows the dash and controls/monitoring essentially finished.

The MadMan engine monitor is shown just above the ignition switch. It has an in-built warning light and noise maker. It is used to accurately monitor engine and gearbox temperatures and water level. The Auber Turbo monitor (below photo) is shown above the headlight switch. It has a warning light with noise maker to the left of it. It is used to monitor turbo exhaust gas temperature and boost air pressure (though little chance of ever over boosting on the stock arrangement). Mine only goes up to 0.7bar (~10psi), compared to the 300tdi Disco which can go up to 20psi when I floor it (so it does need monitoring).
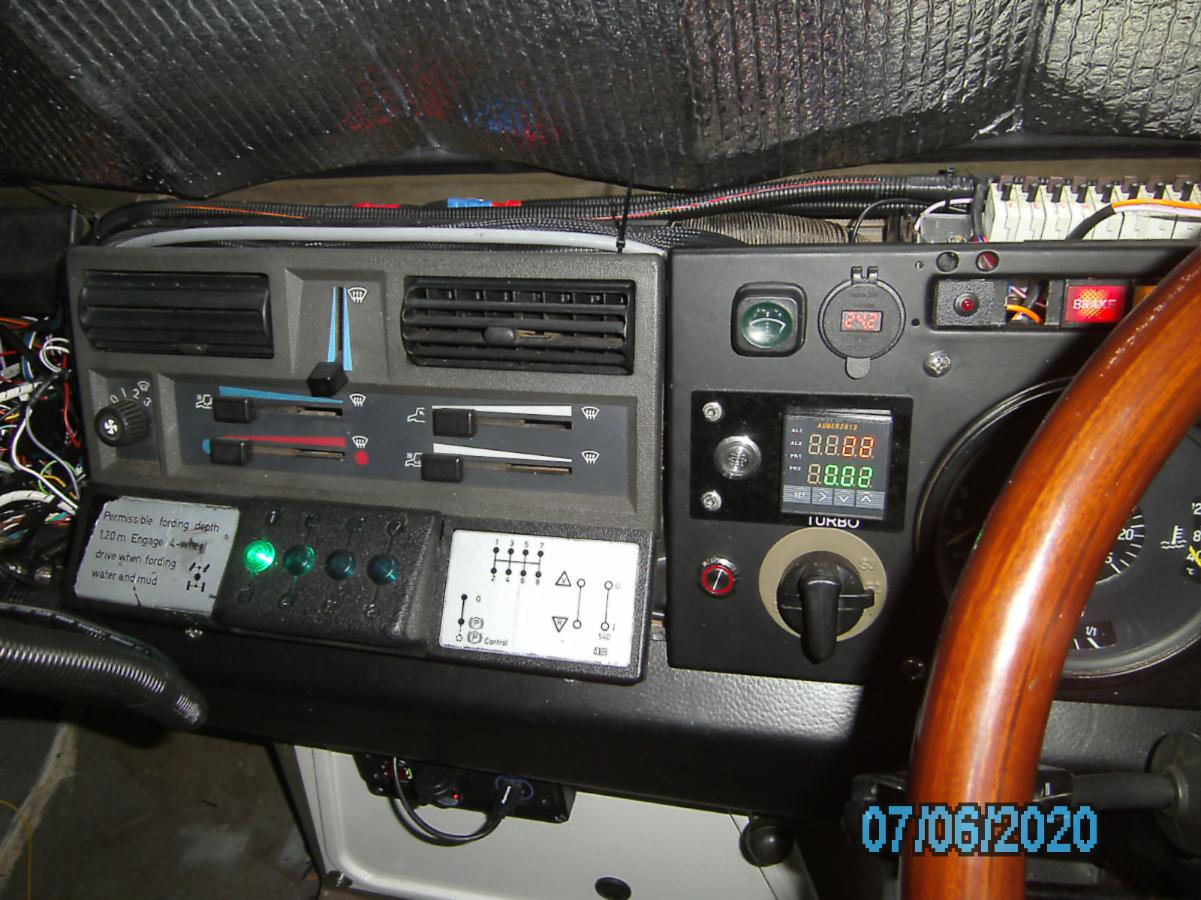
The above photo shows how bright the gear position (high/low range) light (green) is, due to LED's I fitted in lieu of the standard incandescent bulb. However, at night, they were blindingly bright at night before I fitted ~10k Ohm variable dimming resistor for night use. Photo further below shows the wiring looms run into the passenger side ready for termination. The entire passenger side of the dash is full of equipment (not a job for the faint hearted). No room for radios even, so they are down at the gear shift lever lever, mounted off the floor.

Steering Issues
April 2020
I usually (unless I forget) thank God in faith for bringing us home safely before a road trip. In ~Oct. 2020 when shuffling the vehicle in the yard, in preparation for taking it across Sydney, when the steering suddenly went hard and I thought I was at hard lock. I could not move the wheel. I looked down to see where the wheel position was, and saw that it was straight ahead. Jumped out and oil all over the driveway. My steering oil pump high pressure rubber hose had blown. So much better that it happened at home compared to what might have happened out on the road. The steering is almost immovable without the power steering. I was going to buy MB genuine hose assembly but balked at A$350. I took it to the local Pirtek shop and they re-made it for me at A$140 (and much stronger hose). Below are photos of the original hose assembly and the repaired one. This is the risk of buying a 30 year vehicle, a lot of the rubber is going to be perished. Its too unaffordable (and simply impractical) to change everything, so the hope is that nothing dangerous happens as and when the various seals etc fail.
I also discovered that there is a filter inside the steering oil reservoir. Its MANN part H601/6. Difficult to get in Australia. Mog Central has some however. The next issue was to try and find out what was the correct oil. It appears that there are many oils nominated in the various manuals and documents (and maybe any hydraulic oil will work ?). But after much discussion on the MB Forum web site, I settled on Dexron II equivalent, and purchased Castrol 'Power Steering Fluid' from Supercheap Auto Item No. 309869. I see no reason why Dexron III would not be fine either.
Some of the forum members advise that they can drive without the power steering, but I would not recommend it, because at low speeds its very hard to turn the wheel.


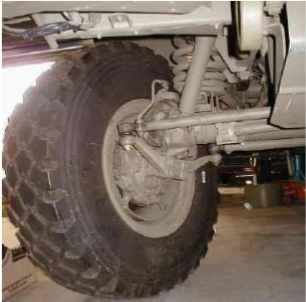
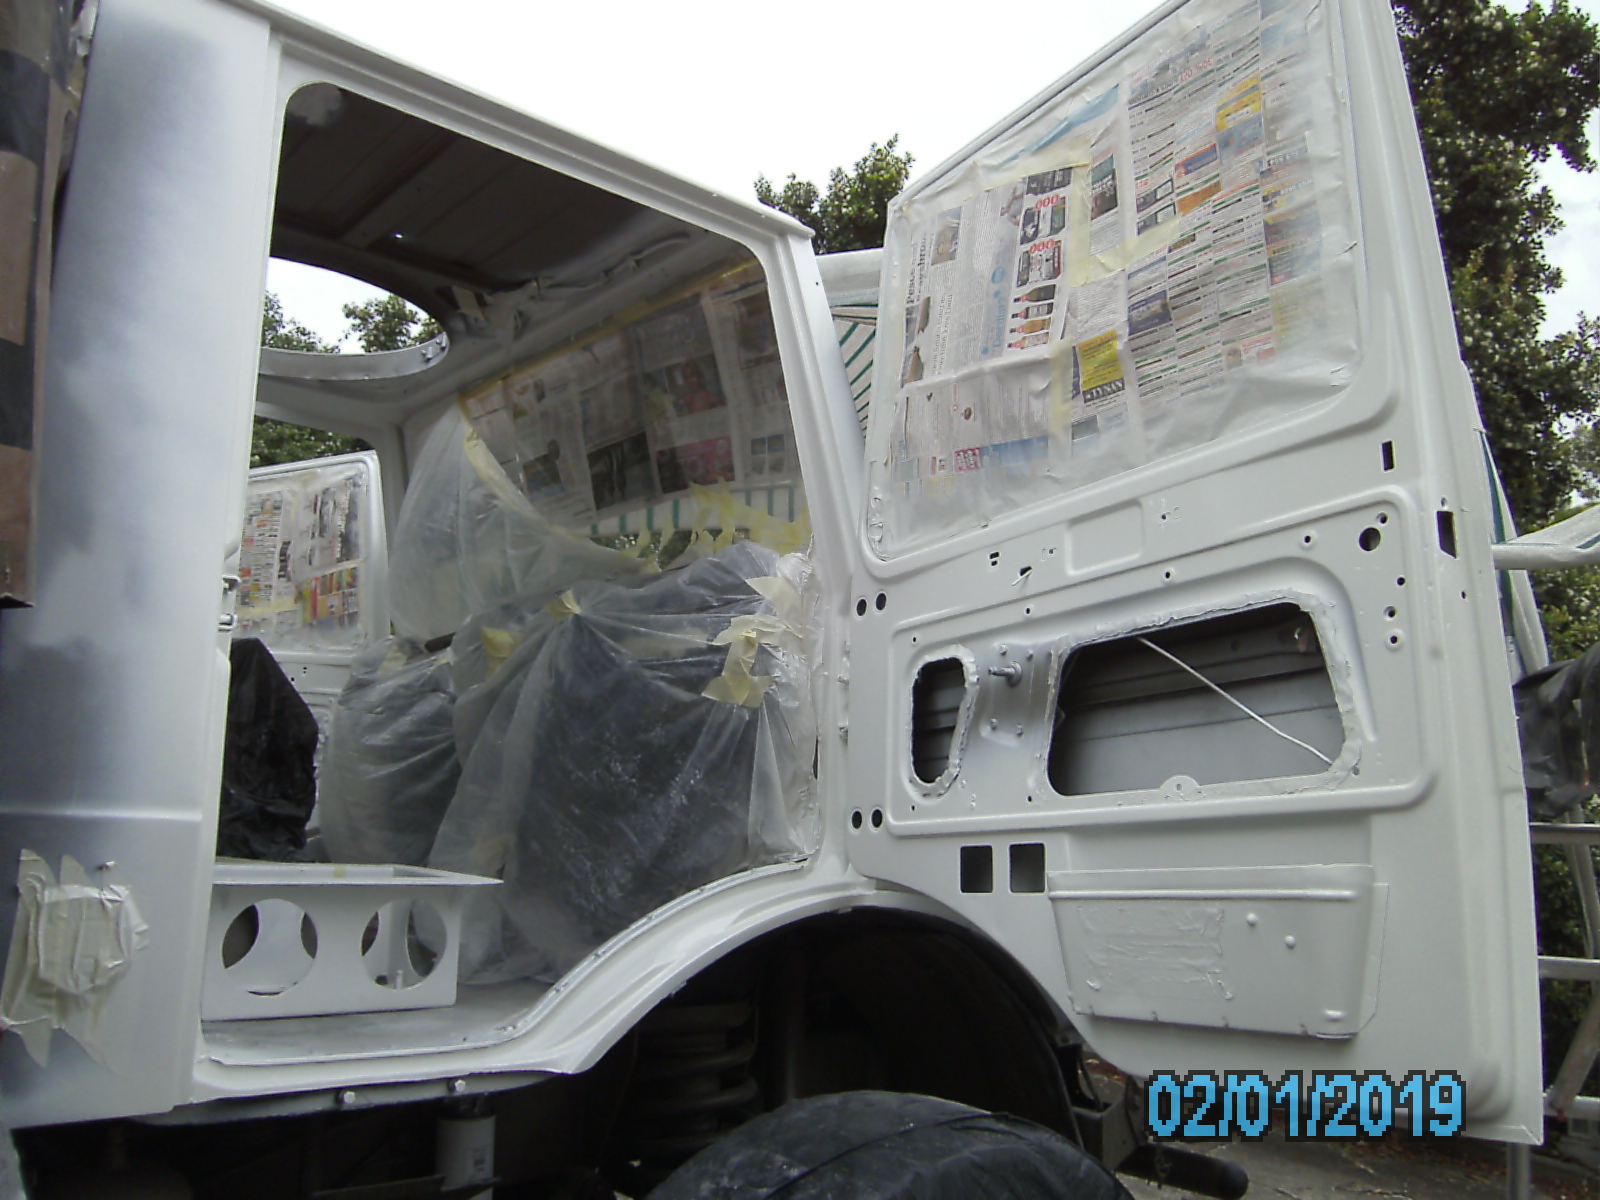
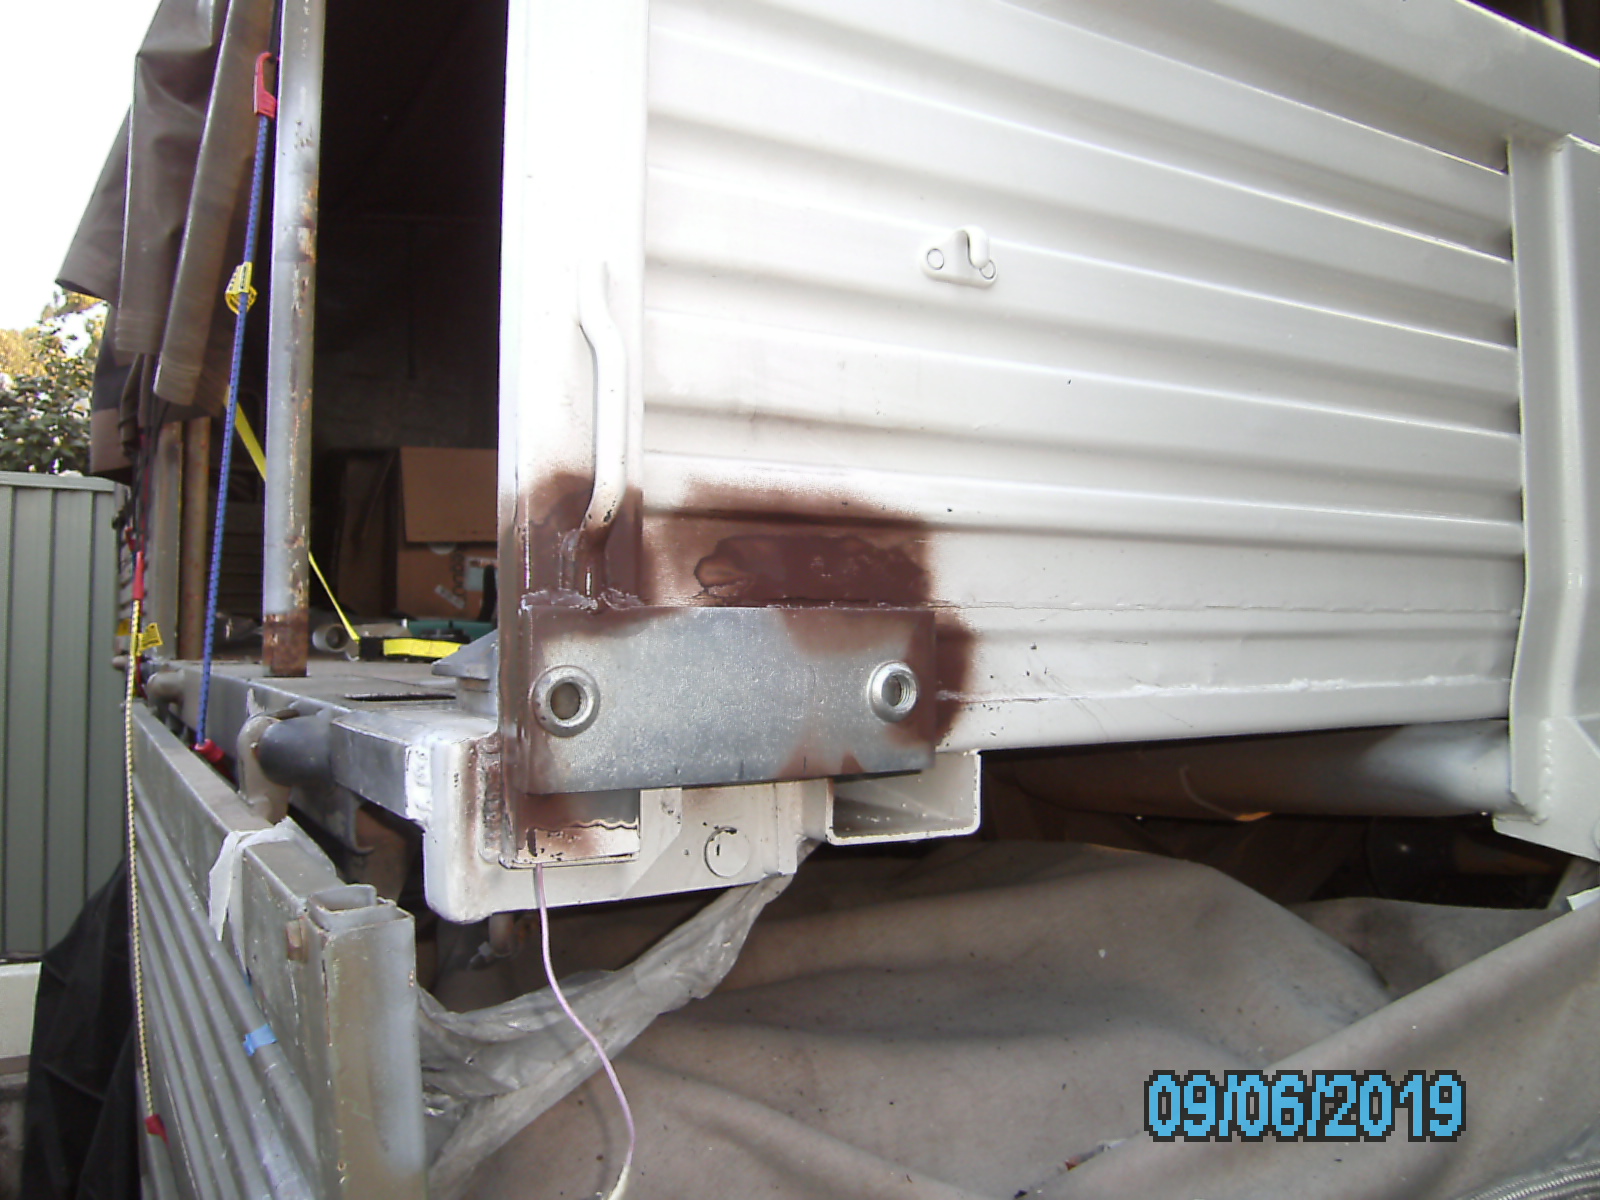
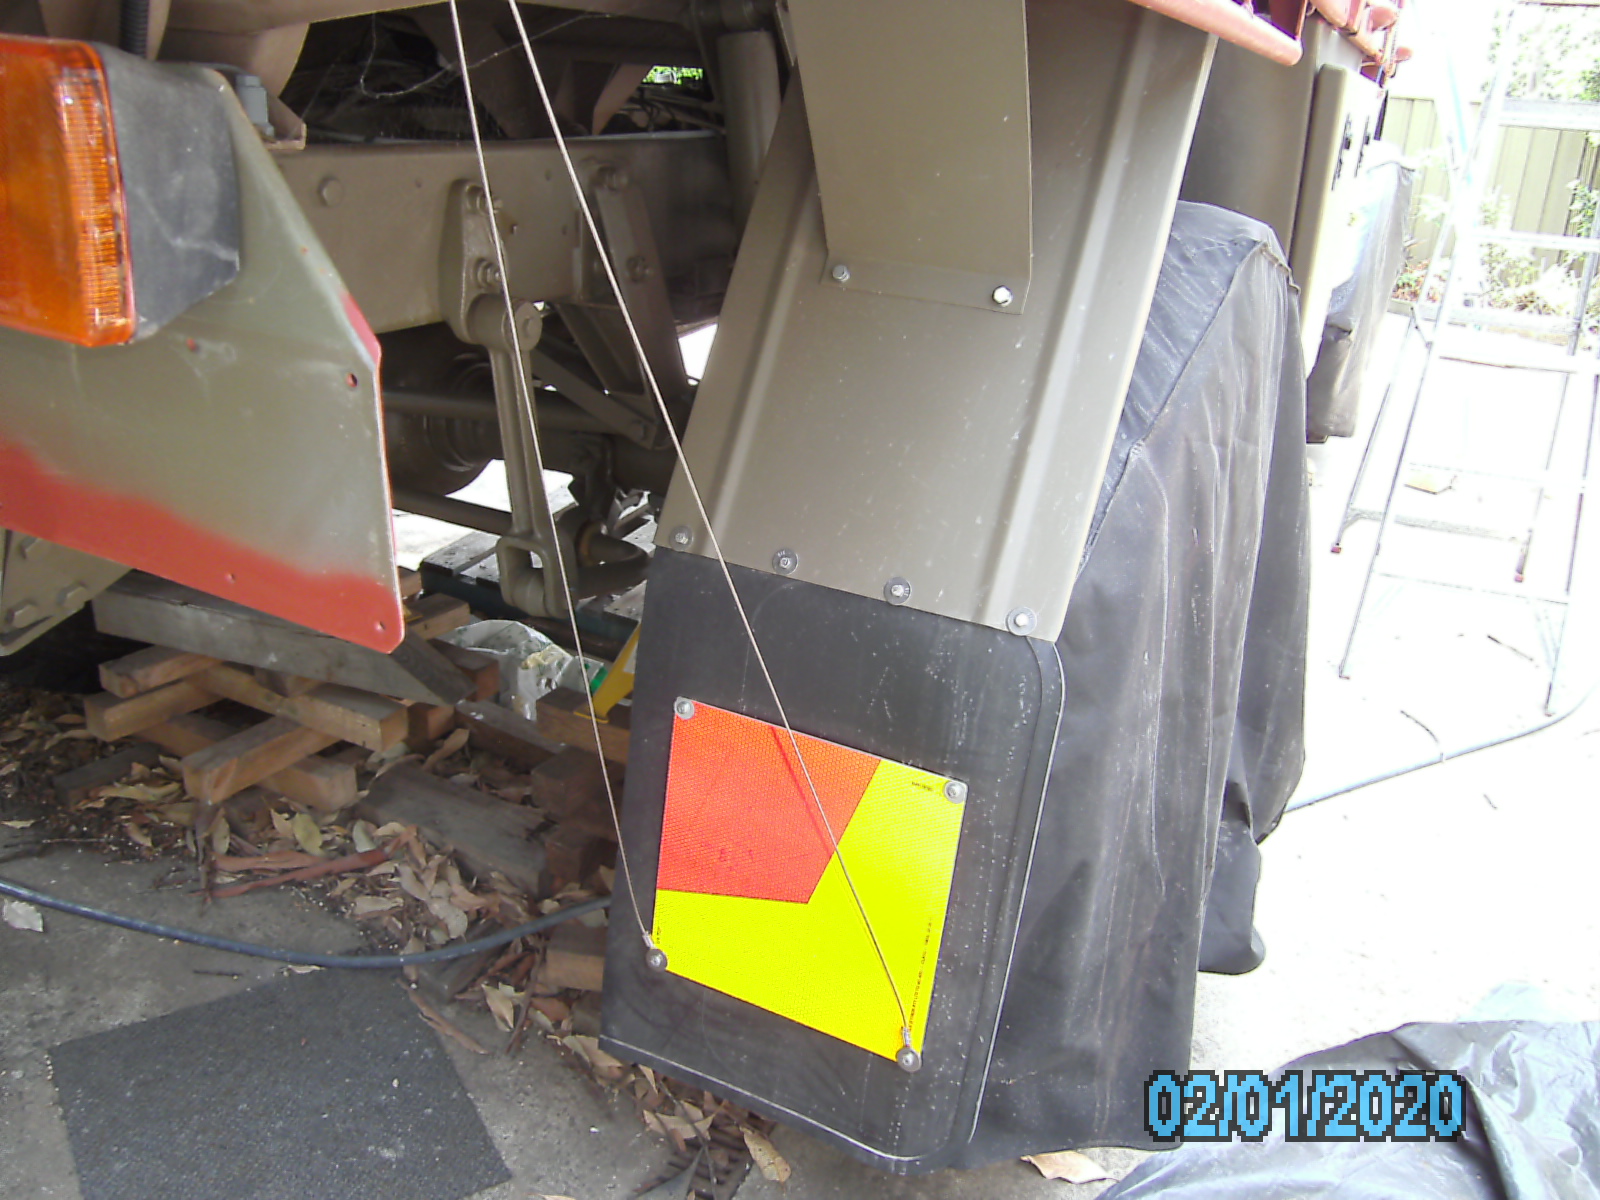
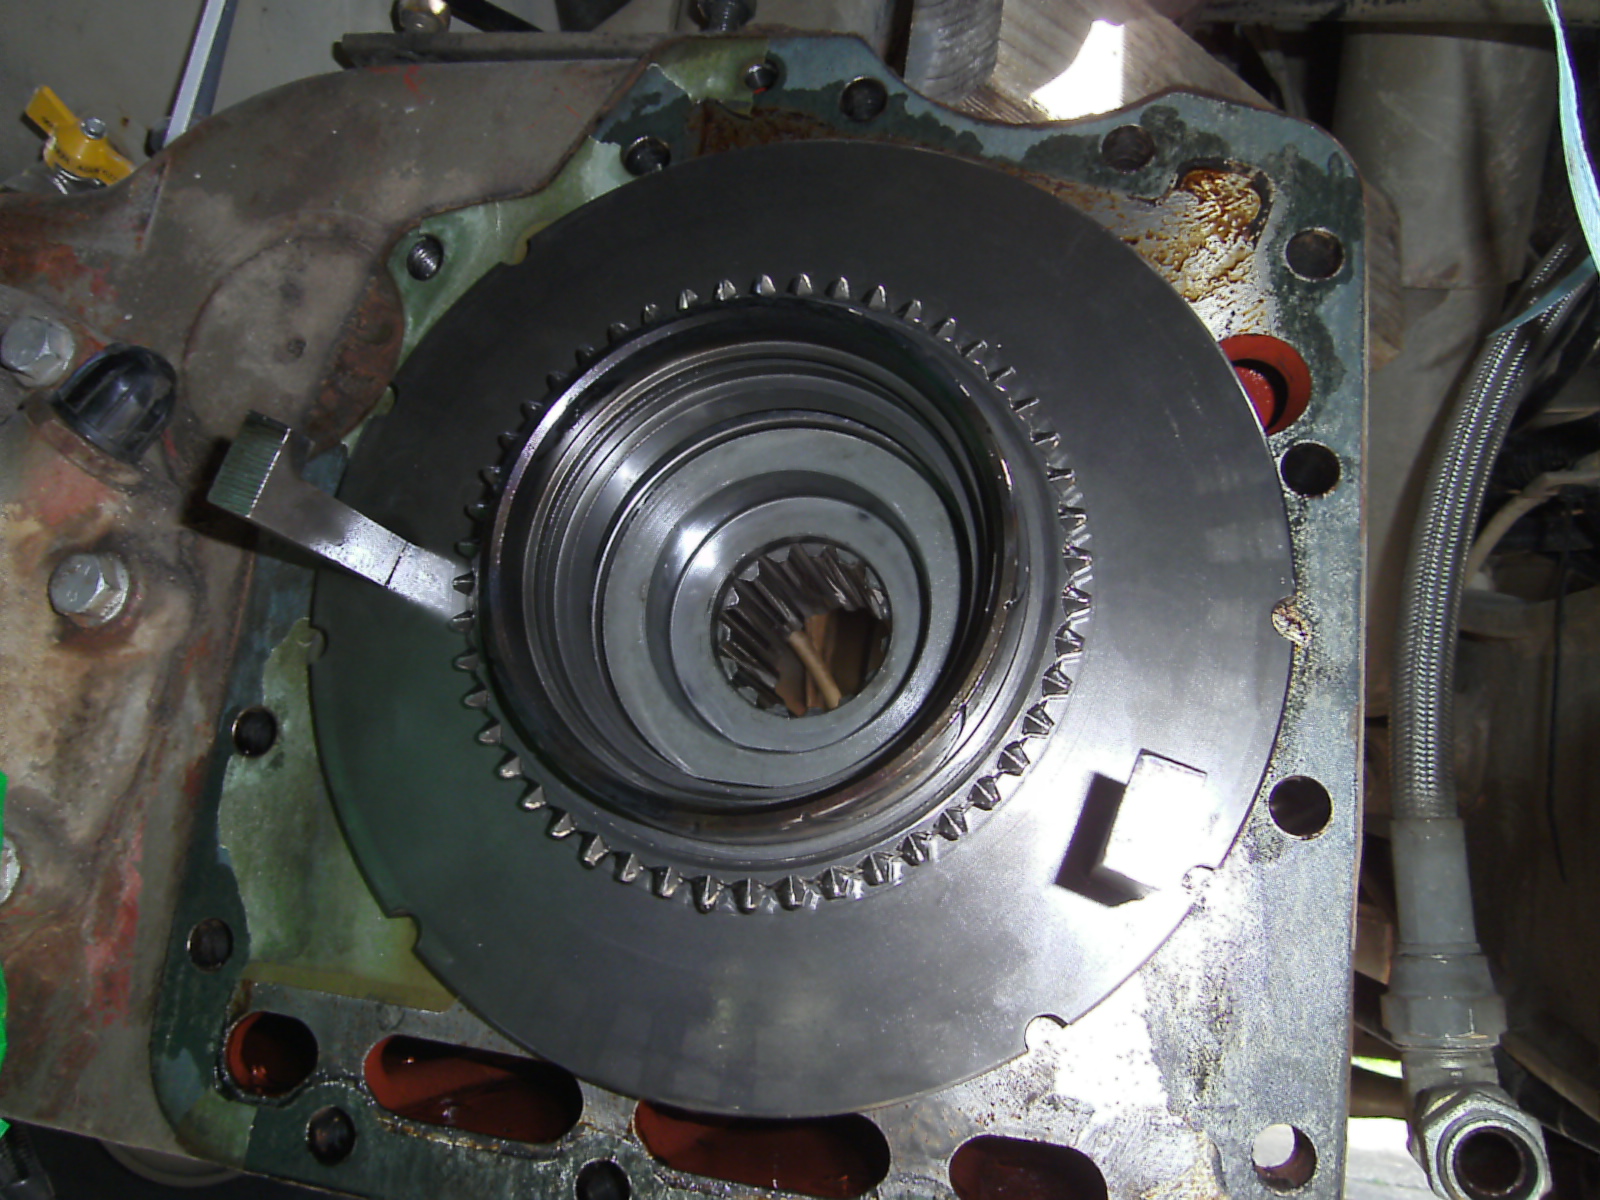
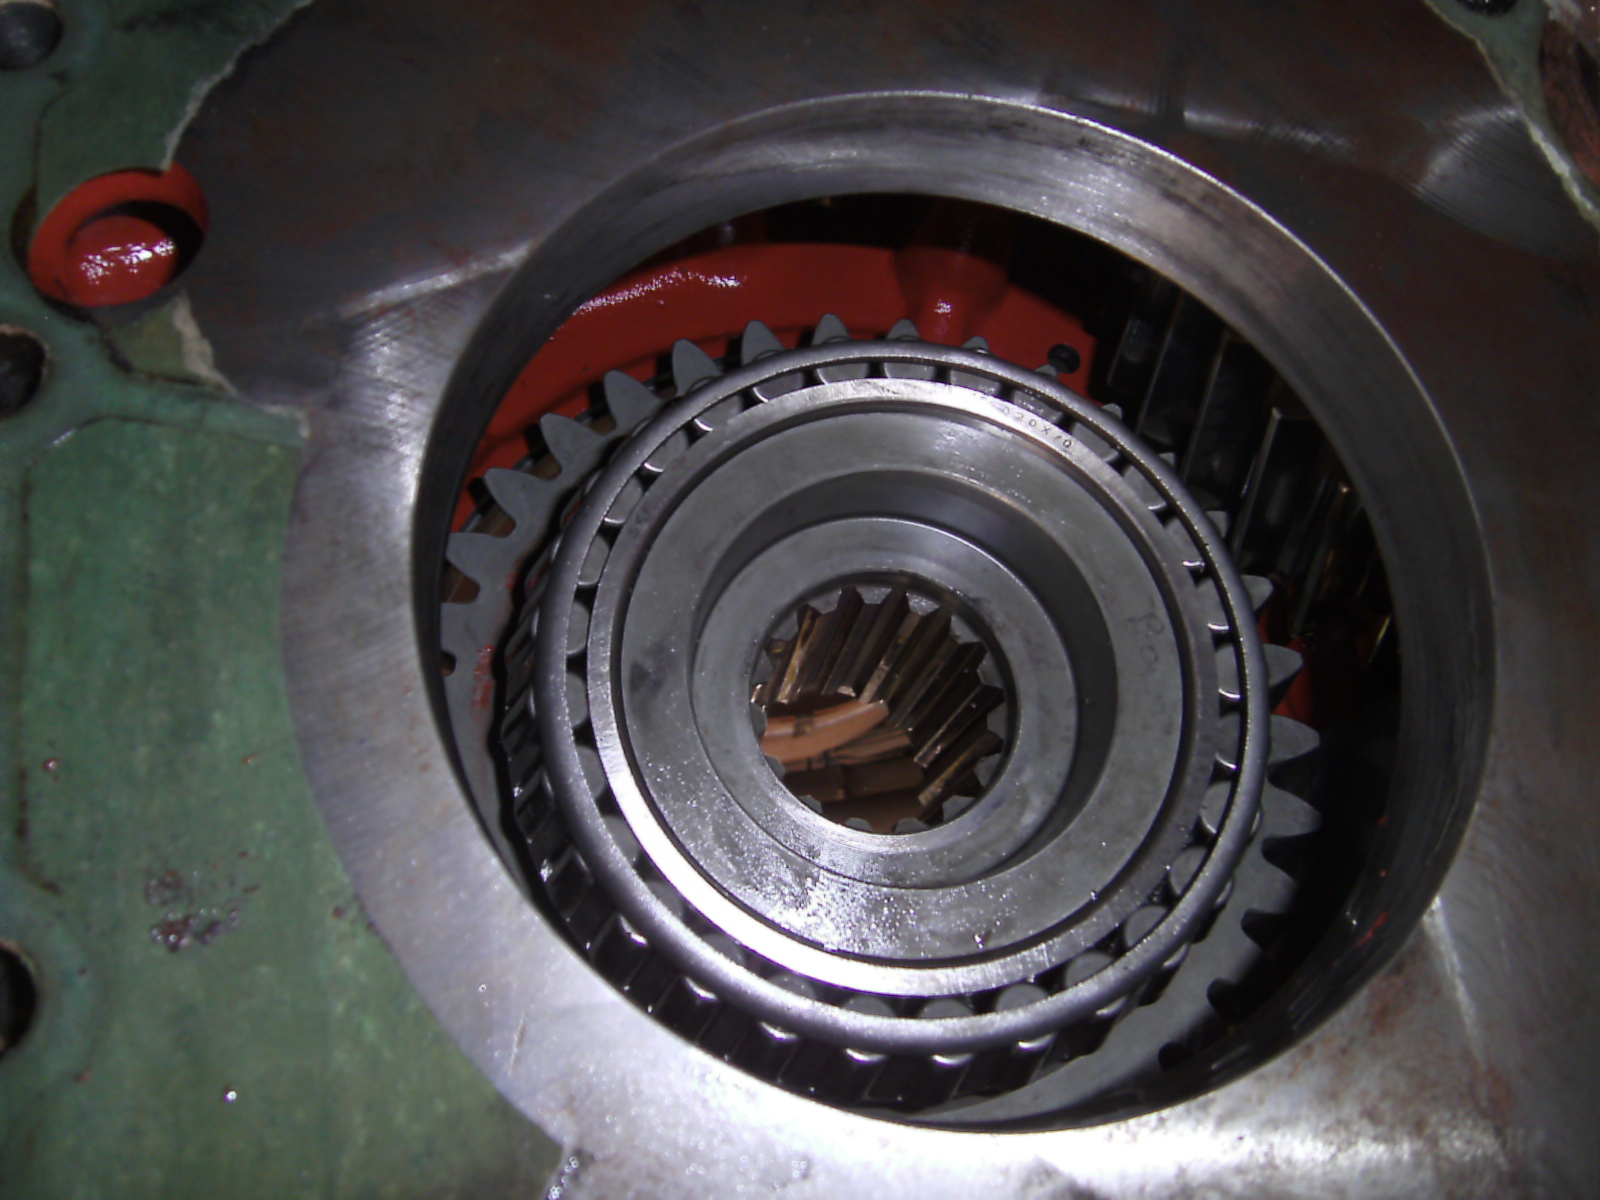
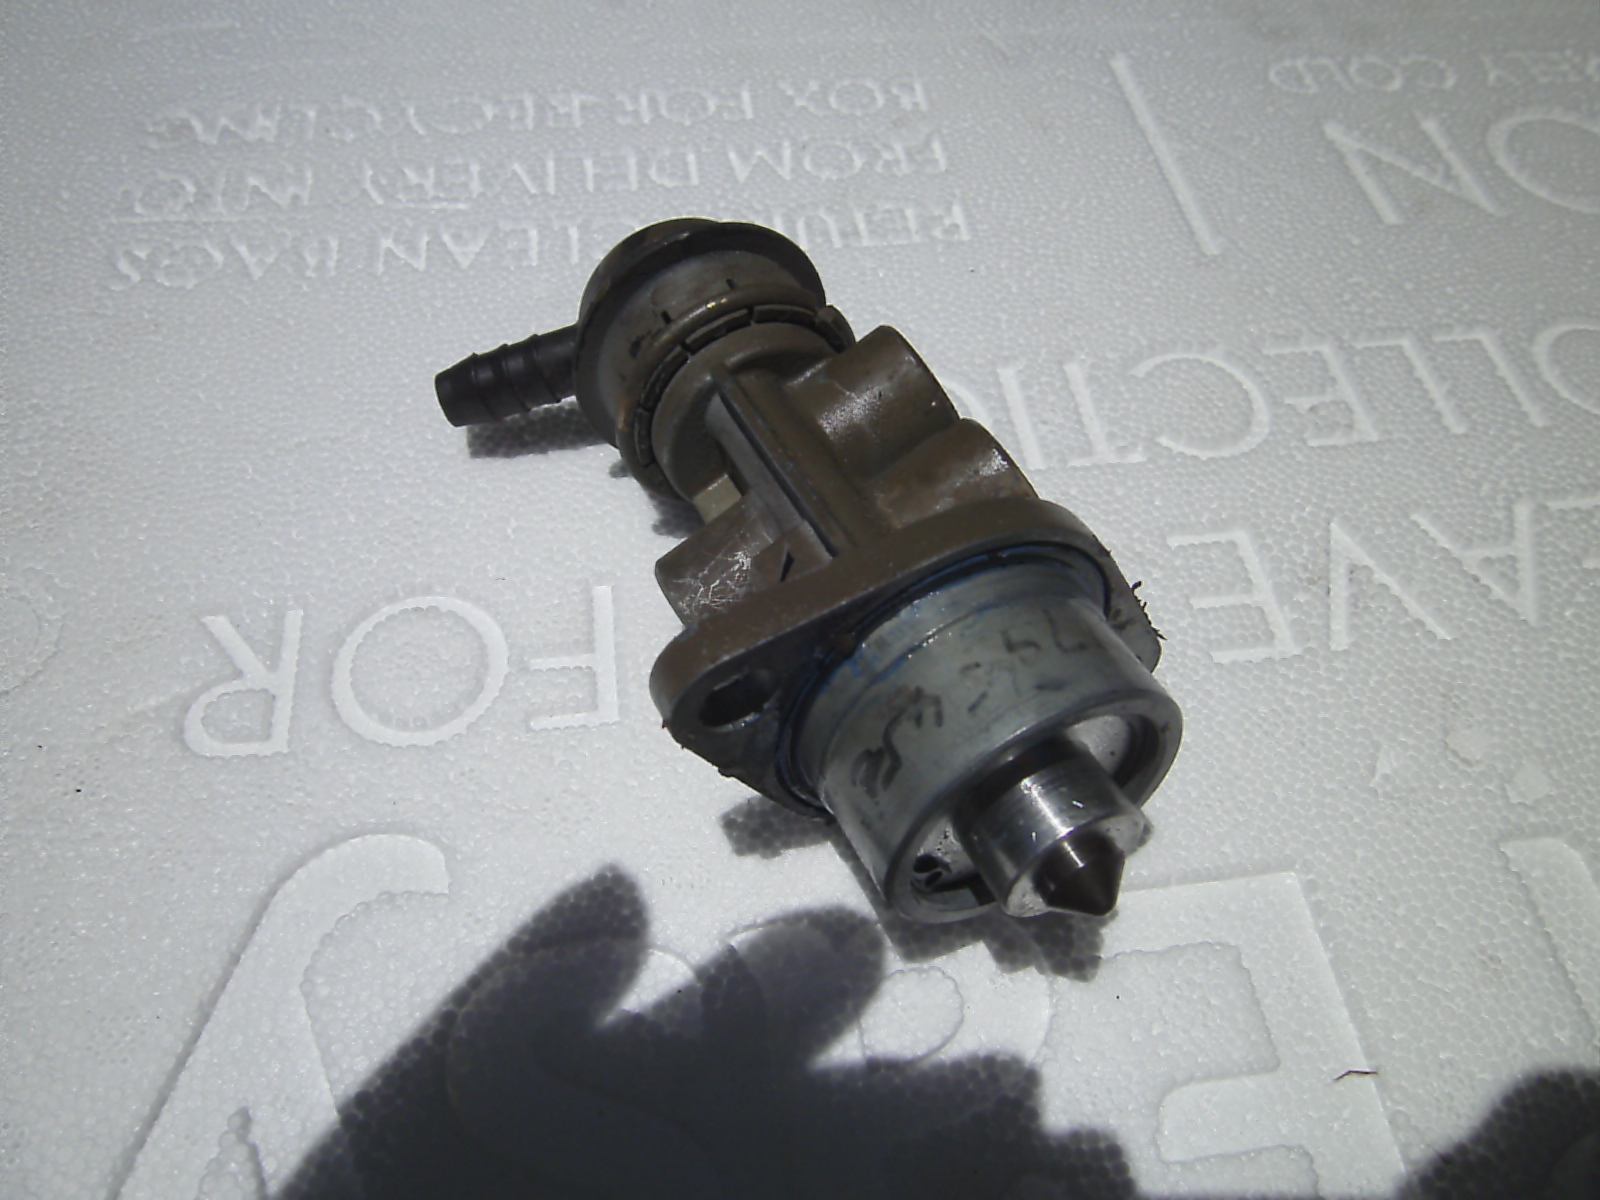
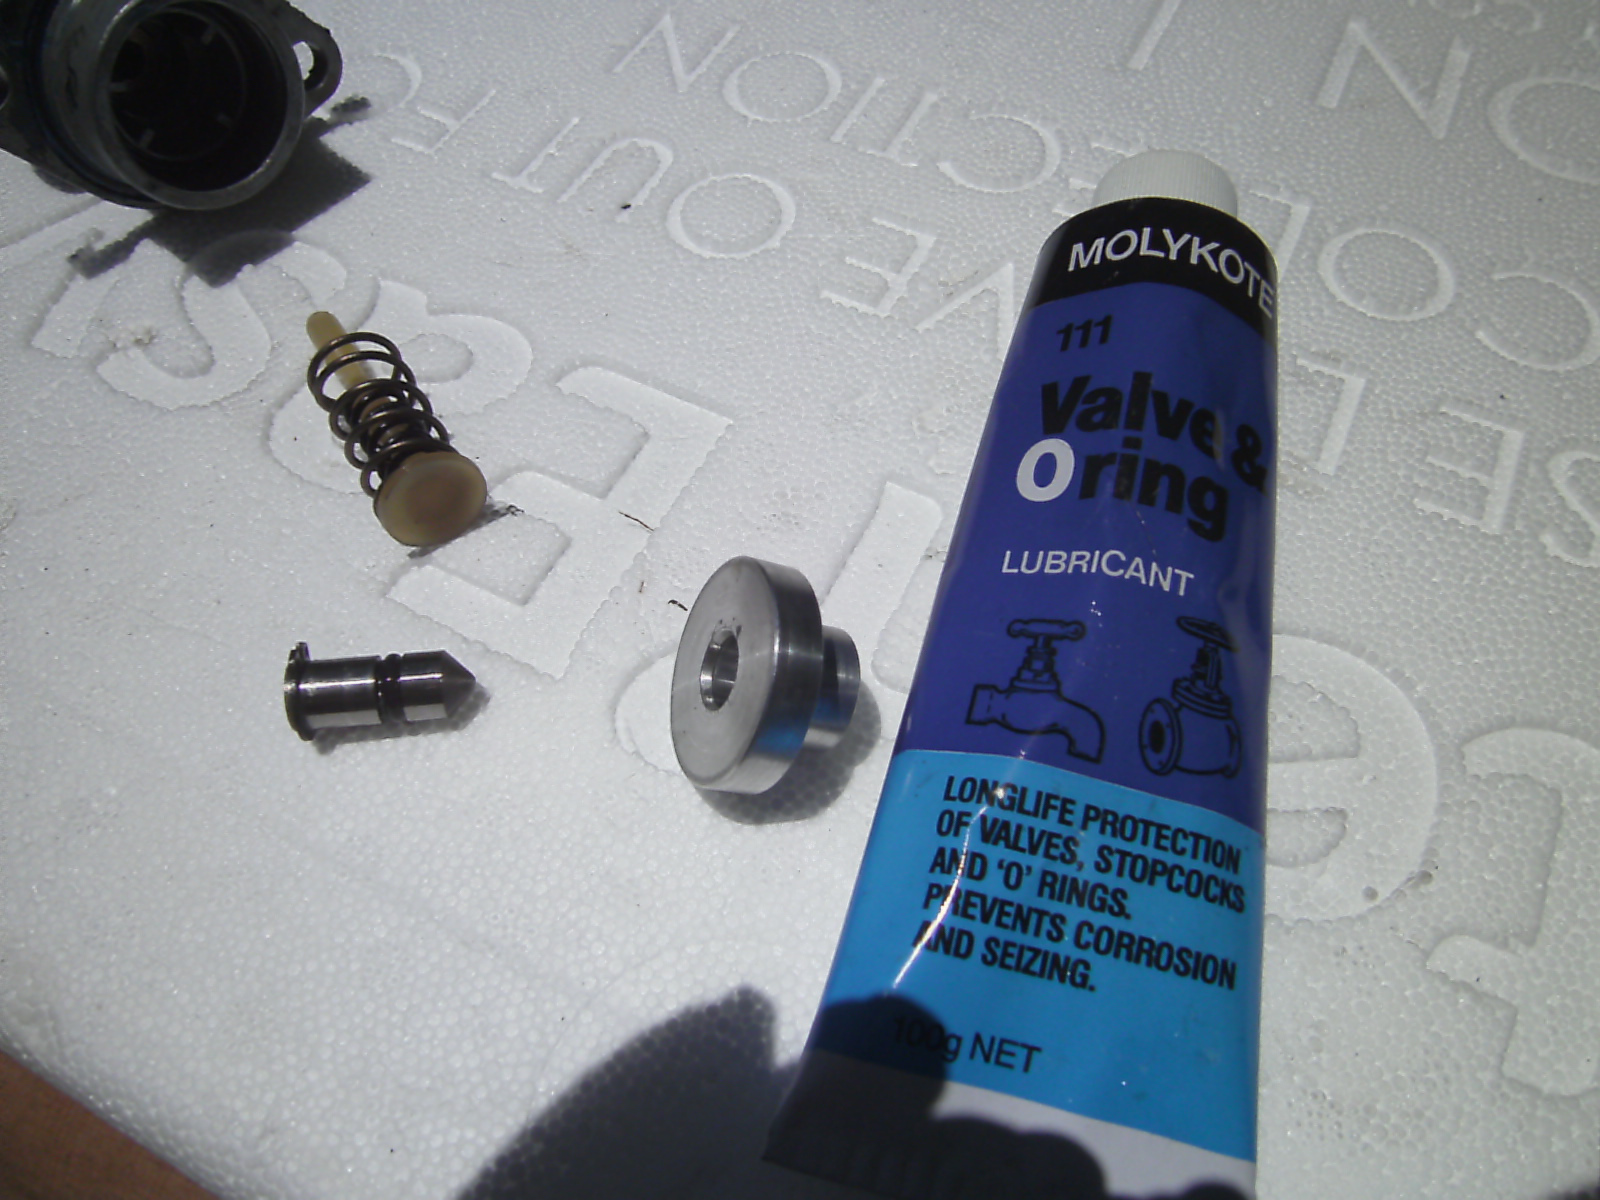
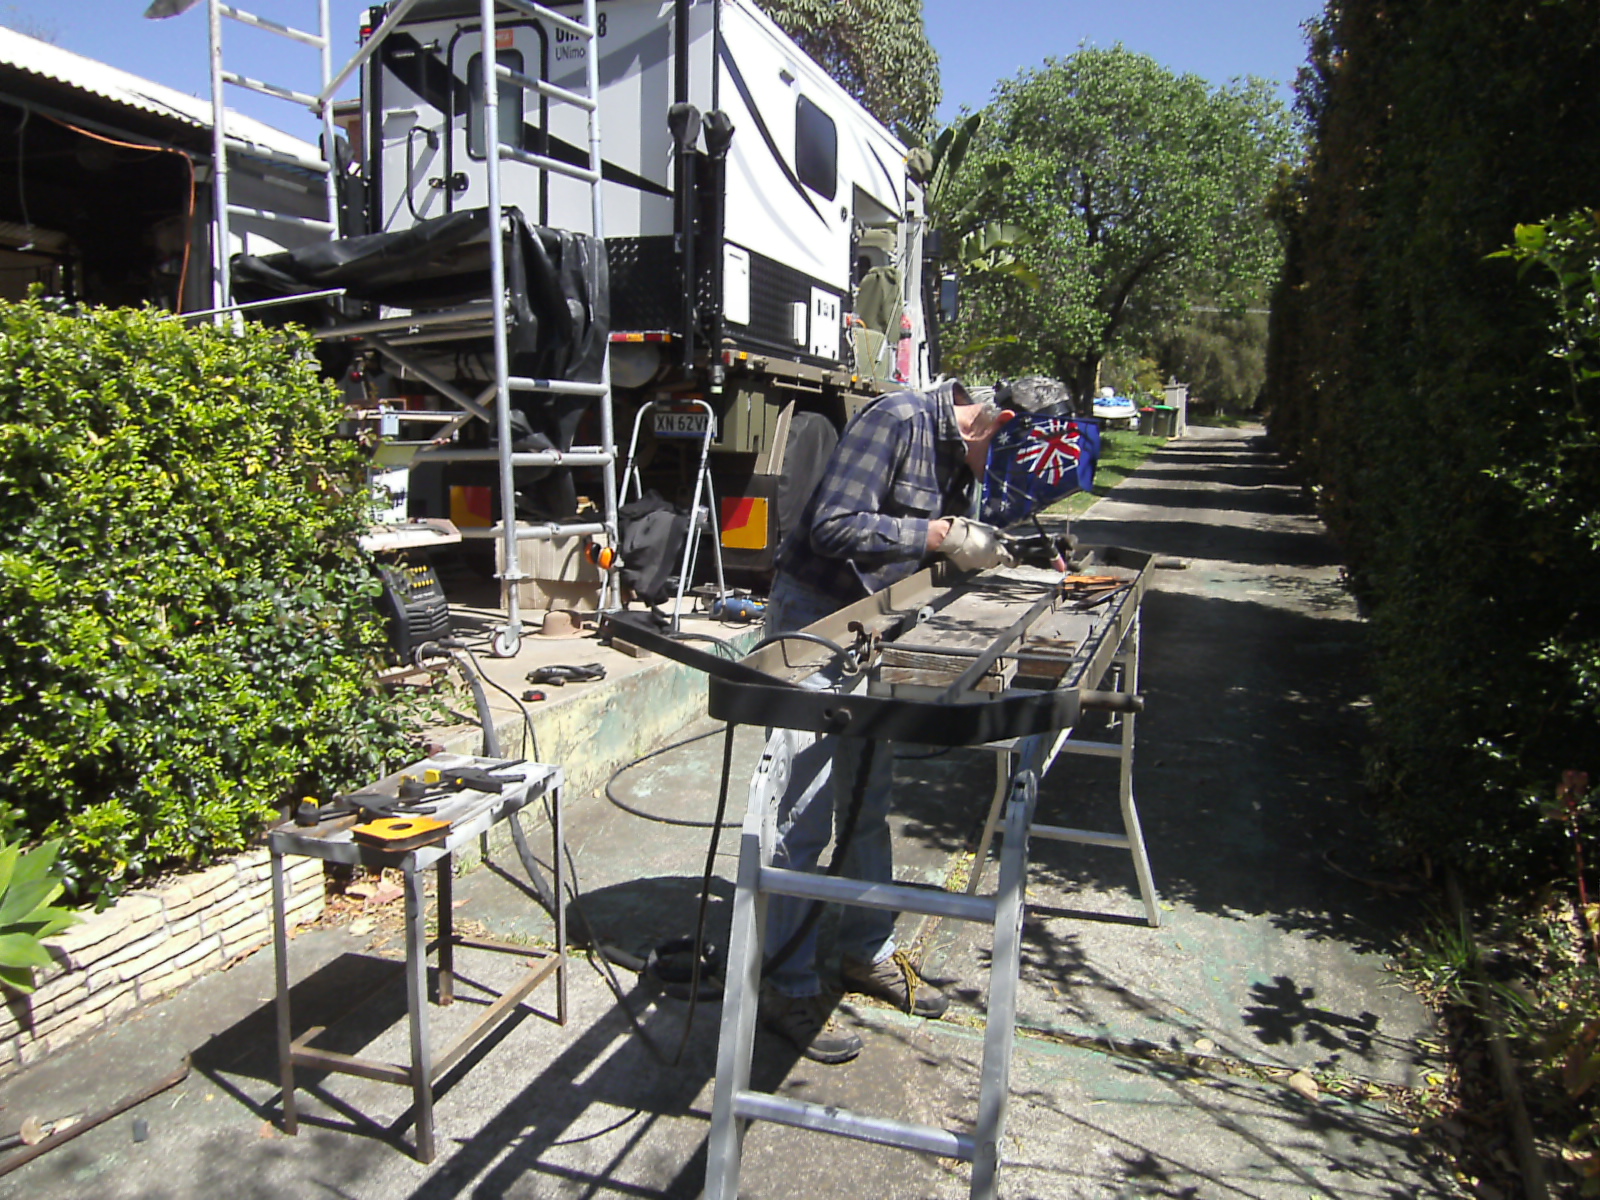
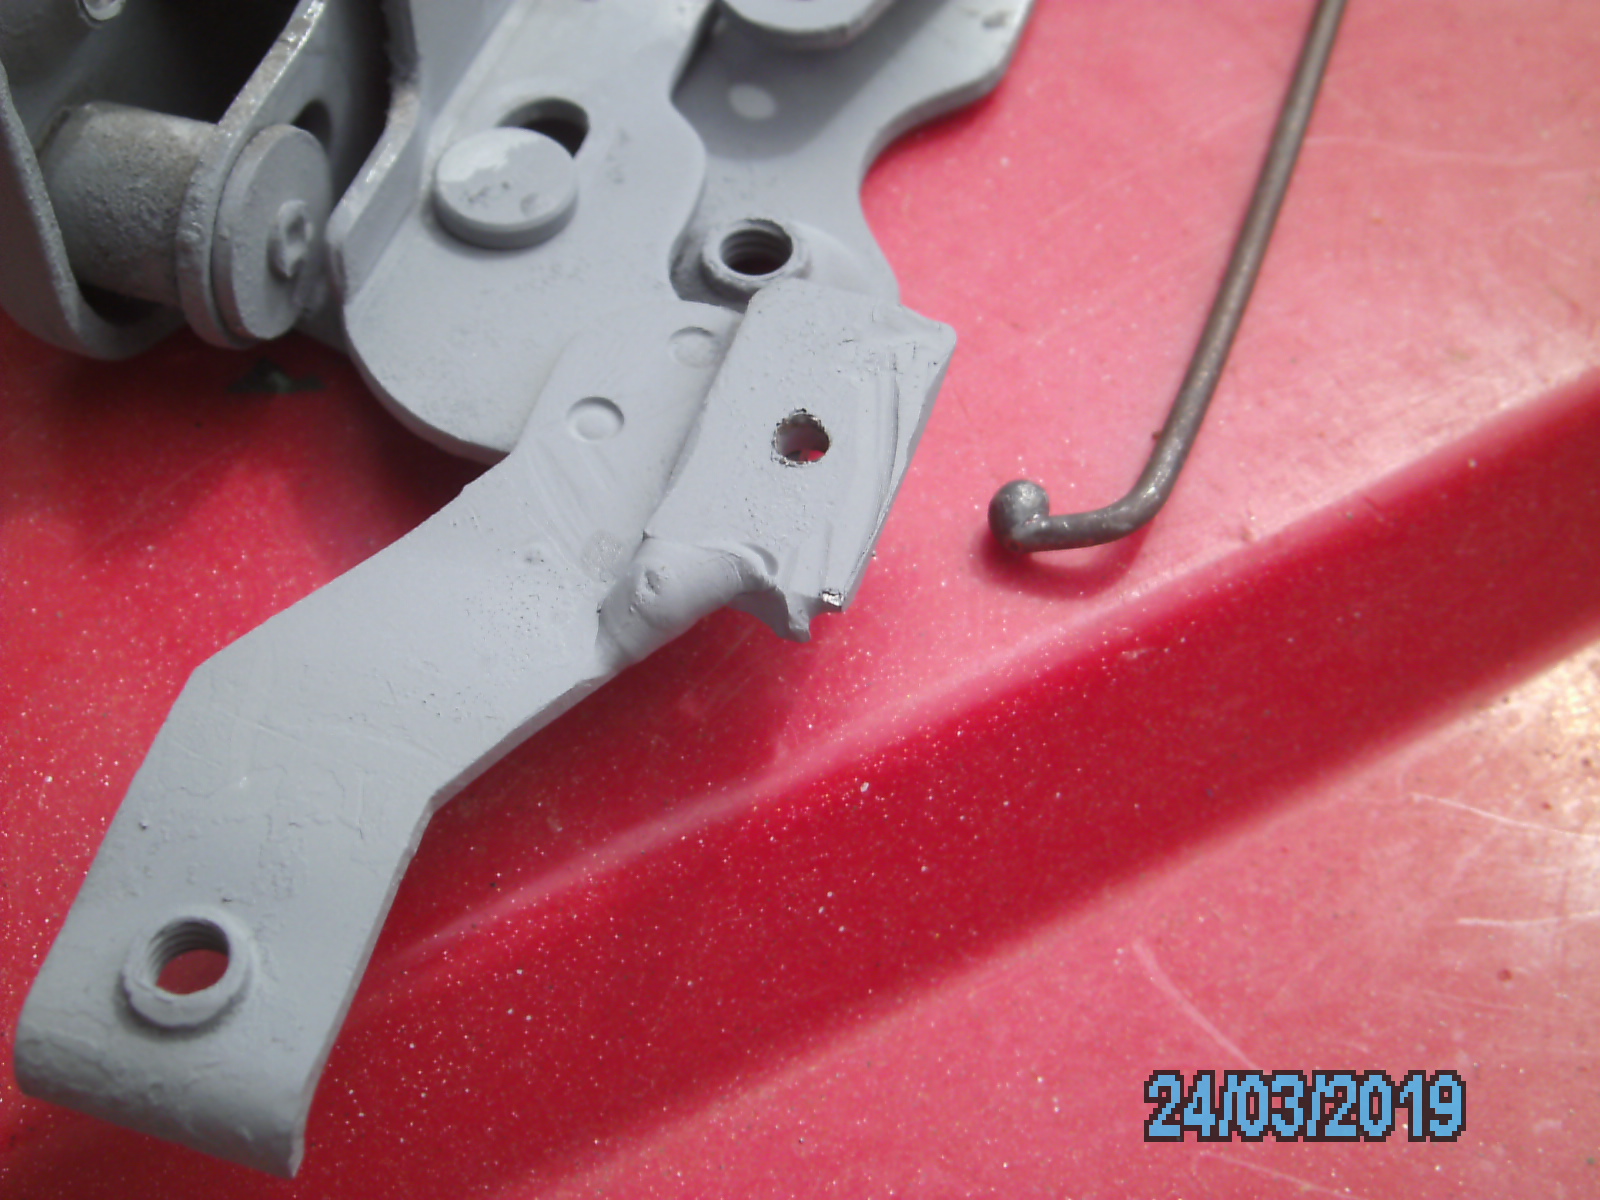
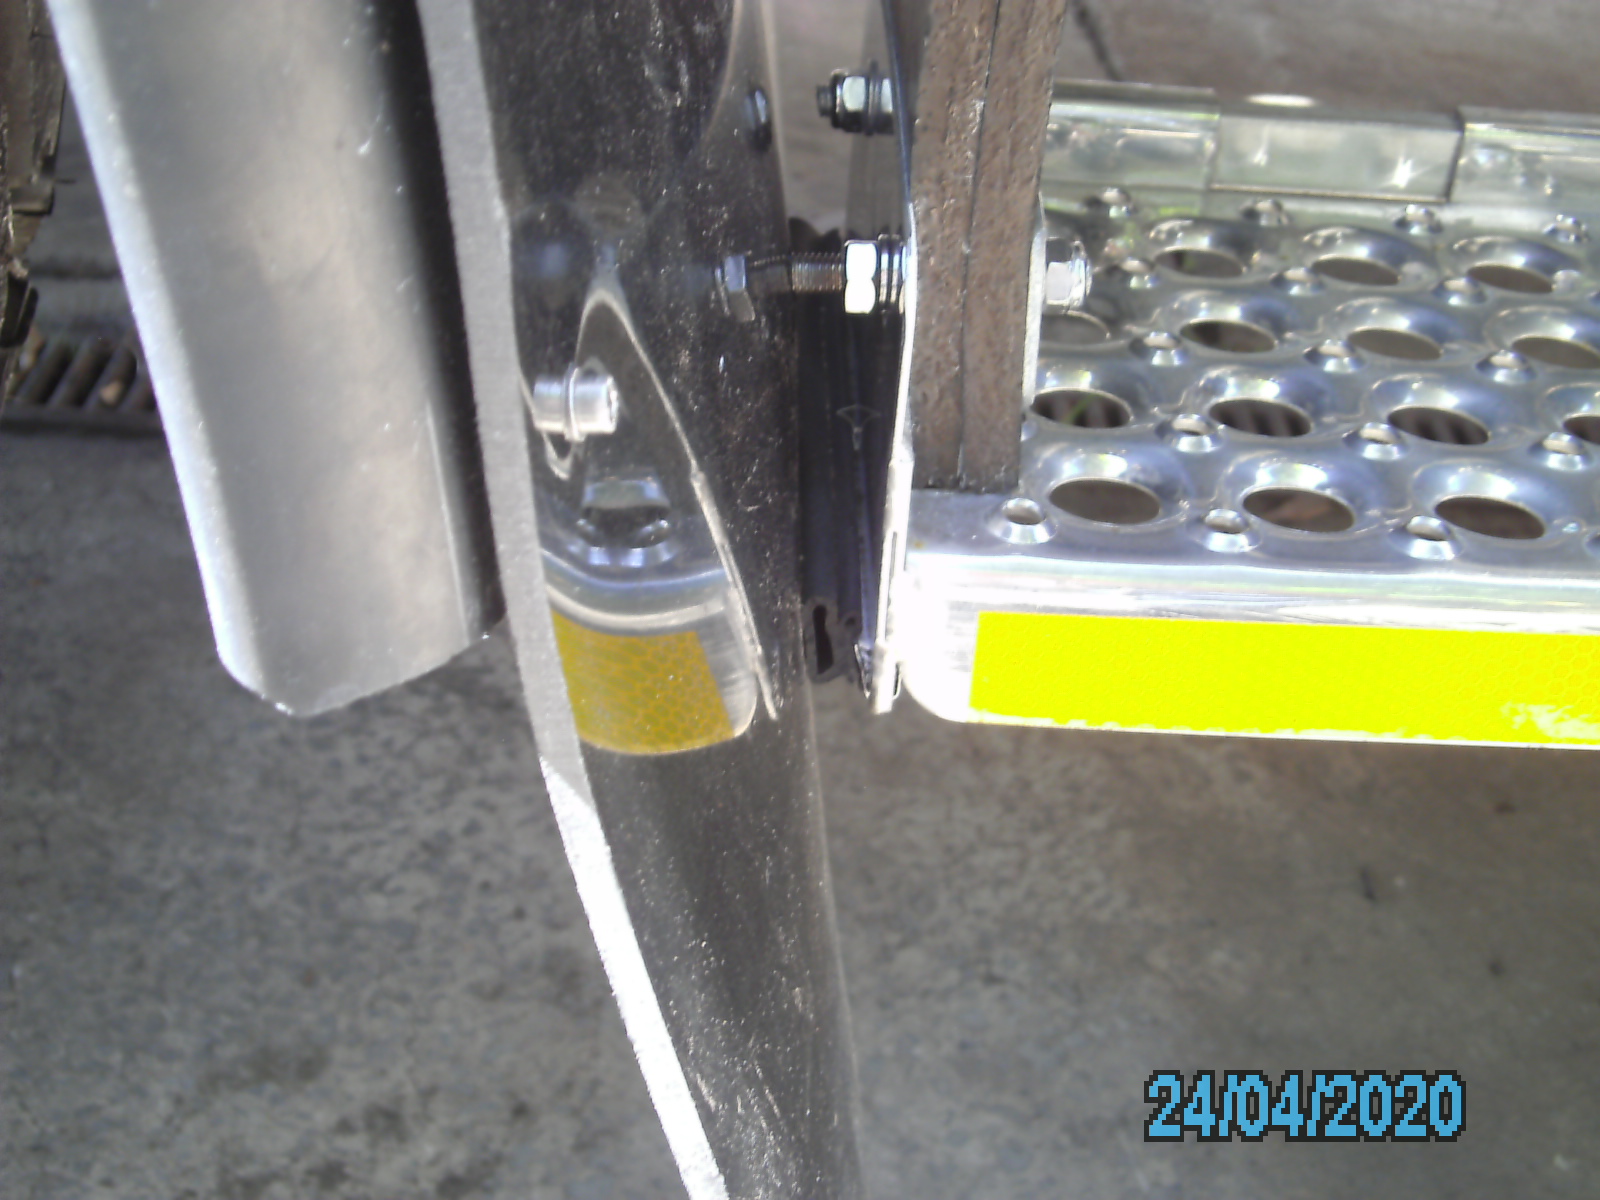
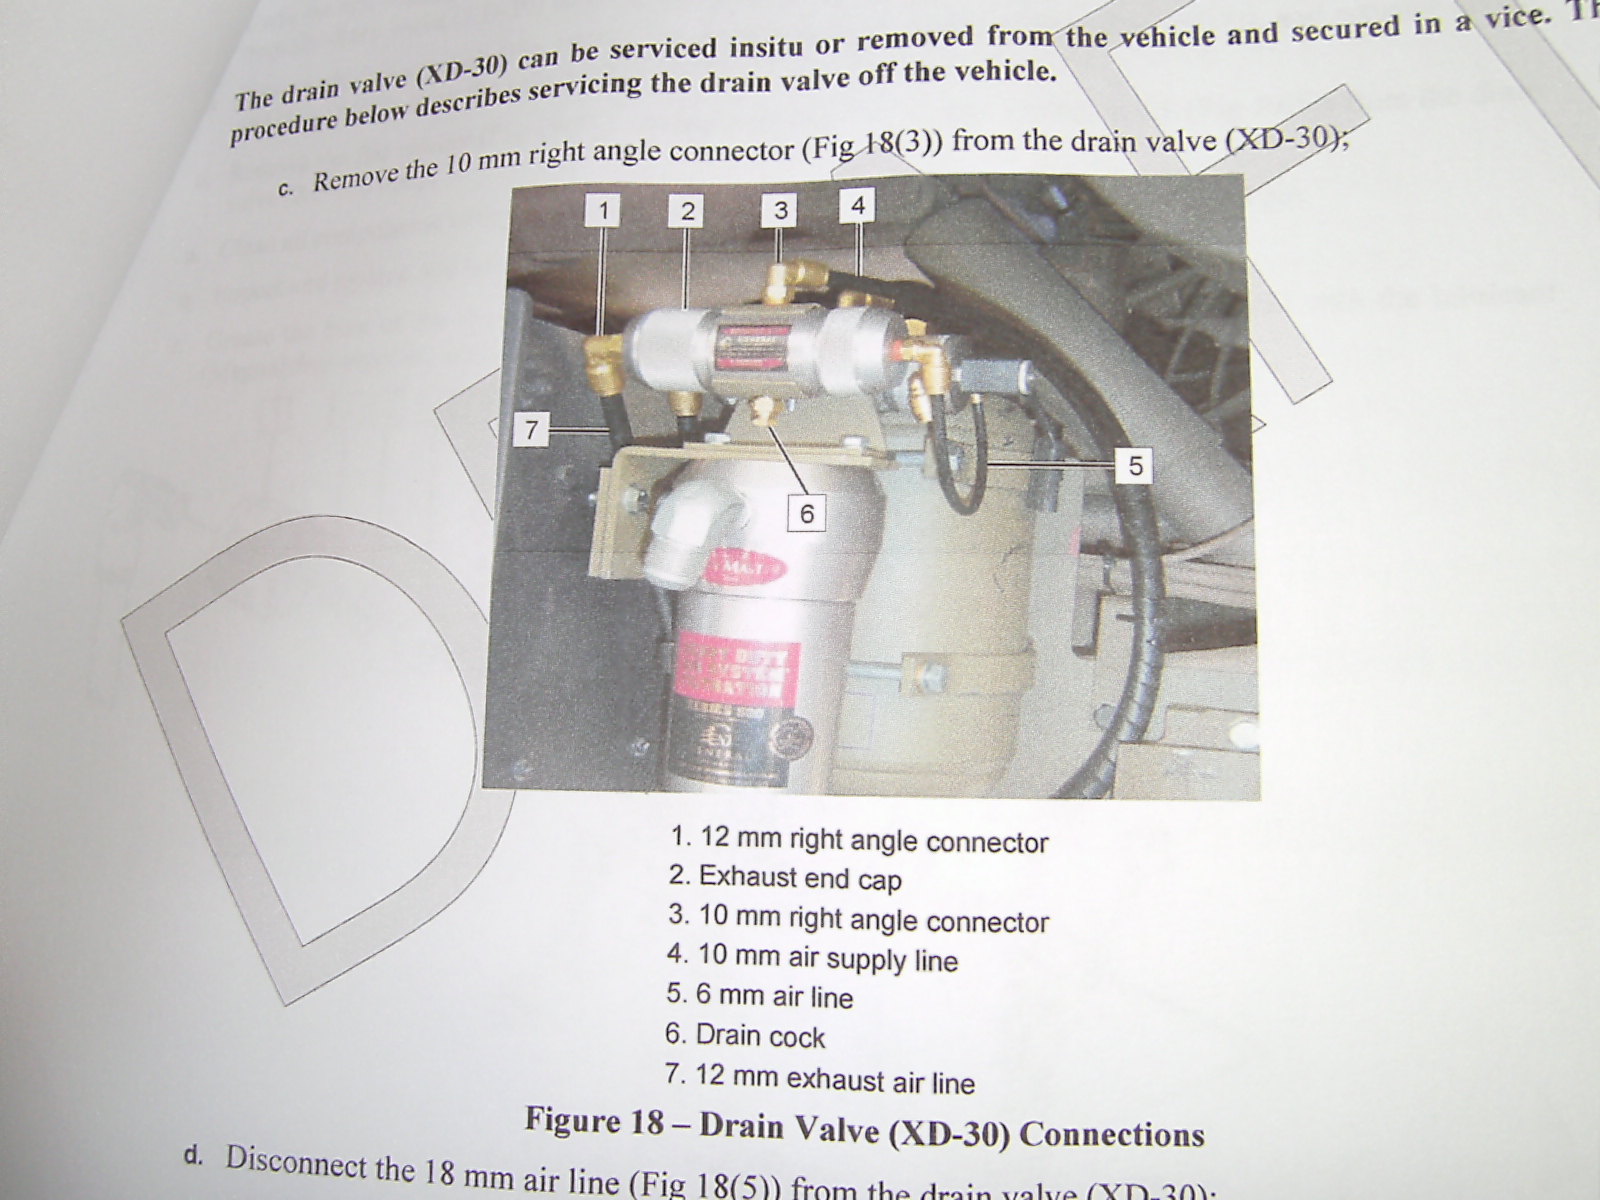